Made and counted by Wren —

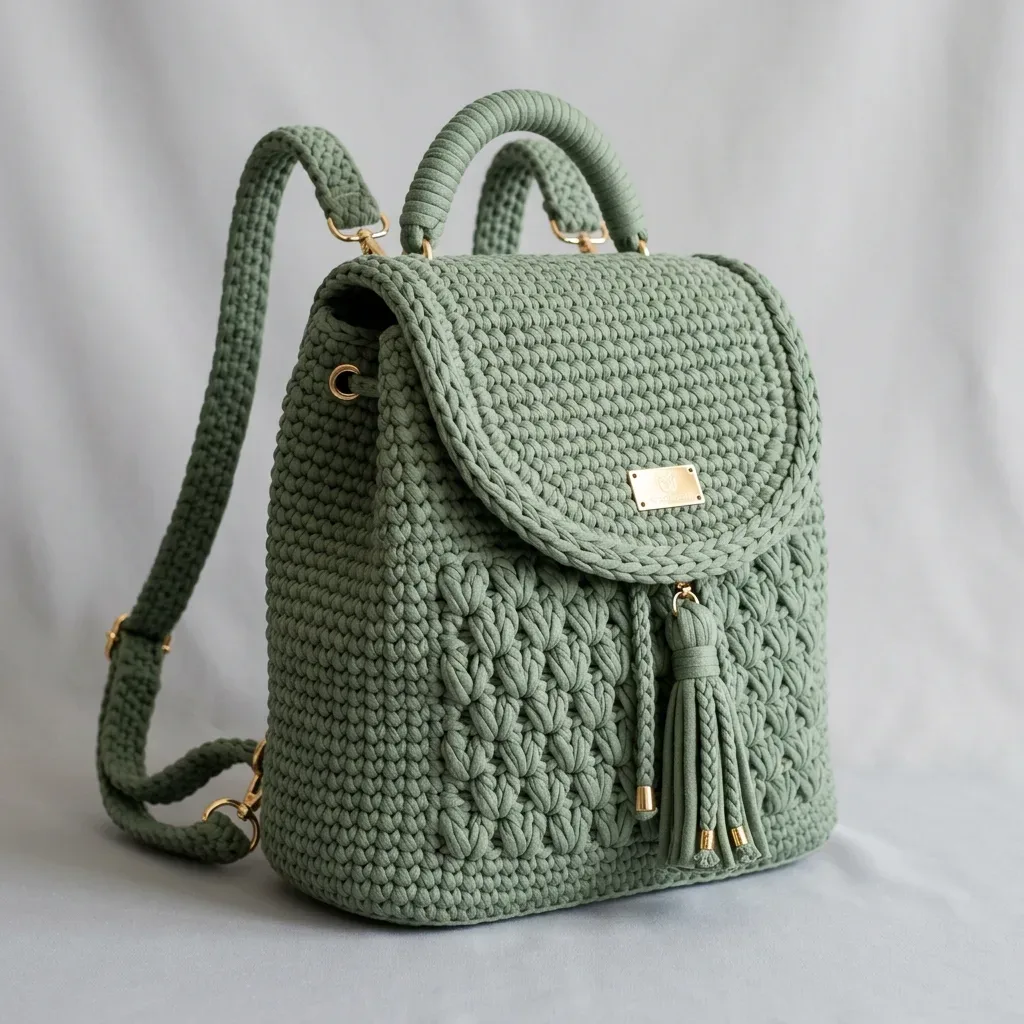
Structured sage green crochet backpack with tassel closure

6.5 mm hook, bulky cord crochet backpack with flap, tassel, and adjustable straps.

Structured sage green crochet backpack with tassel closure
IntermediateLevel
10-14 hoursTime
5 mmHook
BulkyYarn
Jump to the pattern

About this pattern

A sage green crochet backpack worked in bulky 4-5 mm cord with a 6.5 mm hook, built from a rectangular base, a 58-stitch joined-round body, a separate textured front panel, a rounded flap, a top handle, and two adjustable straps. Finished size runs about 9 x 10.5 x 4 inches (23 x 26.5 x 10 cm). The project takes roughly 10 to 14 hours plus blocking, and firm gauge is required for the structure to hold.

This sage green crochet backpack starts with a firm rectangular base, grows the body upward in joined rounds, then adds a textured front panel, rounded flap, top handle, straps, drawstring, and tassel made separately and assembled last. The count that matters most is 58 stitches per round, set by the base's edging round and held through all 20 plain rounds of the Backpack Body before the eyelet round at Round 21 depends on it lining up. A bulky 4-5 mm cord worked on a 6.5 mm hook keeps the fabric dense enough to stand upright without added support.

The pattern

Written out round by round

Materials

Yarn

  • 430 to 520 yards (393 to 475 m) of bulky braided cotton or polyester cord, 4 to 5 mm diameter, in sage green

Suggested Brands

  • Bobbiny Premium Braided Cord 5 mm, Ganxxet Braided Cotton Cord 5 mm, or Hobbii Ribbon XL used firmly with a slightly smaller hook. Choose a cord that creates a dense, self-supporting fabric. This is key for that boutique look.

Hooks

  • US K/10.5 (6.5 mm) crochet hook for the main body
  • US J/10 (6 mm) hook for straps if needed for tighter gauge

Hardware

  • 4 gold D-rings or swivel rings
  • 2 strap sliders
  • Magnetic snap or turn-lock closure

Notions

  • Tapestry needle
  • Stitch markers
  • Sharp scissors

Optional but Recommended

  • Plastic canvas insert for base stability
  • Fabric lining
  • Purse feet
  • 4 to 6 small grommets or eyelets

Abbreviations

  • Joined SC Round = Chain 1, single crochet in each stitch around, join with slip stitch to first sc. The ch-1 does NOT count as a stitch.
  • BLO SC (Back Loop Only Single Crochet) = Insert your hook through the back loop only (the loop furthest from you), yarn over, pull up a loop, yarn over and pull through both loops. This creates that nice ridge at the base where the body meets the bottom.
  • Puff Stitch = This creates the beautiful texture on the front panel. Yarn over, insert hook in indicated stitch, pull up a loop to the height of the row. Repeat that sequence three times total (so you have multiple loops on your hook). Yarn over and pull through ALL loops on hook, then chain 1 to close. Counts as 1 stitch.
  • Surface Slip Stitch Braid = Hold your yarn on the wrong side. Insert hook from the right side through the fabric, pull up a loop. Insert into the next spot, pull up a loop and pull through the loop already on your hook. Work loosely so the fabric doesn’t pucker. This adds that gorgeous braided trim detail.
  • Left-handed note = Work the same stitch counts and shaping. Your rounds will move in the opposite visual direction. Mirror the trim and strap placement if you prefer.
  • approx = approximately
  • BLO = back loop only
  • ch = chain
  • dc = double crochet
  • hdc = half double crochet
  • inc = 2 sc in same stitch (an increase)
  • pm = place marker
  • rep = repeat
  • rnd = round
  • RS = right side
  • sc = single crochet
  • sc2tog = single crochet 2 together (a decrease)
  • sl st = slip stitch
  • sp = space
  • st(s) = stitch(es)
  • WS = wrong side
  • UK crocheters: US sc = UK dc

Base

With your 6.5 mm hook, you’ll create a firm rectangular base.

Round 1Ch 19, sc in 2nd ch from hook and each ch across. Turn. (18 sc)
Round 2through 9: Ch 1, sc in each st across. Turn. (18 sc) Edging Round: Ch 1, sc 18 across top, 2 sc in corner, sc 7 down side, 2 sc in corner, sc 18 along foundation edge, 2 sc in corner, sc 7 up side, 2 sc in corner, join. (58 sc)

Checkpoint: Your base should measure about 8 x 3.75 inches (20.5 x 9.5 cm) before blocking. If it’s significantly off, check your gauge.

Backpack Body

Now comes the satisfying part. You’ll watch this bag grow round by round.

Round 1Ch 1, BLO sc in each st around, join. (58 sc) Working in the back loop only for this first round creates a clean angle between the base and the body. You’ll see a nice defined edge.
Round 2through 20: Ch 1, sc in each st around, join. (58 sc each round) Just keep going. Put on a podcast, settle in. These rounds build up quickly.
Round 21Eyelet Round Ch 1, sc 6, ch 1, skip 1, [sc 8, ch 1, skip 1] 5 times, sc 6, join. (52 sc + 6 ch-1 spaces = 58 positions)

These eyelets are for your drawstring. If they seem too small for your cord, replace ch-1 with ch-2 and skip 2 stitches, then restore the count on the next round by working 2 sc into each ch-2 space.

Round 22through 23: Ch 1, sc in each sc and ch-1 space around, join. (58 sc each round)(58)
Round 24Top Rim Ch 1, reverse sc or firm sl st in each st around, join and fasten off. (58 sts)

Checkpoint: Your body should stand about 10.5 inches (26.5 cm) tall from base to rim. Top circumference should be approximately 25.5 to 26 inches (65 to 66 cm).

Front Texture Panel

This is what gives the bag its character. The puff stitches create a raised diamond-like pattern.

Round 1Ch 25, sc in 2nd ch from hook and each ch across. Turn. (24 sc)
Round 2Ch 1, sc 2, [puff in next st, sc 3] 5 times, puff in next st, sc 1. Turn. (24 sts)
Round 3and all odd rows through Row 15: Ch 1, sc in each st across. Turn. (24 sc)
Round 4Ch 1, sc 4, [puff in next st, sc 3] 5 times. Turn. (24 sts)Rows 6, 8, 10, 12, 14: Repeat Rows 2 and 4 alternately, ending with a Row 2 repeat on Row 14. (24 sts)Border: Sc evenly around the entire panel, placing 2 sc in each corner to keep it flat.

Set this aside for assembly. You’ll sew it centered on the lower front, beginning 1.5 inches (4 cm) above the base.

Rounded Flap

The gentle curve on this flap is achieved through simple decreases.

Round 1Ch 33, sc in 2nd ch from hook and each ch across. Turn. (32 sc)
Round 2through 8: Ch 1, sc in each st across. Turn. (32 sc)
Round 9Ch 1, sc2tog, sc 28, sc2tog. Turn. (30 sc)
Round 10Ch 1, sc in each st across. Turn. (30 sc)
Round 11Ch 1, sc2tog, sc 26, sc2tog. Turn. (28 sc)
Round 12Ch 1, sc in each st across. Turn. (28 sc)
Round 13Ch 1, sc2tog, sc 24, sc2tog. Turn. (26 sc) Border: Sc evenly around, placing 2 sc at upper corners. Add a surface slip stitch braid around the curved edge for that elevated finish.

Top Handle

Round 1Ch 31, sc in 2nd ch from hook and each ch across. Turn. (30 sc) Work 3 more rows of sc for a total of 4 rows.

You can fold this around a 7 inch (18 cm) cord for extra structure, or leave it flat and seam the long edges together. Attach to two D-rings at the back top edge.

Shoulder Straps (Make 2)

Round 1Ch 87, sc in 2nd ch from hook and each ch across. Turn. (86 sc) Work 2 more rows of sc for a total of 3 rows.Attach through sliders and lower side D-rings. Final strap length should adjust between 24 to 34 inches (61 to 86 cm).

Drawstring

Make a 34 inch (86 cm) cord using one of these methods: Chain 91 and slip stitch back along the chain Create a Romanian cord for a rounder look

Thread through the eyelets you created in Round 21.

Tassel

Wrap your cord around something 8 inches (20 cm) long about 10 times. Tie securely at the top, wrap the neck to create that classic tassel shape, trim the ends evenly, and attach to your drawstring or flap hardware.

Assembly

Step 11. Block the body lightly over a box or folded towel form so the sides dry straight. This step really makes a difference.
Step 22. Center the front texture panel on the lower front and sew invisibly around all edges using matching cord and your tapestry needle.
Step 33. Sew the flap across the back top edge. The curved edge should fall over the front panel by about 2.25 inches (5.5 cm).
Step 44. Add your magnetic snap or turn-lock under the flap, placing the receiving side above the tassel line.
Step 55. Attach upper D-rings for straps near the back corners and lower rings 1.25 inches (3 cm) above the base on each side.
Step 66. Add braided surface trim around the flap edge, side-front seams, bottom edge, and top handle for that raised minimalist finish you see in the photos.

Tester's notes

58 stitches must hold per round from the base's edging round through all 20 plain rounds of the Backpack Body; recount every few rounds since a drifted count won't show until the eyelet round forces the issue.

Place a stitch marker at the join point of every round. With 58 sc per round and no color change marking the spiral start, the seam is easy to lose track of.

Round 21's eyelet count reads 52 sc + 6 ch-1 spaces = 58 positions. If the cord runs thicker than 5 mm, swap ch-1 for ch-2 (skip 2) and restore the stitch count on the next round as the pattern directs.

Tension needs to stay firm through the entire body. A loosened gauge partway through collapses the upright shape the dense fabric is meant to hold, and sizing down the hook is the fix, not adding extra stitches.

At a glance

Rounds20
Parts8
LevelIntermediate
Time10-14 hours
Hook5 mm
YarnBulky

Gauge check

After the base's edging round, measure the piece against the pattern's own checkpoint of about 8 x 3.75 inches (20.5 x 9.5 cm) before blocking.

If the measurement is off, re-swatch to 9 sc and 10 rounds = 4 inches (10 cm) with the 6.5 mm hook, sizing down a hook if the fabric feels loose, before starting the 20-round body.

Stitch-count checkpoints

  • Base · Round 1: 18 sts
  • Base · Round 2: 58 sts
  • Backpack Body · Round 22: 58 sts
  • Backpack Body · Round 24: 58 sts
  • Front Texture Panel · Round 1: 24 sts
  • Front Texture Panel · Round 2: 24 sts

If something looks wrong

The base measures noticeably off from 8 x 3.75 inches (20.5 x 9.5 cm) before blocking.
Gauge is loose or tight relative to the stated 9 sc and 10 rounds = 4 inches. Re-swatch with the 6.5 mm hook, sizing down if the fabric feels loose, before continuing to the 18-sc, 58-sc edging base.
The body cups or flares instead of standing upright.
Tension loosened somewhere across the 20 plain rounds, or the 58-stitch count drifted. Count stitches every few rounds and tighten tension back to the firm density the base established.
The Round 21 eyelets won't take the drawstring cord.
The ch-1 spaces are too small for a 4-5 mm cord. Rework as ch-2, skip 2 stitches, then restore the 58-stitch count on the next round by working 2 sc into each ch-2 space, as the pattern allows.
The front texture panel doesn't sit flat against the body once sewn on.
The panel was attached before blocking, or its gauge (8 sts and 8 rows = 4 inches) was never checked against the body's gauge (9 sc and 10 rounds = 4 inches). Block the panel to its stated gauge first, then center and sew it to the lower front before attaching the flap.

Yarn substitutions

Worsted-weight cottonFinished bag runs smaller than the stated 9 x 10.5 x 4 inches since worsted is thinner than the pattern's 4-5 mm bulky cord. Drop to a 5 mm hook and expect a softer drape that leans more on the plastic canvas insert for structure.
Bulky acrylic chenille or velvet-style cordMatches the 4-5 mm weight range but drapes softer and is less self-supporting than braided cotton or polyester. Keep the 6.5 mm hook but work firmly, and treat the plastic canvas base as mandatory rather than optional.
Bulky jute or paper cordProduces a stiffer fabric than the cotton or polyester cords named in the pattern, which may allow skipping the plastic canvas insert. Jute often runs tighter at the same 6.5 mm hook, so re-check gauge against the 8 x 3.75 inch base checkpoint before continuing.
FAQs

Questions

Is the plastic canvas insert and fabric lining required?

No. Those are listed as a pro tip for a boutique finish, not a requirement. Skipping them speeds up assembly but the base feels less rigid, since the firm gauge and dense cord are what hold the shape on their own.

What should be checked before starting the 20-round body?

Check the base against its own checkpoint: about 8 x 3.75 inches (20.5 x 9.5 cm) before blocking. If it's off, re-swatch to 9 sc and 10 rounds = 4 inches with the 6.5 mm hook first, since the whole bag's structure depends on that gauge holding across all 58 stitches per round.

Why does the pattern call for two different hook sizes?

The 6.5 mm (K/10.5) hook is for the main body and base. The 6 mm (J/10) hook is only for the straps if a tighter gauge is needed there, so using the larger hook throughout isn't wrong, it's just not the specified default.

One at a time —

Get the next pattern

Tested round by round before it is sent. No spam.