Made and counted by Wren —

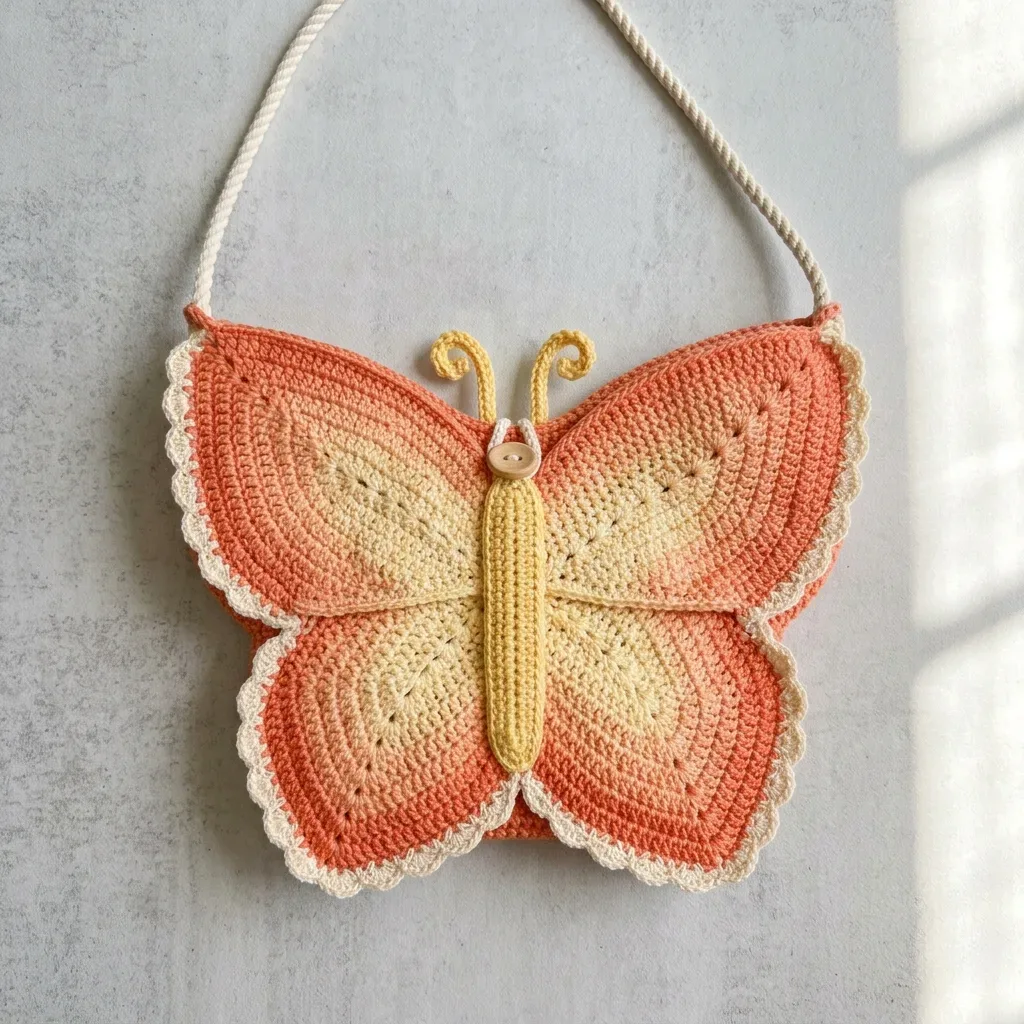
Crochet a sunset ombre butterfly crossbody bag

US E-4/3.5 mm hook, DK weight cotton: crochets an 11 x 9 inch ombre butterfly crossbody bag.

Crochet a sunset ombre butterfly crossbody bag
IntermediateLevel
6-8 hoursTime
3.75 mmHook
DKYarn
Jump to the pattern

About this pattern

A crossbody bag shaped like a butterfly, built from two mirrored wings, a tubular body, a scallop border, and two antennae, in four colors of DK weight cotton. Wings use a US E-4 / 3.5 mm hook over 21 rounds each; the body runs 15 rounds plus a 4-round button loop. Finished size is 11 inches wide by 9 inches tall, excluding the strap.

This crossbody bag takes the shape of a butterfly, built from two mirrored upper wings worked in continuous spiral rounds, plus a narrow body tube that forms the bag opening, a scallop border, and two antennae. The wing ombre runs from cream yellow at the center through salmon pink to coral orange at the outer edge across 21 rounds per wing. The body tube starts at 40 sc in Round 1, increases to 45 sc by Round 2, and holds that count through 15 rounds total.

The pattern

Written out round by round

Materials

  • Paintbox Yarns Simply DK in Melon Sorbet, Blush Pink, Buttercup Yellow, and Vanilla White gives excellent stitch definition for this pattern.
  • Lion Brand 24/7 Cotton DK in Tangerine, Peach, Butter, and Ecru is widely available and has a smooth mercerized finish.
  • Scheepjes Catona works well but you may need to go up to a US F-5 / 3.75 mm hook to reach gauge since it runs slightly finer.
  • Avoid fluffy or hairy yarns. You want that crisp stitch definition to make the ombre effect really shine.

Yarn

  • Light worsted weight (Category 3 or DK weight) cotton or cotton blend yarn in four colors.
  • Color A (Coral Orange): 280 yards / 256 meters for outer wing sections
  • Color B (Salmon Pink): 120 yards / 110 meters for mid wing transition
  • Color C (Cream Yellow): 180 yards / 165 meters for wing centers, body, and antennae
  • Color D (Cream White): 100 yards / 92 meters for scallop border

Hooks

  • US size E-4 / 3.5 mm for wings and body
  • US size D-3 / 3.25 mm for border and antennae

Notions

  • Yarn needle
  • One flat shank button, approximately 0.75 inch / 19 mm diameter
  • 4 stitch markers
  • Scissors
  • Blocking board and rust proof pins
  • 28 inches / 71 cm twisted cotton cord or rope in cream, approximately 0.25 inch / 6 mm diameter for strap
  • Sewing needle and thread for button attachment

Abbreviations

  • Scallop Stitch = Skip 2 stitches, work 5 dc in the next stitch, skip 2 stitches, slip stitch in the next stitch. This creates one shell over 6 stitches. Your stitch count must be divisible by 6 before starting the scallop round.
  • Curled Antenna = Chain 12. In the 2nd chain from hook, work 3 sc. Work 2 sc in each of the next 4 chains to create the curl. Work 1 sc in each remaining chain back to the base. The extra stitches in that small section force the piece to spiral.
  • ch = chain: yarn over and pull through the loop on your hook
  • sl st = slip stitch: insert hook, yarn over, pull through both the stitch and the loop on hook in one motion
  • sc = single crochet: insert hook, yarn over, pull up a loop (2 loops on hook), yarn over, pull through both loops
  • hdc = half double crochet: yarn over, insert hook, pull up loop (3 loops), yarn over, pull through all 3
  • dc = double crochet: yarn over, insert hook, pull up loop, yarn over and pull through 2 loops twice
  • inc = increase: work 2 sc in the same stitch
  • dec = decrease using invisible method: insert hook in front loop of next stitch, then front loop of following stitch, yarn over, pull through both loops, yarn over, pull through remaining 2 loops
  • MR = magic ring: an adjustable starting loop that pulls closed tightly
  • pm = place marker
  • st(s) = stitch or stitches
  • RS = right side (the pretty side facing out)
  • WS = wrong side

Upper Wing (Make 2)

Both upper wings are worked identically. You will flip one piece during assembly to create the mirror image. All rounds are worked on the right side in a continuous spiral. Use your US E-4 / 3.5 mm hook.

Begin with Color C (cream yellow).

Round 1Make a MR. Work 6 sc into ring. Pull ring closed. Do not join. Pm in first st. (6 sc)
Round 2Inc in each st around. (12 sc)
Round 3(Sc in next st, inc in next st) 6 times. (18 sc)
Round 4(Sc in next 2 sts, inc in next st) 6 times. (24 sc)
Round 5(Sc in next 3 sts, inc in next st) 6 times. (30 sc)
Round 6(Sc in next 4 sts, inc in next st) 6 times. (36 sc)
Round 7(Sc in next 5 sts, inc in next st) 6 times. (42 sc) Change to Color B on last yarn over of last st of Rnd 7.
Round 8(Sc in next 6 sts, inc in next st) 6 times. (48 sc)
Round 9(Sc in next 7 sts, inc in next st) 6 times. (54 sc)
Round 10(Sc in next 8 sts, inc in next st) 6 times. (60 sc)
Round 11(Sc in next 9 sts, inc in next st) 6 times. (66 sc) Change to Color A on last yarn over of last st of Rnd 11.
Round 12(Sc in next 10 sts, inc in next st) 6 times. (72 sc)
Round 13(Sc in next 11 sts, inc in next st) 6 times. (78 sc)
Round 14(Sc in next 12 sts, inc in next st) 6 times. (84 sc)
Round 15Sc in each st around. (84 sc)
Round 16(Sc in next 13 sts, inc in next st) 6 times. (90 sc)
Round 17Sc in each st around. (90 sc) Now you will shape the flat inner edge. This straight edge sits against the body center. Stop working in the round.
Round 18Shaping row, worked flat Turn work. Ch 1 (does not count as st), sc in next 60 sts, turn. (60 sc)
Round 19Ch 1, sc2tog, sc in next 56 sts, sc2tog, turn. (58 sc)
Round 20Ch 1, sc2tog, sc in next 54 sts, sc2tog, turn. (56 sc)
Round 21Ch 1, sc2tog, sc in next 52 sts, sc2tog. Fasten off Color A. (54 sc) Your upper wing should measure approximately 5.5 inches / 14 cm at the widest point and 4.5 inches / 11.5 cm tall.
Lower Wing (Make 2)

Lower wings are slightly wider and taper more at the bottom to create that fuller lower lobe shape.

Begin with Color C.

Round 1MR, 6 sc into ring. Pull closed. Pm. (6 sc)
Round 2Inc in each st around. (12 sc)
Round 3(Sc in next st, inc in next st) 6 times. (18 sc)
Round 4(Sc in next 2 sts, inc in next st) 6 times. (24 sc)
Round 5(Sc in next 3 sts, inc in next st) 6 times. (30 sc)
Round 6(Sc in next 4 sts, inc in next st) 6 times. (36 sc)
Round 7(Sc in next 5 sts, inc in next st) 6 times. (42 sc) Change to Color B on last yarn over of last st of Rnd 7.
Round 8(Sc in next 6 sts, inc in next st) 6 times. (48 sc)
Round 9(Sc in next 7 sts, inc in next st) 6 times. (54 sc)
Round 10(Sc in next 8 sts, inc in next st) 6 times. (60 sc)
Round 11(Sc in next 9 sts, inc in next st) 6 times. (66 sc) Change to Color A on last yarn over of last st of Rnd 11.
Round 12(Sc in next 10 sts, inc in next st) 6 times. (72 sc)
Round 13(Sc in next 11 sts, inc in next st) 6 times. (78 sc)
Round 14Sc in each st around. (78 sc)
Round 15(Sc in next 12 sts, inc in next st) 6 times. (84 sc)
Round 16Sc in each st around. (84 sc)
Round 17shaping decreases Sc in next 18 sts, dec, sc in next 20 sts, dec, sc in next 20 sts, dec, sc in next 20 sts, dec, sc in remaining 2 sts. (80 sc)
Round 18flat shaping Turn. Ch 1, sc in next 56 sts, turn. (56 sc)
Round 19Ch 1, sc2tog, sc in next 52 sts, sc2tog, turn. (54 sc)
Round 20Ch 1, sc2tog, sc in next 50 sts, sc2tog. Fasten off. (52 sc)

Each lower wing should measure approximately 5.5 inches / 14 cm wide and 4 inches / 10 cm tall.

Butterfly Body

The body is a narrow tube in Color C that forms the bag opening. Use your E-4 hook.

Foundation: Using Color C, ch 20.

Round 1Starting in 2nd ch from hook, sc in next 18 chs, 3 sc in last ch (bottom tip), working back along the other side of the foundation ch: sc in next 17 chs, 2 sc in the first ch (top). Pm in first st. Do not join. (40 sc)
Round 2Sc in next 18 sts, inc in next st, inc in next st, inc in next st, sc in next 17 sts, inc in next st, inc in next st. (45 sc)
Round 3Sc in each st around. (45 sc)
Round 4Sc in next 18 sts, (sc in next st, inc in next st) twice, sc in next st, sc in next 17 sts, sc in next st, inc in next st, sc in next st. (48 sc)
Rounds 5–7Sc in each st around. (48 sc)
Round 8Sc in next 18 sts, dec, sc in next 4 sts, dec, sc in next 17 sts, dec, sc in next 3 sts. (45 sc)
Round 9Sc in each st around. (45 sc)
Round 10Sc in next 18 sts, dec, sc in next 3 sts, dec, sc in next 18 sts, dec. (42 sc)
Round 11Sc in each st around. (42 sc)
Round 12(Sc in next 5 sts, dec) 6 times. (36 sc)
Round 13Sc in each st around. (36 sc)
Round 14(Sc in next 4 sts, dec) 6 times. (30 sc)
Round 15Sc in each st around. (30 sc)
Round 16(Sc in next 3 sts, dec) 6 times. (24 sc)
Rounds 17–18Sc in each st around. (24 sc) Sl st in next st. Do not fasten off. Flatten the tube.

Body Opening and Button Loop

Work across the front 12 sts only:

Round 1Ch 1, sc in next 12 sts across the front, turn. (12 sc)
Round 2Ch 1, sc in each st across, turn. (12 sc)
Round 3Button loop row Ch 1, sc in next 5 sts, ch 4, sk 2 sts, sc in next 5 sts, turn. (10 sc + ch-4 loop)
Round 4Ch 1, sc in next 5 sts, 4 sc in ch-4 sp, sc in next 5 sts. Fasten off. (14 sc) Work Rows 1 and 2 on the back 12 sts for 4 rows total, no button loop needed. Fasten off.

The completed body should measure approximately 6 inches / 15 cm long and 1.5 inches / 4 cm wide.

Wing Border

Switch to your US D-3 / 3.25 mm hook and Color D for the border.

Upper Pair Border

Round 1Preparatory Round Join Color D with sl st at any outer edge stitch. Sc evenly around entire outer perimeter of both upper wings combined, working 1 sc per st and 1 sc per row end. Place markers at each of the 4 outer corners. Work approximately 174 sc total. Join with sl st to first sc. (174 sc)
Round 2Scallop Round: Ch 1. (Sk 2 sts, 5 dc in next st, sk 2 sts, sl st in next st) 29 times. Join with sl st to base of first ch-1. Fasten off. (29 scallops)(5)

Lower Pair Border

Round 3Preparatory Round Join Color D at any outer edge stitch. Sc evenly around entire outer perimeter of both lower wings combined. Work approximately 168 sc total. Join with sl st to first sc. (168 sc)
Round 4Scallop Round: Ch 1. (Sk 2 sts, 5 dc in next st, sk 2 sts, sl st in next st) 28 times. Join with sl st to base of ch-1. Fasten off. (28 scallops)(5)

Antennae (Make 2)

Using your D-3 hook and Color C:

Ch 12. In 2nd ch from hook, work 3 sc. Work 2 sc in each of the next 4 chs. Work 1 sc in each remaining ch back to the base. Fasten off leaving a 10 inch tail.

Assembly

Step 1Lay all four wing pieces right side up on a flat surface. Arrange them so upper wings sit side by side with flat inner edges touching along a vertical center line. Lower wings sit directly below with their flat edges also meeting at center.
Step 2Leave a small gap of about 0.5 inch / 1.25 cm between the bottom of the upper wings and the top of the lower wings. The body will cover this gap.
Step 3Wet block all four wing pieces before assembly. Soak in cool water for 10 minutes, gently squeeze out water, lay flat on your blocking board, pin to dimensions, and dry fully for 12 to 24 hours.
Step 4Weave in all ends carefully. For color change tails, weave each in the direction of the matching color so it blends invisibly.

Tester's notes

4 stitch markers earn their keep here: one per wing round-start plus one each for tracking the front 12 sts versus back 12 sts during the Body Opening and Button Loop section.

21 rounds per wing means color changes land at different points on each repeat since Color A, B, and C yardages (280, 120, 180 yd) are not split evenly across rounds; check remaining yarn before starting a new round rather than mid-round.

40 sc in Round 1 sets the body's base; Round 2's increases bring it to 45 sc, and that count holds through the rest of the 15 rounds, so a miscount here throws off the later 12-st front and back split for the Body Opening.

No stuffing goes into this bag; color-change tails should be woven in the direction of the matching color, per the assembly note, so the ombre transitions stay invisible on the right side.

At a glance

Rounds64
Parts6
LevelIntermediate
Time6-8 hours
Hook3.75 mm
YarnDK

Gauge check

Gauge: With Color A and US E-4 / 3.5 mm hook in single crochet (sc) worked in continuous rounds: 16 sc and 18 rows = 4 inches / 10 cm, blocked. A bag that is too small will not hold your essentials; a bag that is too large loses that butterfly silhouette. Make a swatch and adjust your hook size if needed.

After Round 1 of the body tube, count stitches: the piece should read 40 sc, not more or fewer, with stitches sitting close enough that no mesh shows between them.

Stitch-count checkpoints

  • Upper Wing (Make 2) · Round 5: 30 sts
  • Upper Wing (Make 2) · Round 12: 72 sts
  • Upper Wing (Make 2) · Round 18: 60 sts
  • Upper Wing (Make 2) · Round 20: 56 sts
  • Lower Wing (Make 2) · Round 6: 36 sts
  • Lower Wing (Make 2) · Round 14: 78 sts

If something looks wrong

The wing cups or curls instead of lying flat after blocking.
Spiral rounds worked at tight tension pull the fabric inward; pin to the stated dimensions on the blocking board and let it dry the full 12 to 24 hours before unpinning, which is usually enough to correct the curl without re-crocheting.
Color blocks on the two wings don't
Both wings are worked identically and only flipped during assembly, so if the ombre transition rounds don't match, one wing was likely started with the wrong color or a round was skipped; recount against the round-by-round color order before joining.
Button loop sits too loose or too tight
The ch-4 loop over 2 skipped stitches is sized for the stated 0.75 inch / 19 mm button; use a different button only if the chain count is adjusted to match, otherwise re-work Row 3 at the stated ch-4.
The body tube opening doesn't match the
The last body round must end at a count that divides evenly into the front 12 sts and back 12 sts worked in the Body Opening and Button Loop section; if the split is off, recount the final body round before starting Row 1 there.

Yarn substitutions

Mercerized cotton, DK weightClosest match to the pattern's stated gauge; keep the US E-4 / 3.5 mm hook for wings and body and the D-3 / 3.25 mm hook for border, with no yardage adjustment since the listed amounts already assume this weight.
Cotton-acrylic blend, DK weightSlightly more stretch than pure cotton, so going down to the D-3 / 3.25 mm hook even for the wing sections may be needed to keep the scalloped border's structure; drape turns softer, which blurs the ombre's edge definition.
Light worsted acrylic, Category 3Lower cost but less stitch definition, dulling the ombre transition lines the pattern relies on; no stuffing is used in this design so bulk isn't a concern, but size up to an F-5 / 3.75 mm hook only if gauge runs tight.
FAQs

Questions

Does this bag need any stuffing or lining?

No. The body is a narrow tube in Color C that forms the bag opening directly, with no stuffing called for anywhere in the pattern. Lining is not included in the materials list.

Can the strap be crocheted instead of using cord?

The pattern specifies a 28 inch / 71 cm twisted cotton cord or rope, about 0.25 inch / 6 mm diameter, rather than a crocheted strap. Swapping to a crocheted chain or rope stitch would need its own length check against that 28 inch target.

Why does the pattern call for two different hook sizes?

The US E-4 / 3.5 mm hook works the wings and body for an open, flexible fabric, while the smaller US D-3 / 3.25 mm hook tightens the wing border and antennae so edges stay crisp rather than floppy. Using one hook throughout will loosen the border's scallop definition.

One at a time —

Get the next pattern

Tested round by round before it is sent. No spam.