Made and counted by Wren —

Step-by-Step Crochet Braid Stitch Pattern

Master the crochet braid stitch with this detailed FPdc and BPdc guide. Create gorgeous textured fabric perfect for scarves, blankets, and cozy home decor.

IntermediateLevel
4-6 HoursTime
WorstedYarn
Jump to the pattern

About this pattern

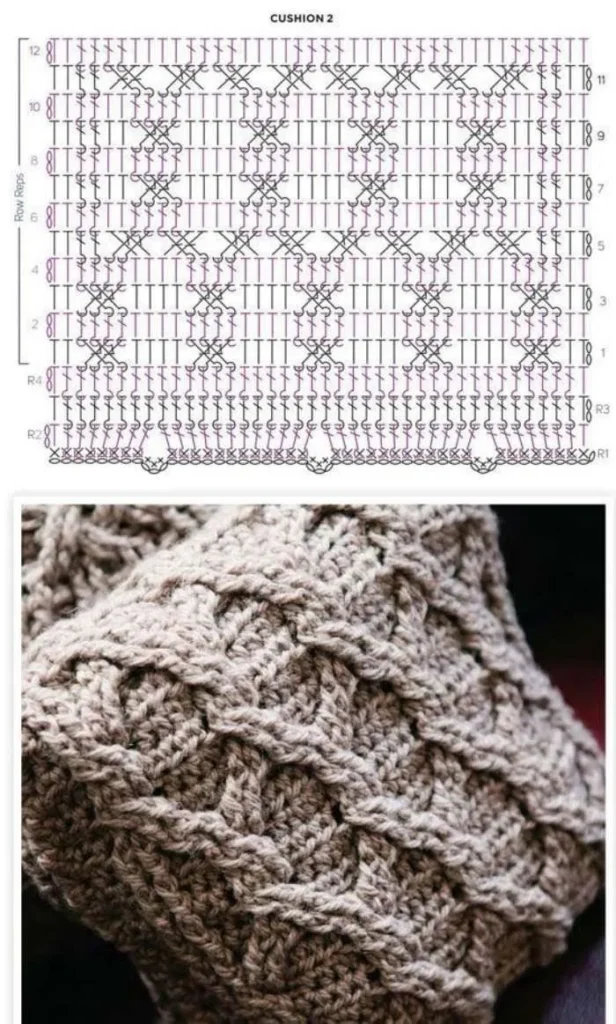
This crochet braid stitch pattern creates one of the most visually impressive textures you can achieve without ever touching a cable needle. Using nothing but front post and back post double crochet stitches worked in a clever repeating sequence, you'll build up a thick, woven-looking fabric that mimics the appearance of a knitted braid or cable. It's perfect for crocheters who love the look of intricate knitwork but want to stick with their hook, and it's an excellent way to level up your post stitch skills.

The key techniques here are FPdc (front post double crochet) and BPdc (back post double crochet), worked in a specific stacking order across Step 2, the Main Pattern round, and Step 4 where the braid officially establishes itself. You'll need to be comfortable reading which stitches sit on top of which from the previous row, since the notes specifically call out that FPdc always stacks on FPdc and BPdc always stacks on BPdc. Expect this to take an intermediate crocheter about 4-6 hours to complete a good-sized swatch or project, plus a little extra time on your very first repeat while your hands learn the pattern.

The finished fabric has incredible depth and dimension, with raised ridges that catch the light and cast soft shadows, giving it a rich, almost tactile quality that flat single or double crochet simply can't match. It works up dense and warm, making it ideal for scarves, cowls, blanket panels, or statement cushion covers. Because it looks so much more complicated than it actually is, anything made with this braid stitch makes a genuinely impressive handmade gift.

Variations

This braid stitch is a fantastic base for experimenting once you've got the repeat memorized. For a bold, graphic look, try alternating colors every few rows using a worsted weight like Heartland or Super Saver in a deep forest green and cream combo, letting the raised FPdc columns really pop against the contrasting background. For a cozy autumn palette, pair a burnt orange with a warm brown so the braid reads like actual twisted rope. If you want a chunkier, faster-working version, size up to a bulky yarn like Bernat Blanket paired with a 6.5mm hook, and reduce your starting chain accordingly while keeping the same 4+3 multiple (for example, chain 39 instead of 23 for a wider wrap). Going the other direction, a lighter DK weight with a smaller hook creates a delicate braid perfect for baby blankets or soft infinity scarves. For holiday flair, work it up in red and white for a candy-cane-inspired table runner, or in metallic gold thread mixed with a rich burgundy for an elegant winter cowl. You could also turn this into a pillow cover by working two braid-stitch panels to your desired width (just keep adding sets of 4 stitches to your foundation chain) and seaming them around a pillow form. Fiber content matters too: a wool-blend yarn will show off the raised stitches with crisp definition, while a soft acrylic or cotton blend keeps things machine washable for kids' or pet blankets. Don't be afraid to mix this braid panel with plain double crochet borders on either side for a modern, sampler-style throw that highlights the texture as a focal stripe rather than an all-over pattern.

I am obsessed with this braid stitch because it tricks everyone into thinking you're a crochet wizard when really you're just alternating FPdc and BPdc in the right order! The chain multiple of 4+3 keeps your row math simple, and once you get through Step 2's first row of double crochet, the Main Pattern round and Step 4's braid-establishing round click into place surprisingly fast. There's something so satisfying about watching those raised post stitches stack neatly on top of their matching partners row after row, the FPdc landing right on the FPdc below and the BPdc tucking behind the BPdc, building that woven braid effect right before your eyes. It genuinely feels like knitting cables, minus the cable needle and the fuss. I also love that this is one of those patterns where repeating Rows 2 and 3 is basically the whole game plan, so once you've got the rhythm down you can crochet it while half-watching TV. It's meditative, it's texturally gorgeous, and it makes you feel like a total pro.
Common mistakes

  • Losing track of whether you're workingPlace a stitch marker in the very first FPdc of each row as a visual anchor, and always double-check by looking at the previous row: FPdc stitches should sit directly on top of other FPdc stitches, never on a BPdc.
  • Starting with a foundation chainCount your chain carefully before beginning Step 2 — for example 20+3=23 works, but 22 or 24 will throw off the entire braid repeat. Recount twice, since miscounted foundation chains are the single biggest cause of a wonky braid pattern.
  • Working the post stitches too tightly around the postFront and back post double crochets naturally pull yarn tighter than regular dc, so consciously relax your tension or go up half a hook size to prevent the fabric from cupping or curling at the edges.
  • Skipping ahead without properlyThis foundational row sets up the stitch placement for every post stitch that follows, so make sure it's worked evenly across the full chain before starting the Main Pattern round — an uneven first row will visibly throw off your braid alignment.
  • Forgetting to repeat Rows 2 and 3 in the correct orderKeep a small written note or row counter nearby reminding you that the braid pattern depends on alternating these two rows consistently; working two of the same row in a row will break the woven look established in Step 4.
  • Mixing up which side is the frontSince post stitches are worked from the front or back of the fabric, always check your work is facing the same way before beginning a new row, or the FPdc/BPdc placement will end up reversed compared to the row below.

The pattern

Written out round by round

Materials

Yarn

  • Choose a yarn that shows stitch definition well.

Hook

  • Use a hook size recommended for your yarn.

Abbreviations

  • ch = Chain
  • sc = Single Crochet
  • dc = Double Crochet
  • FPdc = Front Post Double Crochet
  • BPdc = Back Post Double Crochet
  • sk = Skip
  • st(s) = Stitch(es)

Step 1: Foundation Chain

  1. Foundation ChainChain a multiple of 4 + 3 stitches (e.g., 20+3=23) for this pattern to work out.

Step 2: First Row of Double Crochet

  1. Round 1Starting in the 3rd chain from the hook, double crochet (dc) in each stitch across.Chain 2 and turn your work.

Step 3: Begin Braid Pattern with Front and Back Post Double Crochet

  1. Round 2Chain 2 (counts as first dc). Repeat the following pattern across the row: FPdc around the next 2 stitches, then BPdc around the next 2 stitches.Continue alternating FPdc and BPdc in sets of two until the end of the row.Chain 2 and turn.

Step 4: Establishing the Braid

  1. Round 3Chain 2 (counts as first dc). Start with BPdc in the next 2 stitches (to keep the braid pattern in relief).FPdc around the next 2 stitches.Continue across the row, alternating BPdc and FPdc stitches in sets of two to maintain the braided look.Chain 2 and turn.

Step 5: Continuing the Pattern

Repeat Rows 2 and 3 to keep the braid pattern consistent.

The FPdc stitches always go on top of FPdc stitches from the previous row, and BPdc stitches go on top of BPdc stitches.

Assembly

Step 1

Continue for as many rows as needed, repeating Rows 2 and 3.

Step 2

To complete the pattern, finish with a simple row of double crochet to give the piece a neat edge.

Important notes

💡 Use a smooth, well-plied worsted weight yarn so the FPdc and BPdc stitches stand out clearly — this pattern's whole beauty relies on strong stitch definition.

💡 Choose your hook based on your yarn's recommended size, then test a small swatch first since post stitches tend to work up tighter than standard dc rows.

💡 Place a removable stitch marker at the beginning of each row to help you track your FPdc and BPdc stacking as you repeat Rows 2 and 3.

💡 Remember the golden rule from the pattern notes: FPdc always stacks on FPdc, and BPdc always stacks on BPdc from the previous row — glance down at your work often to confirm this.

💡 Block your finished piece gently with steam or a light wet-block to help the braid columns relax into place and lie flatter without losing their raised texture.

💡 If your foundation chain feels fiddly to count, chain a few extra stitches, then unravel down to your needed multiple of 4+3 once you've verified the count twice.

FAQs

Frequently asked questions

What yarn weight works best for this braid stitch pattern?

A worsted weight yarn with good stitch definition works beautifully for showing off the raised FPdc and BPdc texture. Smooth, tightly plied yarns like a wool blend or cotton-acrylic mix will make the braid pop more than fuzzy or highly textured yarns.

Can I make this pattern wider or narrower than the original?

Yes, just adjust your foundation chain in multiples of 4, keeping the plus 3 at the end (for example 23, 27, or 31 stitches). This lets you customize the width for a scarf, blanket panel, or pillow cover while keeping the braid repeat intact.

Why do my FPdc and BPdc stitches look misaligned after a few rows?

This usually happens when the stacking order gets confused between rows. Double-check that every FPdc sits directly above the FPdc from the row before it, and every BPdc sits above the previous BPdc, as noted in the pattern.

Is this pattern good for a beginner trying post stitches for the first time?

It's rated intermediate because it requires comfort with both FPdc and BPdc worked in a specific alternating sequence. If you've practiced post stitches individually before, this is a great next project to build confidence with them in combination.

Does this braid stitch curl or cup at the edges?

Post stitch fabric can sometimes pull tighter than standard stitches, causing slight cupping. Working with a slightly larger hook or relaxing your tension on the post stitches, plus a gentle block when finished, usually resolves this.

One at a time —

Get the next pattern

Tested round by round before it is sent. No spam.