Made and counted by Wren —

Cozy Crochet Pullover Pattern for Breezy Weather

Crochet a seamless top-down granny-square pullover with customizable length and sleeves using size 4 yarn and an H hook for effortless breezy-day style.

Cozy Crochet Pullover Pattern for Breezy Weather
IntermediateLevel
4-6 HoursTime
5 mmHook
Worsted (Size 4)Yarn
Jump to the pattern

At a glance

Begin at the neckline with a foundation round that establishes the granny-square yoke shape from the top down.

Increase steadily through the following rounds so the yoke widens naturally across the shoulders and chest.

Work rounds 8 through 10 to continue shaping the yoke before dividing for sleeves and body.

Adjust the neck opening so it sits comfortably and measures close to the target 8-inch width.

Set aside stitches at each underarm and begin working the sleeves separately to your preferred length.

Return to the body stitches and work them in the round, joining seamlessly beneath the underarms.

Continue through rounds 15 to 28, stopping earlier for a cropped fit or later for a longer tunic.

Weave in all remaining ends and give the finished pullover a light steam or blocking to relax the stitches.

About this pattern

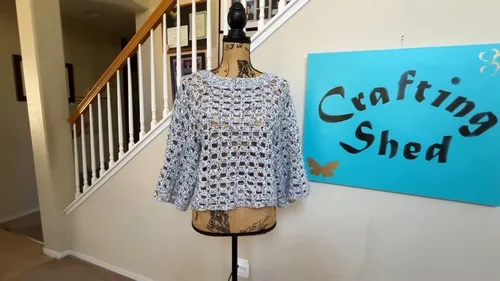
This cozy crochet pullover is built on the classic granny-square motif, reimagined into a seamless, top-down sweater that's as fun to make as it is to wear. It's the perfect project for anyone who loves the texture and rhythm of granny squares but wants something wearable and modern instead of another blanket. Whether you're transitioning your wardrobe into fall or just want a breezy layer for cool evenings, this pullover strikes the perfect balance between handmade charm and everyday practicality.

You'll work through single crochet, double crochet, treble crochet, chains, and slip stitches, building the yoke first and letting the granny-square construction naturally shape the neckline and shoulders before you split off for the sleeves and body. It's rated confident beginner to intermediate, so if you've made a granny square before and can follow simple increases, you're ready. Expect to spend a relaxed weekend or a handful of evenings from cast-on to your last woven-in end.

The finished pullover measures roughly 18½ inches across the body and 19 inches long, with 18-inch sleeves, a 10-inch arm opening, and an 8-inch neck opening — though you control the exact length of both body and sleeves as you go. The result is a soft, textured sweater with a slightly relaxed fit, perfect for gifting to a fellow yarn lover or keeping all to yourself for chilly mornings and campfire nights.

Variations

This pattern is endlessly customizable, starting with the two big built-in choices: length and sleeves. Stop the body rounds early (right around what would be Round 15-18) for a cropped, boxy crop-top silhouette perfect with high-waisted jeans, or push through all the way to Round 28 and beyond for a hip-skimming tunic you can wear as a dress with leggings. Sleeves work the same way — stop at elbow length for a cute cardigan-style layer, go three-quarter for transitional weather, or work the full 18 inches for a long-sleeve classic. For yarn, while Caron Coconut Cakes gives you that beautiful built-in gradient, you could swap in Mandala for a more subtly speckled effect, or go solid Soft or Bernat Blanket Yarn (adjusting hook size down slightly) for a punchier, single-color look. Try color-blocking manually with two contrasting solids — a cream body with a rust or forest green yoke — for a totally different, more structured aesthetic. Seasonally, this pullover shifts easily: work it in warm terracotta and mustard tones for an autumn feel, icy blues and whites for a winter-ready thicker version (size up your hook to an I or J with bulky yarn), or soft pastels for a spring throw-on layer. For sizing beyond the sample, add extra granny-square-style increase rounds evenly around the yoke before splitting for sleeves to widen the chest and shoulders, and simply work additional body or sleeve rounds to lengthen — since the construction is seamless and worked to measurement rather than a fixed row count, this pattern is genuinely one of the easiest sweaters to size up or down as you crochet.

I designed this pullover because I wanted all the satisfaction of granny squares without the seaming marathon at the end — and working it seamlessly from the top down delivers exactly that. Watching the foundation round blossom into a yoke, then split naturally into sleeves and body, feels like a little bit of crochet magic every single time. I love that the treble crochet stitches add just enough height and texture to make the granny motif feel fresh and sweater-worthy instead of blanket-like. The customizable length is my favorite part — I've made a cropped boxy version for summer nights and a longer tunic-length one for lazy Sundays, and both came from the exact same pattern. Using Caron Coconut Cakes for the sample means the color gradient does all the styling work for you, no color-change fussing required. And because there are no seams to sew, no separate pieces to block and match, this becomes a genuinely relaxing, meditative make — the kind of project you can pick up for twenty minutes or an entire afternoon and always leave happy with your progress.
Common mistakes

  • Losing track of the foundation round'sPlace a stitch marker at the very first stitch of the foundation round and move it up as you complete each subsequent round so you always know exactly where each round begins and ends.
  • Working the treble crochet stitchesConsciously keep your tension looser on treble stitches than you would for single or double crochet, and check every few rounds that your work is lying flat rather than cupping or ruffling.
  • Splitting for the sleeves and bodyBefore dividing at the underarm, measure against the target 10-inch arm opening and adjust the number of stitches set aside for each sleeve so both sides match evenly.
  • Not checking gauge or fit beforeTry the piece on (or hold it against yourself) every few rounds once you reach the body section, and stop when it hits your desired length rather than following a fixed round count blindly.
  • Rushing through the neck openingWork the neck adjustment slowly, trying the opening against your head or a similarly sized object partway through, aiming for that 8-inch measurement as a guide rather than an exact rule.
  • Mixing hook tension between sessionsBefore picking the project back up, work a few stitches on a scrap of yarn first to re-settle your tension, and compare your gauge against your last completed round.

The pattern

Written out round by round

Materials

  • Yarn — two skeins of a size 4 (medium weight) yarn; the sample uses Caron Coconut Cakes for its built-in color gradient.
  • Crochet hook — size H (5 mm).
  • Scissors
  • Blunt needle — for weaving in ends.
  • Stitch markers
  • Tape measure

Abbreviations

  • ch = chain
  • st = stitch
  • sl st = slip stitch
  • sc = single crochet
  • hdc = half double crochet
  • dc = double crochet
  • inc = increase
  • dec = decrease
  • mr = magic ring
  • fo = finish off
  • tr = treble crochet

Creating the Sleeves

Attach your yarn at the arm opening.

  1. Round 1Chain 3, double crochet in the next stitch, chain 3, skip 3 stitches, double crochet in the next 2 stitches. Follow the pattern, adjusting for the corner. Join with a slip stitch.
  2. Round 2Chain 3, five double crochets in each chain-3 space. Repeat around, ending with four double crochets in the last chain-3 space. Join with a slip stitch.
  3. Round 3Chain 3, double crochet in the next stitch, chain 3, skip 3 stitches, double crochet in the next 2 stitches. Repeat around and join with a slip stitch.Rounds 4–16: Repeat Rounds 2 and 3 consecutively until you reach your desired sleeve length.

Foundation Round

  1. Foundation RoundStart with a slip knot and chain 116. Join with a slip stitch to form a ring. Chain 1, then single crochet in each chain around. Join with a slip stitch to end the round.
  2. Round 1Chain 3, double crochet in the next stitch. Then repeat the pattern: chain 3, skip 3 stitches, double crochet in the next 2 stitches. For the corners: chain 3, skip 3 stitches, double crochet, chain 3, and double crochet in the same stitch. Repeat for each side of the square, creating five chain-3 spaces between corners. Join with a slip stitch in the third chain of the beginning chain 3.
  3. Round 2Chain 3, then five double crochets in the next chain-3 space. Repeat five double crochets in each chain-3 space. In the corner chain-3 space: two double crochets, chain 1, two double crochets. Repeat around, ending with four double crochets in the last chain-3 space. Join with a slip stitch in the third chain of the beginning chain 3.
  4. Round 3Chain 3, double crochet in the next stitch. Chain 3, skip 3 stitches, double crochet in the next 2 stitches. For the corners: chain 3, treble crochet in the chain-1 space, chain 3, skip 1 stitch, double crochet in the next 2 stitches. Repeat around and join with a slip stitch.
  5. Round 4Chain 3, five double crochets in the next chain-3 space. In the corner chain-3 space: five double crochets, chain 3, five double crochets. Repeat around, ending with four double crochets in the last chain-3 space. Join with a slip stitch.
  6. Round 5Chain 3, double crochet in the next stitch, chain 3, skip 3 stitches, double crochet in the next 2 stitches. For the corners: chain 3, skip 3 stitches, double crochet in the next stitch, double crochet, chain 4, double crochet in the same space, double crochet in the next stitch. Repeat around and join with a slip stitch.
  7. Round 6Chain 3, five double crochets in each chain-3 space. In the corner chain-4 space: four double crochets, chain 2, four double crochets. Repeat around, ending with four double crochets in the last chain-3 space. Join with a slip stitch.
  8. Round 7Chain 3, double crochet in the next stitch, chain 3, skip 3 stitches, double crochet in the next 2 stitches. For the corners: chain 3, skip 3 stitches, double crochet, chain 3, double crochet in the chain-2 space. Repeat around and join with a slip stitch.

Rounds 8–10

Repeat Rounds 2, 3, and 4 consecutively.

Adjusting the Neck Opening

To widen the neck opening, add a multiple of five chains to each side of the square. Five chains will open it up by about 1 inch.

Creating the Body

Continue crocheting from where you left off, increasing the arm opening. Join the corners and continue on the front, then join the corners again.

  1. Round 11Chain 3, double crochet in the next stitch, chain 3, skip 3 stitches, double crochet in the next 2 stitches. At the corner, chain 3, skip 3 stitches, double crochet in the next stitch and in the corner space, then chain 15. Pick up the other corner, double crochet in the corner space and in the next stitch. Repeat for the other side, then join with a slip stitch.
  2. Round 12Chain 3, five double crochets in each chain-3 space. In the 15-chain spaces, double crochet in each chain. Repeat around, ending with four double crochets in the last chain-3 space. Join with a slip stitch.
  3. Round 13Chain 3, double crochet in the next stitch, chain 3, skip 3 stitches, double crochet in the next 2 stitches. Continue the pattern around, including the joining stitches. Join with a slip stitch.
  4. Round 14Chain 3, five double crochets in each chain-3 space. Repeat around, ending with four double crochets in the last chain-3 space. Join with a slip stitch.

Rounds 15–28

Repeat Rounds 13 and 14 consecutively until you reach your desired length.

Assembly

Step 1

Crochet around the neck opening for a clean finish. Weave in all ends and clean up any loose tails.

Important notes

💡 Since this pullover uses a size 4 medium weight yarn with an H (5mm) hook, swatch a small granny motif first to confirm your gauge matches before committing two full skeins to the project.

💡 Use stitch markers generously — mark the start of each round on the foundation and yoke sections, and mark the underarm division points before separating for sleeves so your increases stay symmetrical.

💡 If you're using a gradient yarn like the sample's Caron Coconut Cakes, try to start both sleeves at a similar point in the color repeat so they end up matching rather than looking mismatched.

💡 Decide on your finished length and sleeve length before you start (or at least before you reach those sections) so you're not guessing mid-project — jot your target measurements down somewhere handy.

💡 Keep your tape measure nearby throughout, not just at the end — checking body width, sleeve length, and the neck and arm openings as you go saves you from unraveling rounds later.

💡 Weave in ends as you finish each major section (yoke, sleeves, body) rather than saving them all for the end, since a seamless construction still leaves a surprising number of tails to manage.

FAQs

Frequently asked questions

Can I make this pullover in a different size than the finished measurements listed?

Yes — because it's worked seamlessly from the top down, you can add extra stitches evenly around the yoke's foundation round to widen the chest, and simply work more or fewer body and sleeve rounds to adjust length. Just keep checking your fit as you go rather than following the round count rigidly.

Do I need two skeins of the exact yarn used in the sample?

The sample uses two skeins of Caron Coconut Cakes for its gradient effect, but any size 4 (medium/worsted weight) yarn will work with an H (5mm) hook. Just make sure you have enough total yardage to cover the yoke, sleeves, and body at your chosen length.

How do I know where to stop for the sleeve length I want?

The sleeves are worked to your preferred length rather than a fixed round count, so simply try the sleeve on periodically and stop when it reaches elbow, three-quarter, or full-length as desired. The pattern's 18-inch sleeve measurement is just a guide, not a rule.

Is this pattern good for someone who has never crocheted a garment before?

It's rated confident beginner to intermediate, so if you're comfortable with chain, single crochet, double crochet, and slip stitch, and willing to try treble crochet, you should be able to follow along. The granny-square construction is very forgiving and easy to troubleshoot as you go.

Will the neck opening stretch enough to pull over my head comfortably?

The 8-inch neck opening measurement is a target, but granny-square crochet fabric does have natural give and stretch. If you're concerned, work a slightly looser adjustment round or check the opening against your head before finishing that section.

One at a time —

Get the next pattern

Tested round by round before it is sent. No spam.