Made and counted by Wren —

Crochet Ripple Sweater Pattern: Cozy Chevron Pullover

Make a cozy crochet ripple sweater with a chevron stitch pattern, color-block sleeves, and clever slip-stitch shoulder seams for a custom fit.

Crochet Ripple Sweater Pattern: Cozy Chevron Pullover
IntermediateLevel
10-14 HoursTime
WorstedYarn
Jump to the pattern

At a glance

Chain a long foundation row, choosing a shorter or longer length depending on your desired sweater size.

Work the first row into the back bumps of the chain to build a clean, sturdy starting edge for the panel.

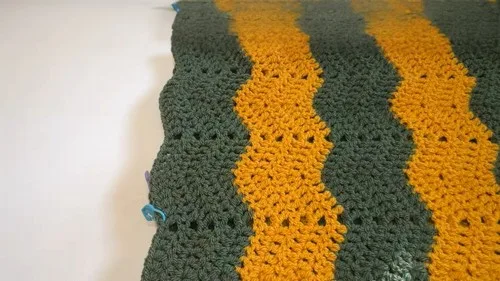
Repeat the chevron stitch pattern across each row, clustering stitches together and skipping others to form the wavy ripple texture.

Continue the ripple rows until the panel reaches your chosen length, then fasten off and weave in the ends.

Make a second matching panel, keeping row count and color changes identical for a balanced finished sweater.

Join the two panels together along the sides using slip stitches, matching the ripple direction on both.

Mark the shoulder points, slip stitch the shoulder seams to form the neckline opening, then work sleeve rounds around each armhole.

About this pattern

This crochet ripple sweater is built from two rectangular body panels worked in a bold chevron stitch, then joined at the sides and shoulders to create a relaxed, drapey pullover. The wave pattern forms naturally as you cluster double crochets together and skip stitches across each row, giving the fabric a rhythmic, zigzag texture that looks far more complicated than it actually is. It's a wonderful project for anyone who loves garment crochet but wants something more textural than a plain stockinette-style sweater, and it's especially satisfying for makers who enjoy watching a pattern repeat build row by row.

The techniques here are approachable but do require attention: working into back bumps of the foundation chain for a clean edge, a stacked single crochet that mimics a double crochet at the start of each row, and consistent stitch counting to keep the chevrons symmetrical. You'll also practice color changes by cutting and rejoining yarn every few rows, plus simple slip-stitch seaming to assemble the sleeves and shoulders. Expect to spend a few evenings on each body panel and a shorter session on the sleeves, with the whole sweater coming together over multiple sittings rather than one marathon session.

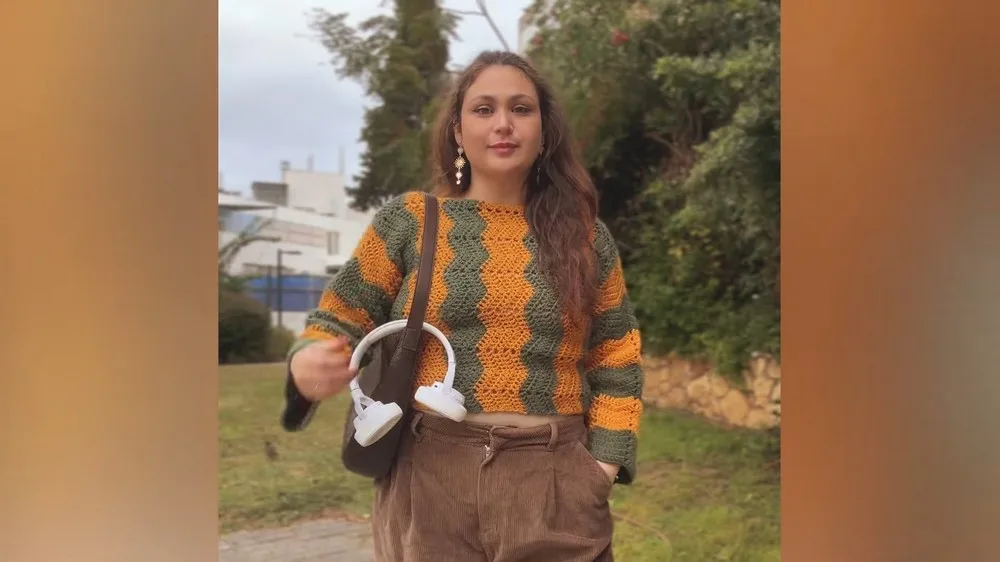
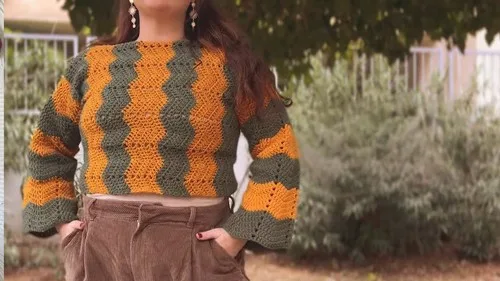
The finished sweater is a boxy, oversized pullover with dramatic chevron stripes running across the body and coordinating striped sleeves, plus a neat slip-stitch seam detail at the shoulders that doubles as the neckline opening. It has a relaxed, cozy drape that works equally well as a cropped layering piece or a longer, sweater-dress-length statement depending on how many rows you work. Because the finished piece is so visually striking, it makes a fantastic handmade gift for a fellow crocheter or a treat-yourself project for your own closet.
Variations

This ripple sweater is basically a color-change playground, so don't be afraid to experiment. For a bold graphic look, alternate just two high-contrast colors like navy and mustard every five rows instead of a multi-color rotation. For something softer, try a gradient effect by shifting through three or four tonal shades of the same color family — think dusty rose to terracotta to rust — so the stripes blend rather than pop. If you want a subtler texture-only sweater, skip the color changes entirely and work the whole thing in one shade; the ripple stitch alone will still read as interesting. Sizing is easy to adjust: the pattern already builds in a cropped option (57-chain foundation, stopping around row 35) versus a longer version (68-chain foundation, up to row 45), so you can customize length before you even start. For a wider fit, add extra full repeats of the (4 dc, skip 2, 4 dc, 3-in-one) sequence to your foundation chain in multiples that keep the pattern balanced, just remember to adjust your sleeve stitch count to match. Yarn-wise, this pattern loves a worsted-weight yarn with good stitch definition — a cotton-acrylic blend will give sharper chevrons and more drape, while a soft acrylic or wool blend will feel cozier and warmer for cooler weather. If you want a lighter summer version, drop down to a DK weight and a larger hook for a breezier, more open fabric. You could also play with the sleeve length by adding extra rounds before fastening off, turning them from short cap sleeves into three-quarter length for more coverage.

Common mistakes

  • Losing track of the chevron repeatPlace a stitch marker at the start of every repeat (each skip-2 point) so you can quickly count back and confirm you haven't added or dropped a stitch.
  • Forgetting to work into the back bumpsTurn the chain over before you begin so the bumps face up, and go slowly on this first row since it sets the tone for the whole panel.
  • Skipping the stacked single crochetTake the extra few seconds to work the sc-into-same-stitch combo; it keeps the first stitch height matching the rest of the row so your edge stays straight.
  • Cutting yarn for a color changeLeave at least a 6-inch tail every time you cut yarn, and weave ends in as you go rather than saving them all for the end.
  • Joining the shoulder seamsCount and mark both sides with stitch markers before you start slip-stitching so the head opening ends up symmetrical.
  • Mismatching the direction of the rippleLay both panels flat side by side before seaming and confirm the peaks and valleys line up in the same direction on each.

The pattern

Written out round by round

Materials

  • Yarn
  • Crochet hook
  • Stitch markers
  • Darning needle

Abbreviations

  • ch = chain
  • sc = single crochet
  • dc = double crochet
  • sl st = slip stitch
  • st(s) = stitch(es)
  • inc = increase

Body Panel

Make 2

Begin with a slip knot, then chain 68 to start the foundation chain; chain 57 instead for a shorter or cropped sweater, and make sure your foundation chain count is correct before starting Row 1.

Work 67 more chains after the initial chain to complete the foundation chain (68 total, or 57 total for the cropped version).

  1. Round 1Work into the back bumps of the foundation chain, starting from the second chain from the hook. Insert hook into the second chain and work a single crochet, forming a stacked single crochet to create a fake double crochet; work another double crochet into the same back bump (mark this first stitch with a stitch marker). Work 4 dc into the next 4 back bumps, skip the next 2 bumps, work 4 more dc into the next 4 bumps, then work 3 dc into the following bump (all in one bump). Repeat (4 dc, skip 2 back bumps, 4 dc, 3 dc in one bump) across to the end of the row. In the last back bump, work an increase (2 dc in the same back bump).
  2. Round 2Turn work and begin with a stacked single crochet into the first stitch. Work 4 dc, skip 2 stitches, 4 dc, then 3 dc in one stitch; repeat this pattern across the row, finishing with an increase (2 dc) in the last stitch.
  3. Round 3-5Repeat Row 2, making sure to correctly count stitches and ensure no stitches are added or missed.After Row 5, chain 1 and cut the yarn, leaving a tail; attach a new yarn color and turn the work as if starting a new row.Insert the hook into the first double crochet of the round, secure the new yarn, and begin working with it.
  4. Round 6-10Repeat the Row 2 pattern, alternating yarn colors every 5 rows.Continue repeating Row 2 in this manner until reaching Row 35 (for a shorter/cropped sweater) or Row 45 (for a longer sweater), depending on the size being made.Make two identical panels.

Sleeves

Make 2
  1. Round 1Flip the sweater so the stitching isn't visible. Attach the second color at any stitch and work single crochet around, working 2 sc into the chain space; continue sc all around for 56 sc total. Join with a sl st to the first sc. (56 sc)
  2. Round 2+Ch 1, repeat the sleeve pattern, alternating colors every 5 rows.

Assembly

Step 1

Once the required number of rows is reached, fasten off and weave in any loose ends.

Step 2

To connect the two panels, ensure the direction of the patterns matches, then use slip stitches to join them together from stitch 1 to stitch 28 on each side.

Step 3

Count 8 rows from each side and mark the points with stitch markers.

Step 4

Connect the shoulder sections using slip stitches, working 2 slip stitches into each row up to the marked stitch (16 slip stitches in total) to form the holes for the head and shoulders.

Step 5

Weave in all ends with a darning needle after completing the sleeves.

Step 6

Remove all stitch markers.

Important notes

Decide on your finished length before you start chaining — 57 chains sets up the cropped version, while 68 chains sets up the longer style, and this choice can't easily be changed mid-project.

Use stitch markers generously, not just at the start of the row but also at the first stitch of the foundation row, since it's easy to lose count during the increase pattern.

Work both body panels to the exact same row count before assembly; laying them side by side periodically will help you catch any discrepancy early rather than after seaming.

The sleeves are worked directly around the armhole opening, so make sure your side seam join (stitches 1 to 28) is secure and even before you start the sleeve rounds.

When forming the shoulder and neckline with the 16 slip stitches, keep your tension even and consistent so the head opening ends up snug but not restrictive.

More photos

Crochet Ripple Sweater Pattern: Cozy Chevron Pullover — photo 2
Crochet Ripple Sweater Pattern: Cozy Chevron Pullover — photo 3
Crochet Ripple Sweater Pattern: Cozy Chevron Pullover — photo 4
FAQs

Frequently asked questions

How do I know how many rows to work for my size?

The pattern gives two stopping points — around row 35 for a shorter, cropped fit or row 45 for a longer sweater — so check your gauge swatch against your desired body length before committing. You can also try the panel on periodically as you work to judge fit.

Can I make this sweater in just one color?

Absolutely — the color changes every five rows are purely decorative, so working the entire sweater in a single yarn color will still show off the ripple texture beautifully. Just skip the cut-and-rejoin steps and continue with the same yarn throughout.

Why does my ripple pattern look uneven after a few rows?

This almost always comes from miscounting stitches during the skip-2 sections, so recount your repeat any time something looks off rather than continuing on and hoping it corrects itself. Placing a marker at the start of each repeat makes this much easier to catch early.

Do the two body panels need to be identical before assembly?

Yes, both panels should match in row count and total stitch count so the side seams and shoulder joins line up evenly. It's worth laying them flat together every so often to compare as you work.

How are the sleeves attached to the body?

The sleeves are worked directly around the armhole opening created when the side seams are joined, picking up single crochet stitches around that opening rather than being made separately and sewn on. This keeps the join seamless and avoids extra sewing at the end.

One at a time —

Get the next pattern

Tested round by round before it is sent. No spam.