Made and counted by Wren —

Stylish Crochet V-Neck Sweater Vest Pattern for Summer

Make a chic crochet V-neck sweater vest with clean ribbing and shaping details. A breezy, wearable summer pattern for confident intermediate crocheters.

Stylish Crochet V-Neck Sweater Vest Pattern for Summer
IntermediateLevel
6-9 HoursTime
4.5 mmHook
DKYarn
Jump to the pattern

At a glance

Crochet the back panel first, working the increase rows to shape the sides gradually.

Shape the neckline on the back panel with a short series of decrease rounds.

Move to the front panel, working the longer set of V-neck decrease rows to form the deep neckline.

Continue the front panel through the V-neck increase rows to widen back out toward the shoulders.

Shape the front neckline with a final set of increase rounds to complete the opposite side of the V.

Decrease both armholes on the front and back panels so the panels taper in at the underarms.

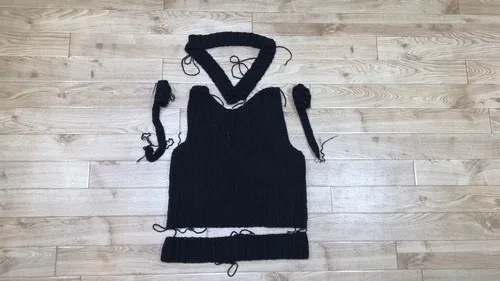
Measure and prepare the neckline ribbing, overlapping the ends to form a clean V-shape, then knot and sew it in place around the neck edge.

Attach the arm and waist ribbing using the same overlap-and-sew method, then weave in all yarn ends to finish.

About this pattern

This crochet V-neck sweater vest is the kind of piece that feels like it walked straight out of a boutique window. Worked in double-knit yarn with a 4.5 mm hook, it combines a clean V-neckline, fitted armholes, and neat ribbed trim for a polished, tailored look. It's perfect for crocheters who want a wearable project that feels modern and versatile — something you can throw over a tank top or button-down and instantly elevate an outfit.

You'll build this vest from a back panel and front panel worked separately, each shaped with careful increases and decreases to create the fitted silhouette and signature V-neck. Armhole shaping decreases on both sides give it that structured, ready-to-wear finish, while the ribbing sections teach a satisfying seaming technique. This is an intermediate-level project — comfortable stitchers who've handled shaping before will move through it smoothly in roughly 6 to 9 hours.

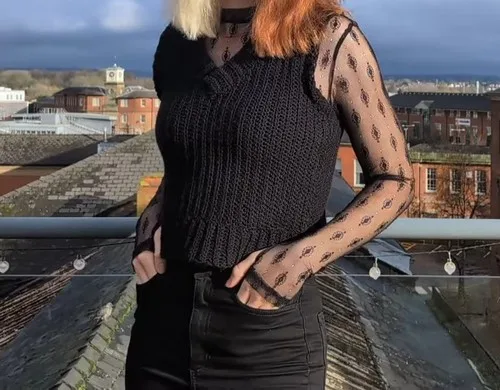
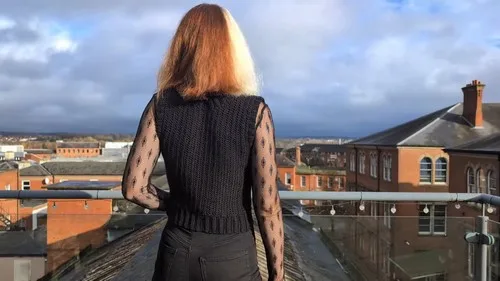
The finished vest has a relaxed yet tailored fit, with a soft ribbed neckline, armholes, and waistband that frame the body beautifully. It drapes with the light structure DK yarn is known for, making it breathable enough for warm-weather layering. Customize the strap and ribbing length for a perfect fit, and you've got a one-of-a-kind handmade piece — ideal for yourself or as a thoughtful, wearable gift for a fashion-forward friend.

Variations

This vest is a fantastic canvas for color and texture play. Try a color-blocked version with a soft sage back panel and a cream front panel, letting the ribbing in a contrasting terracotta tie both together — it reads as intentional and editorial. For a monochrome look, keep everything in one shade like dusty rose or oatmeal and let the ribbing texture be the star. Yarn-wise, DK weight cotton blends like 24/7 Cotton or We Crochet Comfy work beautifully for a breathable summer feel, while a cotton-linen blend like Rowan Summerlite DK adds a slightly crisp drape that holds the V-neck shape especially well. If you want more warmth for early fall, swap in a DK wool blend such as Cascade 220 Superwash for a heavier, cozier vest without changing your hook size. For sizing, lengthen or shorten the front and back panels before the armhole shaping begins to adjust overall torso length, and add or subtract a repeat within the waist ribbing rounds to loosen or tighten the hem — just keep increases and decreases mirrored on both sides so the V-neck stays centered. Want a fun seasonal twist? Try a striped ribbing using two coordinating colors, changing yarn every other round for a subtle candy-stripe trim along the neckline, armholes, and waist. A metallic thread held together with your DK yarn for the ribbing only creates a dressier, eveningwear feel perfect for a holiday party layered over a simple blouse.

I adore how this vest bridges the gap between 'cozy handmade' and 'actually stylish.' The V-neck shaping across those decrease and increase rows gives it real structure instead of the boxy look so many crochet garments fall into — you can genuinely see the neckline take form as you work through the rows. The ribbing technique is one of my favorite parts: overlapping the ends to form that clean V, then sewing it on stitch by stitch until the flaps meet. It's meditative and so satisfying to see it click into place. The armhole shaping decreases on both sides mean this fits like it was made for you, not just any body. And because it's DK weight on a 4.5 mm hook, it works up with lovely drape instead of stiffness. This is the project I reach for when I want to prove that crochet garments can look just as chic as anything from a boutique rack — perfect for that first cool morning after a summer day.
Common mistakes

  • Not measuring the ribbingLay the ribbing along the neckline edge and stretch it gently to check the fit before attaching — ribbing that's too short will pucker the neckline, and too long will leave it gapping.
  • Overlapping the ribbing endsDouble-check that the overlap happens exactly at the center front point and that both ribbing ends angle symmetrically before you insert the needle and knot to secure.
  • Sewing the ribbing on with unevenKeep your tapestry needle stitches consistent in size and pull the yarn through with even pressure — pin the ribbing in place every few inches before sewing for a smoother, flatter finish.
  • Skipping stitch markersPlace a stitch marker at the center V-point before starting the decrease rows so you always know exactly where each decrease should land relative to the point.
  • Mismatching armhole shapingWork both armhole decrease sections side by side or note your row and stitch count carefully so both sides mirror each other exactly before seaming.
  • Leaving yarn tails unwoven untilWeave in ends as you complete each ribbing section (neckline, armholes, waist) rather than waiting until final assembly — it keeps your finishing step fast and tangle-free.

The pattern

Written out round by round

Materials

  • Double-knit weight yarn
  • 4.5 mm crochet hook
  • Scissors
  • Tapestry needle

Abbreviations

  • ch = chain
  • st = stitch
  • hdc = half double crochet
  • inc = increase
  • dec = decrease

Back Panel

Starting Chain : Make a slip knot and chain 30.

  1. Row 1(Half Double Crochet): Yarn over, insert hook into the second stitch from the hook, pull through (3 loops on hook), yarn over, and pull through all three loops.Continue half double crocheting until the end of the row.
  2. Row 2(Half Double Crochet): Chain one, turn your work, and continue doing half double crochets.

Rows 3-10 (Increases on One Side)

Chain one, turn your work.

Half double crochet until one stitch is left.

In the last stitch, make two half double crochets (this creates an increase).

For Row 4, start with an increase (two half double crochets in the first stitch) and continue with normal half double crochets.

Repeat this pattern (half double crochets with increases on one side) for rows 5-10.

Strap Formation (Row 11) : Chain one, half double crochet to the end of the row.

Strap Extension (Row 12) : Chain 30.

  1. Rows 12-16(Normal Half Double Crochet): Continue doing normal half double crochets with no increases.

Neckline Shaping (Decreases)

  1. Row 17Half double crochet until two stitches are left at the end. Decrease: Yarn over, insert hook into the first stitch, pull through; yarn over, insert hook into the second stitch, pull through; yarn over, pull through all loops on the hook.
  2. Row 18Chain one, turn your work, and start with a decrease. Continue with half double crochets for the rest of the row.Rows 19-27: Keep doing decreases on one side and half double crochets for the rest of the row.
  3. Rows 28-31(Normal Half Double Crochet): Do half double crochets with no decreases.

Neckline Shaping (Increases)

  1. Row 32Chain one, turn your work, and make an increase on the neckline side (two half double crochets into the same stitch). Continue with half double crochets.Rows 33-42: Keep doing half double crochets with increases on the neckline side.
  2. Rows 44-48(Normal Half Double Crochet): Do half double crochets.

Back Panel: Armhole Shaping (Decrease)

  1. Row 49Half double crochet for 40 stitches to match the other side.
  2. Row 50Chain one, turn your work, and do a decrease. Continue with normal half double crochets.Rows 51-57: Keep doing half double crochets and decreases on the neckline side.
  3. Rows 58-59(Normal Half Double Crochet): Do half double crochets with no decreases or increases.Finish: Fasten off your yarn.

Front Panel

Rows 1-16 : Follow the same pattern as the back panel.

  1. Row 17(V-neck Start): Half double crochet until 15 chains are left at the top.

Rows 18-29 (V-neck Decreases)

  1. Row 18Chain one, do two decreases on the side where your hook is. Continue with half double crochets.
  2. Row 19Chain one, half double crochet until four stitches are left. Do two decreases.
  3. Row 20Chain one, turn your work, and do another decrease (neckline side). Continue with half double crochets.Keep doing half double crochets and decreases on the neckline side until row 29.
  4. Row 30(Normal Half Double Crochet): Chain one, do normal half double crochet.

Rows 31-42 (V-neck Increases)

  1. Row 31Chain one, turn your work, and continue half double crocheting until a few stitches are left.In the last stitch, do an increase (two half double crochets).
  2. Row 32Turn your work, do an increase in the first stitch. Continue with normal half double crochets.Keep doing half double crochets with two increases on the neckline side until row 42.Strap Formation (Row 43): Half double crochet to the end, then chain 15 to match the height of the other strap.
  3. Rows 44-48(Normal Half Double Crochet): Do normal half double crochets.

Front Panel: Armhole Shaping (Decrease)

  1. Row 49Half double crochet for 40 stitches to match the other side.
  2. Rows 50-57Half double crochet with decreases on the neckline side.
  3. Rows 57-58(Normal Half Double Crochet): Do normal half double crochets. Finish: Fasten off your yarn.

Edges (Ribbing)

Starting Chain : Make a slip knot and chain eight.

  1. Row 1Half double crochet.
  2. Row 2Chain one, turn your work, and do half double crochets in the front loop only. Repeat: Continue this pattern until you reach the desired length for each edge.Neckline: 7 stitches wide Waist: 11 stitches wide Arms: 4 stitches wide Finish: Yarn over, pull through, cut your yarn, and fasten off.

Assembly

Step 1

Stitch Panels : Use a tapestry needle and yarn to stitch together the front and back panels along the straps and sides.

Step 2

Start at the very corner of the first strap and the very corner of the second, pull yarn through, and secure with a knot.

Step 3

Stitch one stitch from one side and another stitch from the other, continuing until the strap is sewn.

Step 4

Sew the sides in the same manner.

Step 5

Attach Neckline Ribbing : Measure the ribbing around the neckline to ensure the correct length.

Step 6

Overlap the ends of the ribbing to create a V-shape.

Step 7

Insert your needle through the middle of the ribbing and tie a knot to secure.

Step 8

Sew the ribbing to the vest by putting the needle through the corner of the ribbing and then through a stitch on the vest, pulling through.

Step 9

Continue sewing around until you reach the overlapping flaps.

Step 10

Sew the flaps together, ensuring they overlap to form the V-neck.

Step 11

Attach Arm and Waist Ribbing : Sew the arm and waist ribbing in the same way.

Step 12

Finishing : Fasten off all yarn ends.

Important notes

💡 Before sewing the ribbing, dry-fit it around the neckline and pin the overlap point first so you can visually confirm the V-shape before committing to stitches.

💡 Work the front and back panels holding your row counts side-by-side so the armhole shaping decreases align perfectly when you seam the shoulders together.

💡 When sewing ribbing to the vest body, work through the corner stitch of the ribbing and a corresponding stitch on the vest edge — this keeps the seam smooth without stretching either piece.

💡 Try on the vest (or check it against a similar garment) after completing the front and back panels but before final ribbing, so you can easily adjust strap length while it's still easy to modify.

💡 Save a small amount of your main yarn color to close up any gaps at the shoulder seams or underarms during the finishing step — a tidy fasten-off makes a big visual difference.

More photos

Stylish Crochet V-Neck Sweater Vest Pattern for Summer — photo 2
Stylish Crochet V-Neck Sweater Vest Pattern for Summer — photo 3
FAQs

Frequently asked questions

What yarn weight and hook size does this vest use?

This pattern uses double-knit (DK) weight yarn paired with a 4.5 mm crochet hook. Keeping consistent tension with this hook size ensures your ribbing and panels match up properly during assembly.

Can I adjust the vest to fit a different body size?

Yes — you can customize the fit by lengthening or shortening the straps and ribbing sections, and adjusting panel length before the armhole shaping begins. Just be sure to keep any changes symmetrical between the front and back panels.

How do I get a crisp V-shape at the neckline?

The V comes from overlapping the ribbing ends at center front, tying them securely, and sewing the flaps together so they overlap evenly. Pinning the overlap in place before sewing helps keep the point sharp and centered.

Is this pattern good for a beginner?

This vest is best suited for intermediate crocheters who are comfortable with shaping techniques like increases, decreases, and seaming ribbing onto a finished panel. If you've completed a few shaped garments before, you'll be well prepared for this one.

What's the best yarn substitute if I don't have DK weight?

Any DK-weight cotton, cotton blend, or lightweight wool blend will work well as a substitute, since it keeps the fabric breathable and drapey for summer wear. Just be sure to check your gauge with the 4.5 mm hook before starting the panels.

One at a time —

Get the next pattern

Tested round by round before it is sent. No spam.