Made and counted by Wren —

Cozy Crochet Slippers: A Simple & Free Pattern

Learn to make cozy crochet slippers with this simple free pattern using double crochet stitches, a shaped opening, and an easy woven tie for a snug fit.

IntermediateLevel
4-6 HoursTime
WorstedYarn
Jump to the pattern

At a glance

Start with a small chained ring and work double crochet stitches into it to form the base of the sole.

Increase evenly around the next couple of rounds so the circle grows into a foot-sized oval shape.

Continue shaping the opening with a further increase round to widen the area where your foot will slide in.

Work plain double crochet rows back and forth, turning at the end of each one, to build up the slipper's height.

Keep repeating these turned rows until the piece reaches the full length needed for the slipper opening.

Seam the back edges together to close the heel and give the slipper its finished, wearable shape.

Weave a length of yarn through the top opening as a tie to snug the fit and add a finishing touch.

About this pattern

These cozy crochet slippers start life as a simple double crochet circle and grow, round by round, into a warm, foot-hugging shape you'll want to wear the moment you finish weaving in the last end. What makes this pattern special is how approachable it is — no fussy amigurumi shaping or intarsia color work, just satisfying rounds of double crochet that build a sturdy sole and snug upper. It's perfect for anyone who wants a quick, cozy handmade item that actually gets used every single day, not just displayed on a shelf.

The finished slippers come out plush, substantial, and cozy — with a rounded toe, a snug shaped opening, and a neat seamed back that gives them real structure instead of a floppy, shapeless feel. They're the kind of handmade gift that gets pulled out of the closet every cold morning, which makes them a wonderful housewarming present, holiday stocking stuffer, or simple treat-yourself project for chilly floors ahead.
Common mistakes

  • Working the increase round unevenlyUse a stitch marker at the start of the round and count your stitches as you go — you should end with exactly double the stitch count you started with, so pause and recount if the numbers feel off.
  • Forgetting that the beginning chain 2Always work your first double crochet directly into the same stitch as the base of the chain 2, not into the next stitch over, or your stitch count will drift and the round won't close evenly.
  • Losing track of the slip stitch joinAlways slip stitch into the very first double crochet of the round (not the chain 2) before starting the next round's chain, and mark that first stitch with a stitch marker so it's easy to find.
  • Not turning the work at the endRemember that once you reach the turning section, every row ends with a turn — get in the habit of physically flipping your work each time so your double crochets stay even on both sides.
  • Miscounting rows during the longUse a row counter or make a small tally mark on paper after every row, and always count both slippers' rows side by side before moving on to seaming the back.
  • Seaming the back too tightlyPin the back seam in place first and try the slipper on (or measure against your foot) before sewing, adjusting the seam line until the heel sits snugly and comfortably.

The pattern

Written out round by round

Materials

  • Worsted weight yarn
  • Crochet hook (size to suit your yarn)
  • A darker or contrasting color yarn (for the woven tie and final edging)
  • Sewing needle (optional, for seaming the back)
  • Scissors

Abbreviations

  • ch = chain
  • st = stitch
  • sl st = slip stitch
  • sc = single crochet
  • dc = double crochet

Forming a Circle

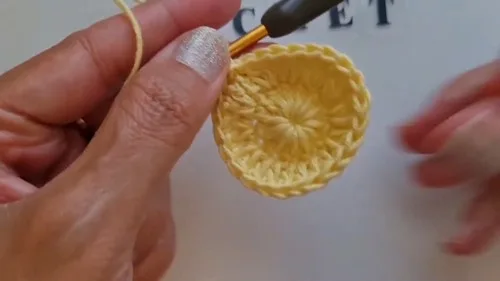
  1. Foundation ChainMake a slip knot and chain 4 stitches.Join the last chain to the first chain with a slip stitch to form a circle.
  2. Row 1(Increasing): Chain 2 (these do not count as a stitch). Work 12 double crochet stitches into the circle.Close the row with a slip stitch into the first double crochet.
  3. Row 2(Increasing): Chain 2 (these do not count as a stitch). Work 2 double crochet stitches into each stitch from the previous row to create an increase in every stitch.Close the row with a slip stitch into the first double crochet.
  4. Row 3(Increasing): Chain 2 (these do not count as a stitch). The increase pattern for this row is: 1 double crochet in the first stitch. 2 double crochet in the next stitch. Repeat this pattern around (1 double crochet, 2 double crochet, etc.).Close the row with a slip stitch into the first double crochet.

Body of the Slipper (No Increase):

  1. Rows 4-9(No Increase): Chain 2 (these do not count as a stitch). Work 1 double crochet into each stitch from the previous row (no increasing).Repeat this for a total of 6 rows (Row 4 through Row 9).

Shaping the Slipper Opening

  1. Row 10(Partial Row): Chain 2 (these do not count as a stitch). Work double crochet stitches into each stitch, but leave the last 10 stitches unworked.

Turning and Continuing Rows

Chain 2 (these do not count as a stitch).

Turn your work.

Work 1 double crochet into each stitch across the row.

Continue working rows in this manner (1 double crochet in each stitch, turning at the end of each row) until you have a total of 14 rows from where you started the partial rows.

Seaming the Back

Fold the slipper with the wrong side out.

Join the back edges together using a slip stitch through the front loop of one side and the back loop of the other side.

Alternatively, you can use a sewing needle to seam the back.

Edging with Single Crochet : Turn the slipper right side out.

Work single crochet stitches around the entire opening of the slipper.

Edging with Double Crochet and Single Crochet : Work double crochet stitches along the sides of the slipper opening.

When you reach the front 10 stitches (the unworked section from Row 10), work single crochet stitches over them.

Continue with double crochet stitches on the other side.

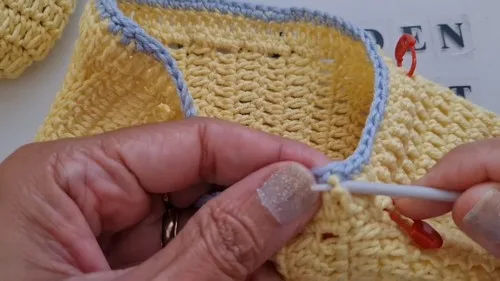
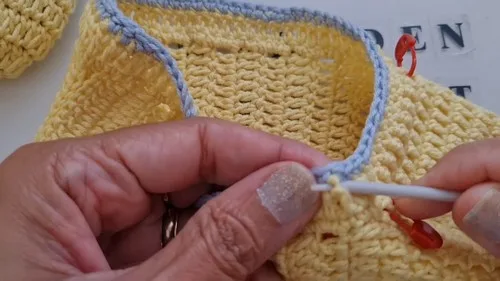
Final Edging with Different Color (Single Crochet) : Attach a different color yarn.

Work single crochet stitches around the entire edge of the slipper.

Weaving the Tie

  1. Creating the TieUsing the darker or different colored yarn, chain 150 stitches.Thread the chain through the double crochet stitches around the opening of the slipper, specifically under the single crochet edging.Skip two stitches between the ends of the tie at the front.Tie the ends of the tie securely and trim any excess yarn.Tie the tie into a bow if desired.

Important notes

💡 Use a hook one size smaller than you'd normally choose for your worsted weight yarn — a tighter gauge here helps the sole hold its shape and keeps the slippers from stretching out of shape underfoot.

💡 Place a stitch marker in the very first double crochet of each round while you're working the circle rounds so you never lose track of where to slip stitch join.

💡 Keep a small notebook or your phone's notes app open to tally your rows during the long turning section, since it's easy to lose count around row 8 or 9.

💡 Block your finished slipper pieces lightly before seaming the back — a quick steam or damp-cloth press helps the double crochet rounds lie flat and makes seaming much neater.

💡 Choose a smooth, sturdy yarn (not too fuzzy) for weaving the tie at the end, since fuzzy yarns can be hard to thread cleanly through your stitches and may fray with wear.

More photos

Cozy Crochet Slippers: A Simple & Free Pattern — photo 2
Cozy Crochet Slippers: A Simple & Free Pattern — photo 3
FAQs

Frequently asked questions

What yarn weight works best for these crochet slippers?

A worsted weight (medium, category 4) yarn works beautifully for this pattern, giving the slippers enough thickness to feel cozy and supportive underfoot. Choose a yarn with some durability, like a wool-blend or acrylic-wool mix, since slippers see a lot of wear and washing.

How do I know how many turned rows to work for my foot size?

The pattern's default is 14 total rows from where the flat rows begin, which suits an average adult foot, but you can try the piece on periodically and stop once it reaches from your heel to just before your toes. Adjust up or down a row or two depending on your foot length.

Can I make these slippers without any seaming?

This pattern does include a seaming step to close the back and shape the heel, which is what gives the slippers their structure and snug fit. If you'd rather avoid seaming, you could experiment with slip stitching the back closed instead of sewing, though a sewn seam typically gives a cleaner, more durable finish.

What's the purpose of the woven tie at the end?

The woven tie is a decorative and functional finishing touch that can be threaded around the slipper opening and tied to snug the fit around your ankle or instep. It also adds a lovely handmade detail that makes the slippers look extra polished.

One at a time —

Get the next pattern

Tested round by round before it is sent. No spam.