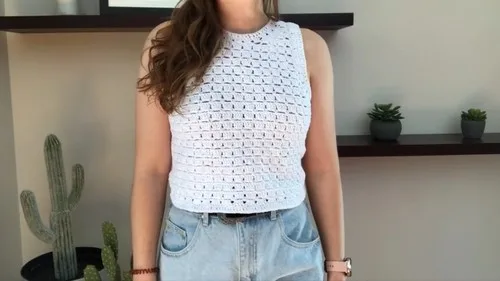
Made and counted by Wren —

Chic Cotton Crochet Vest Pattern for Summer Fashion

Make a chic cotton crochet vest with customizable armholes and neckline shaping. A breezy, beginner-friendly summer wearable pattern in 8 ply cotton.

Chic Cotton Crochet Vest Pattern for Summer Fashion
IntermediateLevel
4-6 HoursTime
3.5 mmHook
WorstedYarn
Jump to the pattern

At a glance

Chain a multiple of four to fit your size, then work straight double crochet rows to build the base fabric.

Continue for about 10 rows until the panel reaches the desired length before the underarms.

Slip stitch across the first few stitches at each side to begin shaping the armhole openings.

Leave a small gap of unworked stitches at the end of the row to open up the armhole space.

Turn your work and begin a slanted stitch sequence that gradually tapers the armhole edge.

Repeat the slanting rows several times until each armhole reaches your desired depth.

Shape the neckline using the same slant-and-decrease technique, working it only on the front panel's opening.

Complete both nearly identical panels, then assemble them together to finish the wearable vest.

About this pattern

This chic cotton crochet vest is the ultimate warm-weather layering piece, built from two nearly identical panels that come together into a breezy, stylish top. What makes it special is how customizable it is — the starting chain of 88 (or your own multiple of four) means you can tailor the fit to your exact measurements, whether you're crafting for yourself, a friend, or as a thoughtful handmade gift. It's perfect for anyone who wants a wardrobe staple that feels personal and polished.

The techniques here center around straightforward double crochet rows, but the real charm comes in the shaping: slip stitches to form armholes, a slanting sequence of slip stitch, single crochet, half double crochet, and double crochet to taper the sides, and a slanty decrease row to shape the neckline. This is a great project for intermediate crocheters ready to practice shaping techniques, and it typically takes a focused weekend — around 4 to 6 hours — from slip knot to finished vest.

The finished vest has a relaxed, open-front silhouette with softly slanted armholes and a shaped neckline that drapes beautifully in lightweight 8 ply cotton. It feels airy and cool against the skin, making it ideal for layering over tanks or dresses all summer long. Sized to your own measurements, it's a genuinely giftable piece — one that feels tailor-made because it is.
Variations

I love how this vest turns a simple chain of double crochet rows into something with real shape and personality. There's something so satisfying about working those first 10 straight double crochet rows and then suddenly transitioning into armhole shaping — slip stitching into the top of the first three stitches feels like the moment the piece finally starts looking like a garment instead of a rectangle. The slanting rows are my favorite part: watching the slip stitch, single crochet, half double crochet, double crochet sequence build a soft diagonal edge is genuinely mesmerizing, and repeating it for 4-5 rows creates such a clean, professional-looking armhole. Then the neckline shaping with its own slanty decrease row mirrors that same technique, so once you've learned it for the armholes, the neckline feels intuitive. Because the front and back panels are nearly identical except for the neckline, you get to practice the shaping twice, which really cements the technique. It's the kind of project where you can feel your skills leveling up row by row, and the payoff — a wearable, breathable summer piece — makes every slant stitch worth it.

Common mistakes

  • Starting chain isn't a multipleBefore you begin, count your foundation chain carefully and confirm it divides evenly by four — adjust up or down by increments of 4 if you're customizing your size.
  • Losing track of stitch countPlace a stitch marker at the beginning of each row and count your double crochets before turning; this makes it much easier to catch mistakes early rather than after the armholes are shaped.
  • Slip stitching too many or too fewSlip stitch into exactly the top of the first three double crochets, no more, and double-check by counting stitches before continuing across the row so your armhole depth stays consistent between panels.
  • Confusing the order of stitches inWork slowly through the first slant row and say each stitch aloud as you make it; once the sequence feels automatic, the following slant rows will go much faster and more accurately.
  • Forgetting to leave the last groupCount backward from the end of your row before you start the armhole shaping so you know exactly where the empty gap should fall, and leave it unworked as instructed.
  • Front and back panels ending upSince the panels are nearly identical, work them side by side or refer back to your first panel's row-by-row notes when shaping the second, adjusting only the neckline steps.

The pattern

Written out round by round

Materials

  • 8 ply cotton yarn
  • 3.5 mm hook

Abbreviations

  • ch = chain
  • st = stitch
  • sl st = slip stitch
  • sc = single crochet
  • hdc = half double crochet
  • dc = double crochet
  • dec = decrease

Creating the Panels

Front & Back Panels These are nearly identical, with only the neckline differing.

Slip Knot Begin with a slip knot and insert your hook.

Foundation Chain Chain 88 for a small size. Adjust based on your size, ensuring it's divisible by four. Measure around your waist or against an existing top.

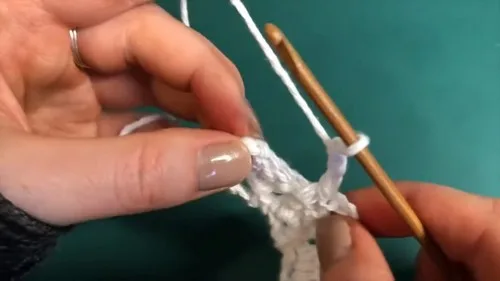
  1. Round 1Insert hook into the second stitch from the hook and do a slip stitch. Chain 3, then single crochet around the chain row. You should have 22 gaps for a small size.
  2. Round 2Chain 3 and turn. Add 3 double crochets into the first gap, then 4 double crochets into each remaining gap.
  3. Round 3Chain 1, turn. Chain 3, and then single crochet through the gaps between double crochets.Repeating Rows: Alternate between rows of chains and single crochets, and rows of double crochets. Repeat until you have 10 double crochet rows.
  4. Creating ArmholesAfter 10 double crochet rows, create armholes by doing slip stitches into the top of the first three double crochets. Continue as usual, leaving the last group of four double crochets empty.
  5. Slanting RowsTurn work and create a slant using a slip stitch, single crochet, half double crochet, and double crochet. Continue with 4 double crochets in each gap, ending with the slant stitches. Repeat this pattern for 4-5 slanty rows until armhole is the desired size.
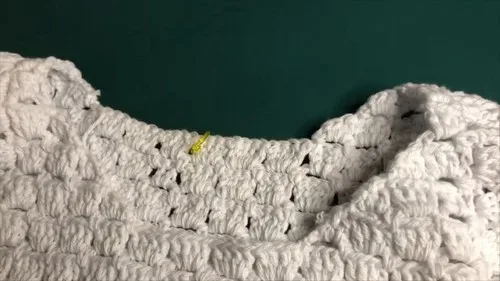
  6. Neckline ShapingAfter the armhole, do the first 4 stitches, then start the slanty decrease row. Continue with slanty rows to shape the neckline. Repeat the pattern until the neckline is shaped, and create the other side in reverse.
  7. Back PanelRepeat the steps for the front panel, but without the neckline. Make seven double crochet rows above the armpit.

Assembly

Step 1

Stitch the front and back panels together at the shoulders and sides.

Step 2

Start at the underarm, chain 1, then do 3 chains and 1 single crochet around the armhole. Do 3 double crochets in each gap next to a slanty stitch, then 4 double crochets in the remaining gaps.

Step 3

For the next row, do double crochets into each stitch, skipping the first one. Stitch two together to create an angle for the armpit.

Step 4

Start at the back, chain 1, then do 3 chains and 1 single crochet around the neck. Do 3 double crochets into each gap, then 2 double crochets and stitch two together around.

Step 5

Chain up 3 and do 4 double crochets into each gap around. Then, do 1 double crochet into every stitch around.

Step 6

Sew a button onto the back of the neck if needed.

Important notes

💡 Use a smooth 8 ply cotton yarn — cotton has less stretch than wool blends, so your stitch counts and armhole shaping will hold their shape beautifully once blocked.

💡 A 3.5 mm hook keeps double crochet stitches snug and even; if your tension runs loose, size down slightly to keep the fabric from feeling too open for a fitted vest.

💡 Place a stitch marker at the start of your armhole shaping row so you can easily find your place again if you set the project down mid-row.

💡 When adjusting your starting chain for a custom size, measure around your waist or bust and compare to an existing well-fitting top rather than relying on chain count alone.

💡 Keep a written or photo record of your row counts on the first panel — it makes matching the second panel's armhole and body length dramatically faster and more accurate.

💡 Block your finished panels with a light steam or wet-block before seaming; cotton responds beautifully to blocking and it will even out any uneven tension in your slant rows.

More photos

Chic Cotton Crochet Vest Pattern for Summer Fashion — photo 2
Chic Cotton Crochet Vest Pattern for Summer Fashion — photo 3
FAQs

Frequently asked questions

How do I know what size chain to start with?

Measure around your waist or bust, or compare against a well-fitting existing top, then chain to that measurement in multiples of four. The pattern's small size uses a chain of 88, so scale up or down proportionally from there.

Are the front and back panels really that similar?

Yes, the two panels are worked almost identically, with the only real difference being the neckline shaping. This makes the second panel much faster to work since you'll already be familiar with the armhole and slant techniques.

What's the trickiest part of this pattern for beginners?

The slanting rows tend to be the biggest learning curve since they combine four different stitch heights — slip stitch, single crochet, half double crochet, and double crochet — in one row. Practicing the sequence slowly on the first repeat makes the following rows much easier.

How many slanted rows will I need for the armholes?

The pattern generally calls for repeating the slant sequence for 4-5 rows, but the exact number depends on how deep you want your armhole to be. Try the vest on periodically or measure against a favorite top to check the depth.

One at a time —

Get the next pattern

Tested round by round before it is sent. No spam.