Made and counted by Wren —

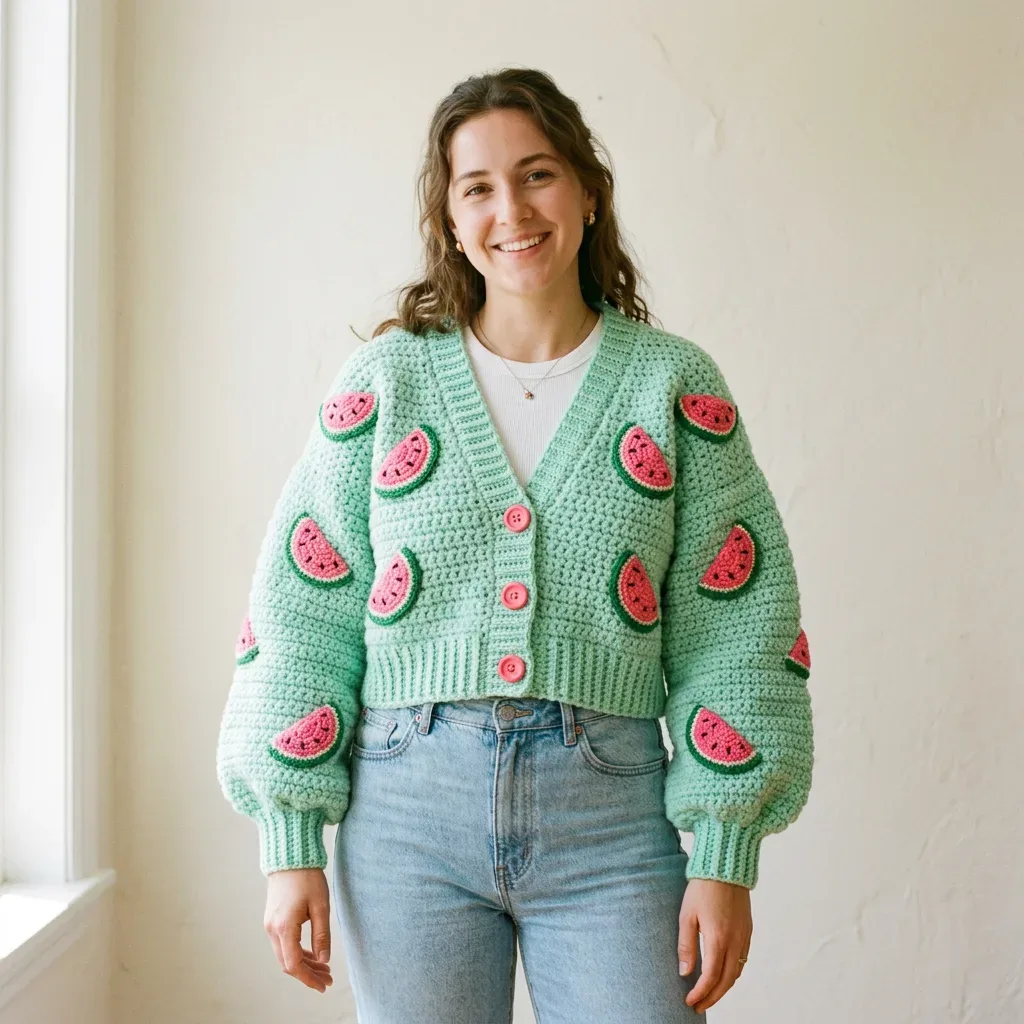
Cropped hdc cardigan with watermelon appliques and balloon sleeves

Size K-10.5 hook, bulky yarn: cropped hdc cardigan with watermelon appliques and balloon sleeves.

Cropped hdc cardigan with watermelon appliques and balloon sleeves
IntermediateLevel
40-60 hoursTime
6.5 mmHook
Bulky (5)Yarn
Jump to the pattern

About this pattern

This cropped cardigan works up in mint green hdc across three flat panels—two fronts, one back—seamed together, with balloon sleeves and ribbed cuffs set in afterward. Fourteen to eighteen crocheted watermelon appliques get whipstitched on post-blocking. Finished bust is 48 inches / 122 cm, length 18 inches / 46 cm. Rated intermediate; expect 40 to 60 hours total.

A boxy, cropped cardigan worked flat in three panels—two fronts and one back—then seamed at shoulders and sides, with balloon sleeves set into the armholes afterward. Mint green hdc body carries 14 to 18 crocheted watermelon slice appliques, whipstitched on after blocking. Finished bust measures 48 inches / 122 cm and length hem to shoulder sits at 18 inches / 46 cm, for a cropped, oversized fit. Plan for approximately 40 to 60 hours of crochet time, not including blocking, plus another 6 to 10 hours for the watermelon appliques.

Skill level: intermediate. You should feel comfortable working flat panels, seaming pieces together, picking up stitches for ribbing, reading shaping instructions, and constructing a set-in sleeve. Confident beginners can tackle it with patience, since the stitches themselves are basic — it's the assembly that requires attention.

Sleeve length (cuff to underarm): 19 inches / 48 cm. Upper arm circumference: 18 inches / 46 cm. This pattern is written for one size with a relaxed, oversized fit suitable for sizes Small through Large depending on ease preference.

The pattern

Written out round by round

Materials

  • Main Color (MC): Mint Green, bulky weight (weight 5), approximately 1200 yards / 1097 meters
  • Contrast Color A (CA): Hot Pink or Coral, bulky weight (weight 5), approximately 80 yards / 73 meters for appliques
  • Contrast Color B (CB): Dark Green, bulky weight (weight 5), approximately 40 yards / 37 meters for applique rind
  • Contrast Color C (CC): Black, any weight scrap yarn, for embroidered seeds on appliques
  • Lion Brand Pound of Love in Mint and Coral works beautifully. It's widely available, machine washable, very soft against skin, and holds stitch definition well.
  • Paintbox Yarns Simply Chunky in Spearmint and Bubblegum offers excellent stitch clarity and a smooth finish. It’s affordable and easy to source online.
  • WeCrochet Brava Bulky in Aloe and Coral is extremely consistent in weight, easy to frog if needed, and fully machine washable.
  • When substituting yarn, choose any bulky weight (weight 5) yarn that gets approximately 12 to 13 hdc over 4 inches on a size K hook. Avoid fuzzy or bouclé yarns since they’ll obscure those cute applique details.
  • US Size K-10.5 (6.5 mm) for main body
  • US Size J-10 (6.0 mm) for ribbing and appliques
  • Yarn needle for seaming and weaving ends
  • 3 pink buttons, approximately 1 inch / 25 mm diameter
  • Stitch markers
  • Measuring tape
  • Scissors
  • Pins for blocking and seaming

Abbreviations

  • blo = back loop only (insert your hook under only the back loop of the stitch instead of both loops)
  • ch = chain (wrap yarn over hook and pull through loop on hook)
  • ch-sp = chain space (the gap created by a chain in the previous row)
  • dc = double crochet (yarn over, insert hook, pull up loop, yarn over and pull through 2 loops twice)
  • hdc = half double crochet (yarn over, insert hook, pull up loop, yarn over and pull through all 3 loops at once)
  • hdc2tog = half double crochet two together, which is a decrease stitch
  • inc = increase (work 2 stitches into the same stitch)
  • pm = place marker
  • rep = repeat
  • RS = right side (the side that faces outward when worn)
  • sc = single crochet (insert hook, pull up loop, yarn over and pull through both loops)
  • sk = skip
  • sl st = slip stitch (insert hook, yarn over and pull through stitch and loop on hook in one motion)
  • st(s) = stitch(es)
  • t-ch = turning chain
  • WS = wrong side
  • yo = yarn over

Hem Ribbing (Back)

With MC and size J-10 hook, chain 9.

Ribbing Row special stitch: all single crochet stitches in the ribbing sections are worked in the back loop only (blo). This creates the stretchy, knit-like rib texture used in the cuffs, hem, and button band. Turn with chain 1 at the start of every ribbing row; that chain 1 does not count as a stitch.

Round 1(RS): Sc in 2nd ch from hook and in each ch across. Turn. (8 sc)
Round 2through 58: Ch 1, sc in blo of each st across. Turn. (8 sc) At the end of Row 58, do not fasten off. Rotate your work 90 degrees to work along the long edge of the ribbing strip.

Body (Back)

Change to size K-10.5 hook.

Round 1(RS): Ch 2, work 1 hdc into each row-end edge across the ribbing strip. Work into approximately every other row-end edge to achieve 58 hdc evenly across. Turn. (58 hdc)
Round 2through 22: Ch 2, hdc in each st across. Turn. (58 hdc) Checkpoint: After Row 22, the back panel above the ribbing should measure approximately 10 inches / 25.5 cm tall.

Body (Left Front)

Change to size K-10.5 hook.

Round 1(RS): Ch 2, work 28 hdc evenly along long edge of ribbing. Turn. (28 hdc)
Round 2through 14: Ch 2, hdc in each st across. Turn. (28 hdc)

Cuff Ribbing

With MC and size J-10 hook, chain 9.

Round 1Sc in 2nd ch from hook and in each ch across. Turn. (8 sc)
Round 2through 24: Ch 1, sc in blo of each st across. Turn. (8 sc) Rotate 90 degrees.

Sleeve Body

Change to size K-10.5 hook.

Round 1(RS): Ch 2, work 24 hdc evenly along long edge of cuff ribbing. Turn. (24 hdc)
Round 2Ch 2, hdc in each st across. Turn. (24 hdc)
Round 3Increase row Ch 2, 2 hdc in first st, hdc in each st across to last st, 2 hdc in last st. Turn. (26 hdc)
Round 4and 5: Ch 2, hdc in each st across. Turn. (26 hdc)
Round 6Increase row Ch 2, 2 hdc in first st, hdc in each st across to last st, 2 hdc in last st. Turn. (28 hdc)
Round 7and 8: Ch 2, hdc in each st across. Turn. (28 hdc) Continue this pattern of increasing every 3rd row:
Round 9Increase to 30 hdc
Round 12Increase to 32 hdc
Round 15Increase to 34 hdc
Round 18Increase to 36 hdc
Round 21Increase to 38 hdc
Round 24Increase to 40 hdc
Round 27Increase to 42 hdc
Round 28through 33: Ch 2, hdc in each st across. Turn. (42 hdc)

Button Band and Buttonhole Band

The bands are worked as one continuous strip picked up along both front edges and around the V-neck.

With MC and size J-10 hook, right side facing, begin at the lower right front edge.

Pickup Row: Work 1 sc per row-end of body rows, and 1 sc per 2 rows of ribbing rows. Continue around the V-neckline, work approximately 20 sc evenly across the back neck, then continue down the left front edge.

Approximate pickup: 36 sc up right front, 24 sc up right V-neck, 20 sc across back neck, 24 sc down left V-neck, 36 sc down left front. Total approximately 140 sc.

Round 1Ch 1, sc in blo of each st across. Turn. (140 sc)
Round 2Buttonhole row Ch 1, work in sc blo across. When you reach each of the 3 marked button positions on the right front (at approximately 2, 7, and 12 inches from the lower edge), ch 2 and skip 2 sts. Continue to end. Turn.
Round 3Ch 1, sc in blo of each st across. When you reach each ch-2 space, work 2 sc into the space. Turn. (140 sc)
Round 4Ch 1, sc in blo of each st across. Turn. (140 sc) Fasten off and weave in ends.

Watermelon Slice Appliques (Make 14 to 18)

With CA (hot pink) and size J-10 hook: Foundation: Ch 2.

Round 1Work 3 sc in 2nd ch from hook. Turn. (3 sc)
Round 2Ch 1, 2 sc in first st, sc in next st, 2 sc in last st. Turn. (5 sc)
Round 3Ch 1, 2 sc in first st, sc in each st across to last st, 2 sc in last st. Turn. (7 sc)
Round 4Ch 1, 2 sc in first st, sc in each st across to last st, 2 sc in last st. Turn. (9 sc)
Round 5Ch 1, 2 sc in first st, sc in each st across to last st, 2 sc in last st. Turn. (11 sc)
Round 6Ch 1, sc in each st across. Turn. (11 sc) Do not fasten off.

Rind Border

Change to CB (dark green).

Round 1Ch 1, do not turn. Work sc around the entire perimeter: approximately 2 sc across the bottom point, 6 sc up the right side, 11 sc across the top edge, 6 sc down the left side, 2 sc across the bottom. Sl st to first sc to join. (Approximately 27 sc)
Round 2Ch 1, sc in each sc around. Sl st to join. Fasten off, leaving a 10 inch / 25.5 cm tail for sewing.

V-Neck and Armhole Shaping (Left Front)

Round 15(RS): Ch 2, hdc in each st across to last 2 sts, hdc2tog. Turn. (27 hdc)
Round 16and 17: Ch 2, hdc in each st across. Turn. (27 hdc)
Round 18Ch 2, hdc in each st across to last 2 sts, hdc2tog. Turn. (26 hdc)
Round 19and 20: Ch 2, hdc in each st across. Turn. (26 hdc)
Round 21Ch 2, hdc in each st across to last 2 sts, hdc2tog. Turn. (25 hdc)
Round 22Ch 2, hdc in each st across. Turn. (25 hdc)
Round 23(RS): Sl st across first 4 sts, ch 2, hdc in each st across to last 2 sts, hdc2tog. Turn. (19 hdc)
Round 24Ch 2, hdc2tog, hdc in each st across. Turn. (18 hdc)
Round 25Ch 2, hdc2tog, hdc in each st across to last 2 sts, hdc2tog. Turn. (16 hdc)
Round 26Ch 2, hdc2tog, hdc in each st across. Turn. (15 hdc)
Round 27Ch 2, hdc in each st across to last 2 sts, hdc2tog. Turn. (14 hdc)
Round 28Ch 2, hdc in each st across. Turn. (14 hdc)
Round 29Ch 2, hdc in each st across to last 2 sts, hdc2tog. Turn. (13 hdc)
Round 30Ch 2, hdc in each st across. Turn. (13 hdc)
Round 31Ch 2, hdc in each st across to last 2 sts, hdc2tog. Turn. (12 hdc)
Round 32through 36: Ch 2, hdc in each st across. Turn. (12 hdc) Fasten off and weave in ends.

V-Neck and Armhole Shaping (Right Front)

Round 15(RS): Ch 2, hdc2tog, hdc in each st across. Turn. (27 hdc)
Round 16and 17: Ch 2, hdc in each st across. Turn. (27 hdc)
Round 18Ch 2, hdc2tog, hdc in each st across. Turn. (26 hdc)
Round 19and 20: Ch 2, hdc in each st across. Turn. (26 hdc)
Round 21Ch 2, hdc2tog, hdc in each st across. Turn. (25 hdc)
Round 22Ch 2, hdc in each st across. Turn. (25 hdc)
Round 23(RS): Ch 2, hdc2tog, hdc in each st across to last 4 sts, leave last 4 sts unworked. Turn. (19 hdc)
Round 24Ch 2, hdc in each st across to last 2 sts, hdc2tog. Turn. (18 hdc)
Round 25Ch 2, hdc2tog, hdc in each st across to last 2 sts, hdc2tog. Turn. (16 hdc)
Round 26Ch 2, hdc in each st across to last 2 sts, hdc2tog. Turn. (15 hdc)
Round 27Ch 2, hdc2tog, hdc in each st across. Turn. (14 hdc)
Round 28Ch 2, hdc in each st across. Turn. (14 hdc)
Round 29Ch 2, hdc2tog, hdc in each st across. Turn. (13 hdc)
Round 30Ch 2, hdc in each st across. Turn. (13 hdc)
Round 31Ch 2, hdc2tog, hdc in each st across. Turn. (12 hdc)
Round 32through 36: Ch 2, hdc in each st across. Turn. (12 hdc) Fasten off and weave in ends.

Armhole Shaping

Round 23(RS): Sl st across first 4 sts, ch 2, hdc in each st across to last 4 sts, leave last 4 sts unworked. Turn. (50 hdc)Half Double Crochet Two Together (hdc2tog) — your decrease stitch: yarn over, insert hook into the next stitch, yarn over and pull up a loop (3 loops on hook); without finishing that stitch, yarn over again, insert hook into the following stitch, yarn over and pull up a loop (5 loops on hook); yarn over and draw through all 5 loops at once. You've turned two stitches into one.
Round 24Ch 2, hdc2tog, hdc in each st across to last 2 sts, hdc2tog. Turn. (48 hdc)
Round 25Ch 2, hdc2tog, hdc in each st across to last 2 sts, hdc2tog. Turn. (46 hdc)
Round 26Ch 2, hdc2tog, hdc in each st across to last 2 sts, hdc2tog. Turn. (44 hdc)
Round 27through 36: Ch 2, hdc in each st across. Turn. (44 hdc) At end of Row 36, fasten off and weave in ends.Shoulder placement: The outer 12 stitches on each side are the shoulder zones. The center 20 stitches form the back neck. Mark these with stitch markers.

Sleeve Cap Shaping

Round 34Sl st across first 4 sts, ch 2, hdc in each st across to last 4 sts, leave last 4 sts unworked. Turn. (34 hdc)
Round 35through 41: Ch 2, hdc2tog, hdc in each st across to last 2 sts, hdc2tog. Turn. After Row 41, you should have 20 hdc.
Round 42Ch 2, hdc2tog across (10 hdc2tog). Turn. (10 hdc) Fasten off, leaving a 12 inch / 30.5 cm tail for seaming.Fold the sleeve in half lengthwise with right sides together. Seam the underarm from cuff edge to the base of the sleeve cap using mattress stitch. Turn right side out.

Left Front Panel

This is the left front as worn, meaning it will be on the wearer’s left side.

Right Front Panel

This is the right front as worn.

Seaming the Body

Lay your back panel flat with the right side facing up. Place the right front panel (right side up) against the right side of the back panel, matching the shoulder edges (12 stitches each). Whipstitch the shoulder seam using your yarn needle and MC. Repeat for the left shoulder seam.

After the shoulder seams are joined, fold the garment so right sides face together. Use a mattress stitch or whipstitch to join the side seams from the hem up to the base of the armhole (Row 22, approximately 10 inches / 25.5 cm). Leave the armhole open.

Checkpoint: Each armhole opening should measure approximately 8 inches / 20.5 cm vertically from base to shoulder seam.

Setting in Sleeves

Pin the sleeve cap into the armhole opening with right sides together. Match the underarm seam of the sleeve to the side seam of the body. The top of the sleeve cap (Row 42 edge) sits at the shoulder seam. Distribute any ease evenly around the cap. Whipstitch the sleeve cap into the armhole. Repeat for the second sleeve.

Seed Embroidery

Using CC (black) and your yarn needle, embroider 4 to 6 small elongated oval shapes on the pink flesh to represent seeds. Use a straight stitch or satin stitch.

Assembly

Step 1Wet blocking is strongly recommended. Submerge your cardigan in cool water for 20 minutes. Gently press out excess water by rolling in a towel. Do not wring. Lay flat on a blocking mat and pin to finished measurements. Allow to dry completely.
Step 2Once dry, pin the watermelon appliques in place before sewing. Scatter them randomly across both fronts and both sleeves. Some can be angled slightly for a playful look. Whipstitch each applique around its full perimeter using the long tail.
Step 3Sew buttons to the left front band opposite the buttonholes.

Tester's notes

Two hook sizes are in play throughout: J-10 (6.0 mm) for ribbing and appliques, K-10.5 (6.5 mm) for the body and sleeves. Swap at the point the pattern names, not before.

58 hdc across the back panel and 28 hdc across each front panel are the counts to hit before shaping starts; miscounting here throws off seaming later.

14 to 18 watermelon appliques go on after wet blocking, not before—pin placement on both fronts and both sleeves before sewing a single stitch.

3 buttons at approximately 1 inch / 25 mm sit on the front band; confirm buttonholes match that diameter before finishing the band.

Use stitch markers at Row 22 of the back panel and Row 14 of the front panels to flag where measurements should land, since both rely on a height checkpoint rather than a stitch count alone.

Turning chains do not count as stitches anywhere in this pattern: chain 2 at the start of hdc rows is not a stitch — work your first hdc into the first stitch at the base of the chain 2. Chain 1 at the start of sc ribbing rows is also not a stitch. Stitch counts given at the end of each row reflect working stitches only, not the turning chain.

V-neck shaping begins partway through the front panels and is worked by decreasing along the center front edge. Right side faces you on odd-numbered rows when starting from the hem.

At a glance

Rounds74
Parts17
LevelIntermediate
Time40-60 hours
Hook6.5 mm
YarnBulky (5)

Gauge check

MC and size K-10.5 (6.5 mm) hook: 12 hdc x 9 rows = 4 inches / 10 cm, worked flat and blocked. Work a swatch and check this before beginning.

If the back panel doesn't measure approximately 10 inches / 25.5 cm tall after Row 22, rip back and adjust hook size up or down half a size before continuing to the front panels.

Applique gauge (with size J-10 hook): each completed watermelon slice measures approximately 3.5 inches / 9 cm wide at the widest point and 2.5 inches / 6.5 cm tall.

Checking your gauge is critical for garment fit: a difference of even one stitch per 4 inches can change the finished bust measurement by 4 inches or more across the full cardigan. Adjust your hook size up or down as needed.

Stitch-count checkpoints

  • Hem Ribbing (Back) · Round 1: 8 sts
  • Body (Back) · Round 1: 58 sts
  • Body (Left Front) · Round 1: 28 sts
  • Body (Left Front) · Round 2: 28 sts
  • Cuff Ribbing · Round 1: 8 sts
  • Sleeve Body · Round 2: 24 sts

If something looks wrong

The back panel doesn't reach 10 inches
Row gauge is running tighter or looser than 9 rows to 4 inches / 10 cm. Add or subtract full rows in pairs rather than resizing mid-panel, since the front panels need to match at Row 14.
The watermelon appliques pucker or curl once sewn on.
Whipstitching too tightly around the perimeter pulls the applique off the flat plane of the body. Loosen the whipstitch tension and steam-block the applique flat before attaching it.
The V-neck edges don't sit
Left Front and Right Front shaping (16 rounds each) were worked to different row counts or with mismatched decrease placement. Recheck both pieces against each other, row for row, before seaming shoulders.

Yarn substitutions

Cotton-acrylic blend, bulky (weight 5)Holds the hdc texture cleanly but adds weight to the finished 48 inch / 122 cm bust, so the boxy shape may drop and lengthen; block flat and re-check the 18 inch / 46 cm length before hemming.
Wool-blend, bulky (weight 5)Gives more give in the ribbing at cuffs and hem and drapes softer than acrylic; swatch to 12 hdc x 9 rows = 4 inches / 10 cm since wool often needs to go up a hook size from K-10.5.
Acrylic, bulky (weight 5), smooth finishClosest match to the gauge as written, stays lightweight for the 40 to 60 hour build, and keeps applique edges crisp; avoid anything brushed or bouclé, which will blur the watermelon rind detail.
FAQs

Questions

Can the watermelon appliques be placed before the cardigan is sewn together?

No. The pattern pins and sews all 14 to 18 appliques after wet blocking and after the body panels are fully seamed, so placement can be adjusted across both fronts and both sleeves at once. Sewing appliques onto unblocked or unseamed panels risks misalignment once the garment relaxes into shape.

Is this cardigan sized for anyone besides the given measurements?

The pattern is written for one size with a 48 inch / 122 cm finished bust and 18 inch / 46 cm length, intended to fit Small through Large depending on preferred ease. Ease preference, not resizing the stitch counts, is the intended way to adjust fit.

One at a time —

Get the next pattern

Tested round by round before it is sent. No spam.