Made and counted by Wren —

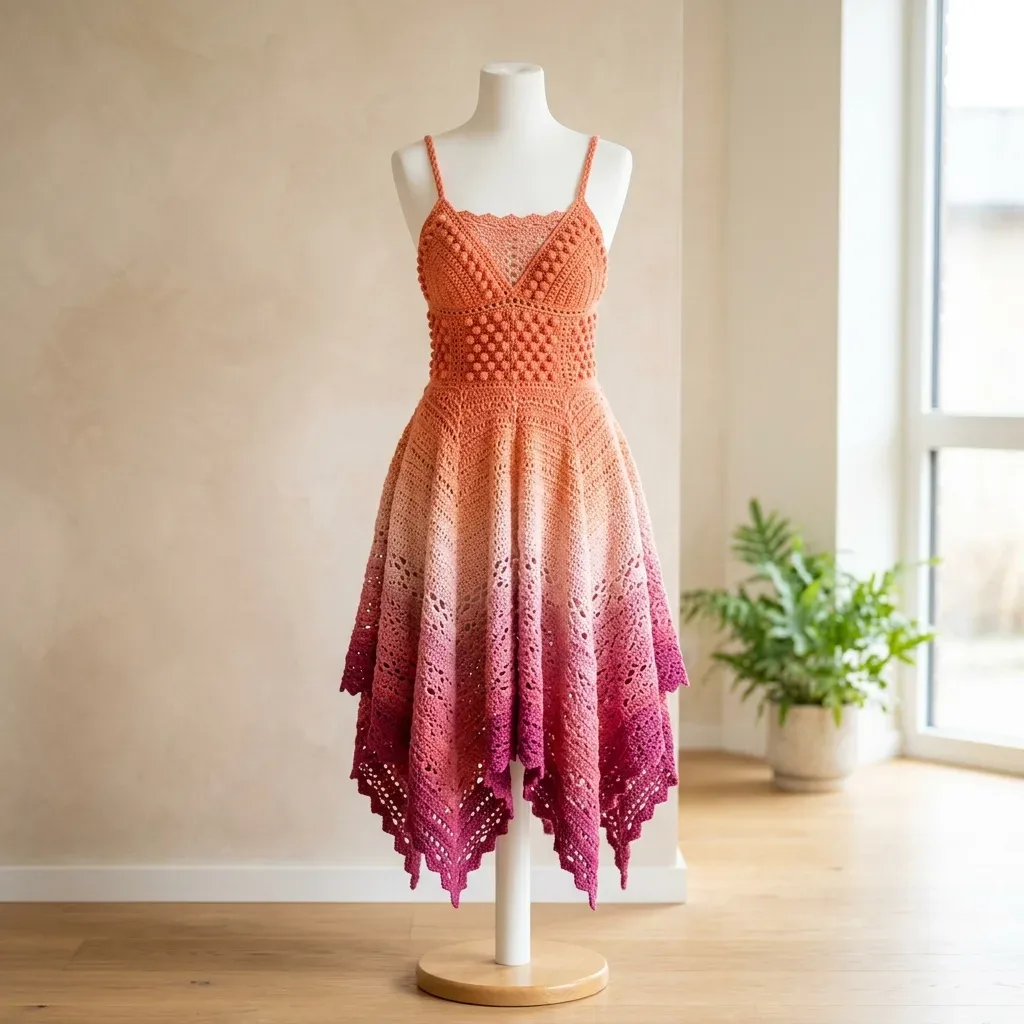
Top-down fairy dress with chevron lace skirt and bobble bodice

3.5mm hook, fingering weight yarn: a top-down fairy dress with bobble bodice, chevron lace skirt, six-point hem.

Top-down fairy dress with chevron lace skirt and bobble bodice
AdvancedLevel
80-120 hoursTime
3.5 mmHook
FingeringYarn
Jump to the pattern

About this pattern

A top-down fairy dress worked in fingering weight yarn across four gradient colors, from a bobble-panel front bodice and spike-stitch back through a chevron lace skirt that ends in six handkerchief points. The pattern spans 45 rows of front bodice, 9 of back, and 20 skirt rounds total, needs 1,400 yards, a 3.5mm hook, and 80 to 120 hours at an advanced skill level.

This dress is built top-down in one continuous construction: straps and bodice first, side seams joined, then a skirt that increases out through 16 rounds of upper expansion before four rounds of chevron lace open into a six-point handkerchief hem. The front bodice carries a bobble panel (five double crochets closed into one stitch) over 45 rows; the back panel uses a 9-row spike-stitch diamond. Total yardage runs about 1,400 yards across four gradient colors. Budget 80 to 120 hours.

The pattern

Written out round by round

Materials

  • Option 1: Malabrigo Sock (100% superwash merino wool, 440 yards per 100 g skein). Purchase one skein each of Sunset, Lettuce, Damask Rose, and Fucsia colorways, or look for a gradient set. This yarn has a beautiful sheen and blocks exquisitely, which is essential for the lace skirt panels to open up correctly.
  • Option 2: Schoppel-Wolle Zauberball (75% wool, 25% nylon, 459 yards per 100 g ball). One or two gradient balls that transition through warm coral to fuchsia tones will work beautifully and eliminate most color-change management. The nylon content adds durability for a wearable garment.
  • Option 3: Cascade Heritage Silk (85% superwash merino, 15% mulberry silk, 437 yards per 100 g skein). The silk content gives this yarn a fluid drape ideal for the skirt. Purchase four coordinating colorways in the gradient range described above.

Substitution note

  • Any fingering or sock weight yarn that achieves gauge may be substituted. Choose a yarn with good stitch definition for the bobble bodice and good blocking capacity for the lace skirt. Avoid very fuzzy or halo yarns, which will obscure the lace pattern.

Yarn

  • Approximately 1,400 yards (1,280 m) total of fingering weight yarn , also called sock weight or lace-heavy. You will use this as a single strand throughout. You need yarn in four gradient colors or one gradient cake that transitions through these zones:
  • Color A (deep coral-orange): approximately 300 yards (274 m)
  • Color B (warm peach): approximately 300 yards (274 m)
  • Color C (blush-pink): approximately 350 yards (320 m)
  • Color D (deep magenta-fuchsia): approximately 450 yards (411 m)

Hook

  • US size E-4 / 3.5 mm crochet hook, or size needed to obtain gauge

Notions

  • Stitch markers, at least 8
  • Tapestry needle for weaving ends
  • Blocking mats and rustproof pins
  • Scissors
  • Measuring tape

Abbreviations

  • beg = beginning
  • bl = back loop only
  • bo = bobble (see Special Stitches below)
  • ch = chain
  • ch-sp = chain space
  • dc = double crochet (yarn over, insert hook, pull up loop, yarn over, pull through 2 loops, yarn over, pull through remaining 2 loops)
  • dec = decrease
  • fl = front loop only
  • hdc = half double crochet
  • inc = increase
  • lp(s) = loop(s)
  • MC = main color currently in use
  • pm = place marker
  • rem = remaining
  • rep = repeat
  • rnd = round
  • RS = right side
  • sc = single crochet (insert hook, pull up loop, yarn over, pull through both loops)
  • sk = skip
  • sl st = slip stitch
  • sm = slip marker
  • sp = space
  • st(s) = stitch(es)
  • tch = turning chain
  • tog = together
  • tr = treble crochet
  • WS = wrong side
  • YO = yarn over

Section 1: Straps (Make 2)

Using Color A, make a foundation chain.

Chain 101.

Round 1Sc in 2nd ch from hook and in each ch across. Turn. (100 sc)
Round 2Ch 1, sc in each st across. Turn. (100 sc)
Round 3Ch 1, sc in each st across. Turn. (100 sc) Fasten off, leaving a long tail for seaming. Set straps aside.

Section 2: Front Bodice Panel

The front bodice is worked flat, beginning at the center front neckline base and worked outward and downward.

Using Color A, chain 3.

Foundation Row: Work 6 sc into 2nd ch from hook (or work a magic ring, 6 sc). Do not join. Turn. (6 sc)

Round 1(RS): Ch 1, 2 sc in first st, sc in next 4 sts, 2 sc in last st. Turn. (8 sc)
Round 2(WS): Ch 1, sc in each st across. Turn. (8 sc)
Round 3(RS): Ch 1, 2 sc in first st, sc across to last st, 2 sc in last st. Turn. (10 sc)
Round 4(WS): Ch 1, sc in each st across. Turn. (10 sc)
Round 5(RS): Ch 1, 2 sc in first st, sc across to last st, 2 sc in last st. Turn. (12 sc)
Round 6(WS): Ch 1, sc in each st across. Turn. (12 sc)
Round 7(RS): Ch 1, 2 sc in first st, sc across to last st, 2 sc in last st. Turn. (14 sc)
Round 8(WS): Ch 1, sc in each st across. Turn. (14 sc)
Round 9(RS): Ch 1, 2 sc in first st, sc across to last st, 2 sc in last st. Turn. (16 sc)
Round 10(WS): Ch 1, sc in each st across. Turn. (16 sc)
Round 11(RS): Ch 1, 2 sc in first st, sc across to last st, 2 sc in last st. Turn. (18 sc)
Round 12(WS): Ch 1, sc in each st across. Turn. (18 sc) Now begin the bobble panel across the center of the front bodice. The bobble section spans the center 10 stitches with 4 sc on each side edge.
Round 13RS, Bobble Row Ch 1, sc in first 4 sts, (bo in next st, sc in next st) 5 times, sc in last 4 sts. Turn. (18 sts total, with bobbles counting as 1 stitch each)
Round 14(WS): Ch 1, sc in each st across. Turn. (18 sc)
Round 15RS, Bobble Row Ch 1, sc in first 4 sts, sc in first bobble, (bo in next sc, sc in next bobble) 4 times, bo in next sc, sc in last 4 sts. Turn. (18 sts)
Round 16(WS): Ch 1, sc in each st across. Turn. (18 sc)
Round 17to 28: Rep Rows 13 to 16 three more times, continuing the bobble checkerboard pattern. (18 sc after each WS row)At the end of Row 28, the front bodice panel measures approximately 4 inches (10 cm) tall at center. The bobble section is complete.

Now work the empire waist band of the bodice:

Round 29(RS): Ch 1, sc in each st across. Turn. (18 sc)
Round 30(WS): Ch 1, sc in each st across. Turn. (18 sc)
Round 31(RS): Ch 1, sc in each st across. Turn. (18 sc)
Round 32(WS): Ch 1, sc in each st across. Turn. (18 sc)
Round 33(RS): Ch 1, sc in each st across. Turn. (18 sc)
Round 34(WS): Ch 1, sc in each st across. Turn. (18 sc) Now work side expansions for the front bodice width:
Round 35(RS): Ch 1, 2 sc in first st, sc across to last st, 2 sc in last st. Turn. (20 sc)
Round 36(WS): Ch 1, sc in each st across. Turn. (20 sc)
Round 37(RS): Ch 1, 2 sc in first st, sc across to last st, 2 sc in last st. Turn. (22 sc)
Round 38(WS): Ch 1, sc in each st across. Turn. (22 sc)
Round 39(RS): Ch 1, 2 sc in first st, sc across to last st, 2 sc in last st. Turn. (24 sc)
Round 40(WS): Ch 1, sc in each st across. Turn. (24 sc)
Round 41(RS): Ch 1, 2 sc in first st, sc across to last st, 2 sc in last st. Turn. (26 sc)
Round 42(WS): Ch 1, sc in each st across. Turn. (26 sc)
Round 43(RS): Ch 1, 2 sc in first st, sc across to last st, 2 sc in last st. Turn. (28 sc)
Round 44(WS): Ch 1, sc in each st across. Turn. (28 sc)
Round 45(RS): Ch 1, 2 sc in first st, sc across to last st, 2 sc in last st. Turn. (30 sc)
Round 46(WS): Ch 1, sc in each st across. Turn. (30 sc)
Round 47(RS): Ch 1, 2 sc in first st, sc across to last st, 2 sc in last st. Turn. (32 sc)
Round 48(WS): Ch 1, sc in each st across. Turn. (32 sc)
Round 49(RS): Ch 1, 2 sc in first st, sc across to last st, 2 sc in last st. Turn. (34 sc)
Round 50(WS): Ch 1, sc in each st across. Turn. (34 sc)
Round 51(RS): Ch 1, 2 sc in first st, sc across to last st, 2 sc in last st. Turn. (36 sc)
Round 52(WS): Ch 1, sc in each st across. Turn. (36 sc)
Round 53(RS): Ch 1, 2 sc in first st, sc across to last st, 2 sc in last st. Turn. (38 sc)
Round 54(WS): Ch 1, sc in each st across. Turn. (38 sc)
Round 55(RS): Ch 1, 2 sc in first st, sc across to last st, 2 sc in last st. Turn. (40 sc)
Round 56(WS): Ch 1, sc in each st across. Turn. (40 sc) Fasten off. Front bodice panel complete. Set aside.

Checkpoint: After the front bodice panel is complete, the piece should measure approximately 8 inches (20 cm) tall from foundation to lower edge, and approximately 6.5 inches (16.5 cm) wide at the widest lower point. Wet block lightly and measure before proceeding.
Section 3: Back Bodice Panel

The back bodice is simpler, worked straight with a slight texture and the same width.

Using Color A, chain 41 (40 working stitches).

Round 1(RS): Sc in 2nd ch from hook and in each ch across. Turn. (40 sc)
Round 2to 8: Ch 1, sc in each st across. Turn. (40 sc)
Round 9RS, Texture Row Ch 1, sc in first 3 sts, then work (spike-sc in next st, sc in next 3 sts) 9 times, spike-sc in next st. Turn. (40 sts)
Round 10(WS): Ch 1, sc in each st across. Turn. (40 sc)
Round 11(RS): Ch 1, sc in each st across. Turn. (40 sc)
Round 12(WS): Ch 1, sc in each st across. Turn. (40 sc)
Round 13RS, Texture Row Ch 1, sc in first st, (spike-sc in next st, sc in next 3 sts) 9 times, spike-sc in next st, sc in last 2 sts. Turn. (40 sts)This offsets the spike-sc by 2 stitches from the previous texture row, creating a diamond texture.
Round 14(WS): Ch 1, sc in each st across. Turn. (40 sc)
Round 15to 56: Continue alternating plain sc rows and texture rows every 4 rows, maintaining 40 stitches throughout. End after a WS row. (40 sc)

The back bodice should match the front bodice in height, approximately 8 inches (20 cm).

Fasten off. Back bodice panel complete.

Section 6: Waist Band Rounds

Round 1Ch 1, sc in each st around, working into the bottom edge stitches of both front and back panels. Join with sl st to first sc. (80 sc)
Round 2Ch 1, sc in each st around. Join. (80 sc)
Round 3Ch 1, sc in each st around. Join. (80 sc)
Round 4Ch 1, sc in each st around. Join. (80 sc)

Section 7: Upper Skirt Expansion

The skirt begins expanding here. Begin transitioning to Color B in this section.

Round 5Ch 1, (sc in next 9 sts, 2 sc in next st) 8 times. Join. (88 sc)
Round 6Ch 1, sc in each st around. Join. (88 sc)
Round 7Ch 1, (sc in next 10 sts, 2 sc in next st) 8 times. Join. (96 sc)
Round 8Ch 1, sc in each st around. Join. (96 sc)
Round 9Ch 1, (sc in next 11 sts, 2 sc in next st) 8 times. Join. (104 sc)
Round 10Ch 1, sc in each st around. Join. (104 sc)
Round 11Ch 1, (sc in next 12 sts, 2 sc in next st) 8 times. Join. (112 sc)
Round 12Ch 1, sc in each st around. Join. (112 sc)
Round 13Ch 1, (sc in next 13 sts, 2 sc in next st) 8 times. Join. (120 sc)
Round 14Ch 1, sc in each st around. Join. (120 sc)
Round 15Ch 1, (sc in next 14 sts, 2 sc in next st) 8 times. Join. (128 sc)
Round 16Ch 1, sc in each st around. Join. (128 sc)
Round 17Ch 1, (sc in next 15 sts, 2 sc in next st) 8 times. Join. (136 sc)
Round 18Ch 1, sc in each st around. Join. (136 sc)
Round 19Ch 1, (sc in next 16 sts, 2 sc in next st) 8 times. Join. (144 sc)
Round 20Ch 1, sc in each st around. Join. (144 sc)

Note: 144 divided by 12 equals 12. This is the stitch count needed to begin the 12-stitch lace chevron repeat.

Section 8: Lace Chevron Skirt

The lace chevron pattern is worked over a 12-stitch repeat. With 144 stitches, you have 12 complete repeats around. Transition through Color B to Color C, then Color D as you work down the skirt.

Round 21Round A Ch 3 (counts as first dc), dc in next 2 sts, ch 2, skip next 2 sts, dc in next 3 sts, ch 2, skip next 2 sts, (dc in next 3 sts, ch 2, skip next 2 sts, dc in next 3 sts, ch 2, skip next 2 sts) 11 times. Join with sl st to top of ch-3. (96 dc, 24 ch-2 sps)
Round 22Round B Sl st into top of ch-3 to reposition. Ch 1, sc in first ch-2 sp, ch 3, skip 3 dc, V-st in center of next ch-2 sp, ch 3, (sc in next ch-2 sp, ch 3, V-st in next ch-2 sp, ch 3) 11 times. Join. (12 sc, 12 V-sts, 24 ch-3 sps)
Round 23Round C Sl st to V-st ch-2 sp, ch 3, (2 dc, ch 1, 3 dc) in same sp (shell over V-st ch-2 sp), ch 2, sc in next sc, ch 2, (shell in next V-st ch-2 sp, ch 2, sc in next sc, ch 2) 11 times. Join. (12 shells, 12 sc, 24 ch-2 sps)
Round 24Round D Sl st to center ch-1 sp of first shell, ch 3, (dc, ch 1, dc, ch 1, dc, ch 1, dc, ch 1, dc) in same sp (fan, 5 dc), ch 3, sc in next sc, ch 3, (fan in center ch-1 sp of next shell, ch 3, sc in next sc, ch 3) 11 times. Join. (12 fans x 5 dc = 60 dc, 12 sc, 24 ch-3 sps)Transition Rnd: Ch 1, (sc in each of 5 fan dc, 3 sc in ch-3 sp, sc in sc, 3 sc in ch-3 sp) 12 times. Join. (120 sc)Continue working lace set repeats, following the 4-round pattern and transition rounds, until the skirt reaches the desired length. Work additional lace sets to create the handkerchief hem panels.

Section 4: Neckline Shaping and Strap Attachment

Return to the front bodice panel. With RS facing, attach Color A at the upper right corner of the front panel (the corner at the V-neck).

Scallop Row: (Sl st into next edge st, work (sc, hdc, 3 dc, hdc, sc) into same edge st, skip 2 edge sts) across upper neckline edge. Fasten off.

Strap placement: Position one strap at approximately 3 inches (7.5 cm) from each side of the center front V. Using the long tail from each strap, sew securely to the WS of the upper front neckline edge. Repeat on back panel, positioning straps to match, approximately 2 inches (5 cm) from each side of the center back.

Assembly

Step 1Weave in all ends securely using your tapestry needle. Take your time with this step.
Step 2Blocking: Wet block your finished dress by soaking it in lukewarm water for 15 to 20 minutes. Gently squeeze out excess water (do not wring) and lay flat on blocking mats. Pin out the lace sections and handkerchief points to open up the pattern. Allow to dry completely before removing pins. This step transforms your dress from "nice" to "stunning."
Step 3If desired, thread elastic through the waistband rounds to add gentle support and structure.

Tester's notes

8 stitch markers minimum are needed to track the front bodice's V-neck shaping and the six hem panel divisions; place extra for a larger size.

1,400 yards total across four colors (300, 300, 350, 450 yards for A through D) means swapping brands mid-project risks a visible color break at the waist seam.

24 stitches and 28 rows per 4 inches in single crochet is mandatory before starting the front bodice; a half-stitch difference shifts the finished 34-inch bust by an inch or more.

6 loops close every bobble (5 dc plus the working loop); work them loosely or the front panel will pucker instead of lying flat.

3.5mm (US E-4) is the specified hook, but swap size freely to hit gauge rather than hold onto that number.

At a glance

Rounds81
Parts7
LevelAdvanced
Time80-120 hours
Hook3.5 mm
YarnFingering

Gauge check

Measure the first few rows of the front bodice panel against 24 stitches and 28 rows per 4 inches in single crochet before committing to size, then swatch 4 rows of the lace chevron repeat to confirm 16 stitches and 8 rows per 4 inches once blocked.

If either count is off, change hook size up or down a step and reswatch rather than adjusting tension by hand, since this garment carries no ease for error.

Stitch-count checkpoints

  • Section 1: Straps (Make 2) · Round 1: 100 sts
  • Section 1: Straps (Make 2) · Round 2: 100 sts
  • Section 2: Front Bodice Panel · Round 15: 18 sts
  • Section 2: Front Bodice Panel · Round 41: 26 sts
  • Section 2: Front Bodice Panel · Round 54: 38 sts
  • Section 2: Front Bodice Panel · Round 55: 40 sts

If something looks wrong

The lace chevron skirt pulls in tight instead of fanning out.
Unblocked lace holds its working tension; wet block and pin the 4-round repeat open to the 16 stitches/8 rows gauge before judging the shape.
Front and back bodice panels are different widths at the side seam.
Gauge drifted over the 45 rows of the front panel versus the 9-row back; recheck both against 24 sts/28 rows per 4 inches and measure flat before seaming.
Handkerchief hem points curl under instead of lying flat.
Each of the six panels needs individual pinning to a point during blocking; leave pinned until fully dry.

Yarn substitutions

Cotton, fingering weightLess stretch and heavier drape; the lace chevron opens less dramatically after blocking, so swatch the 16 st/8 row gauge before cutting yardage.
Acrylic, sock/fingering weightHolds less memory after wet blocking, so the handkerchief points and lace repeat relax over time; pin tightly and allow longer dry time.
Silk-blend, fingering weight (non-superwash)Drapes more fluidly for the skirt but is less forgiving of hook size changes; size down slightly to hold the 24 st/4 in bodice gauge.
FAQs

Questions

Can a different yarn weight replace the fingering weight called for?

Any fingering or sock weight yarn that hits 24 stitches and 28 rows per 4 inches in single crochet works. Moving up to sport weight changes the 34-inch bust and 28-inch waist measurements, so resize the stitch counts rather than just swapping hooks.

How are the four gradient colors managed across sections?

Color A starts at the straps and front bodice, with B, C, and the heaviest color D (450 yards) carrying the skirt's chevron rounds. Working from a single gradient cake instead of four skeins removes most of the join planning.

Is the lace chevron skirt readable before blocking?

Expect the 4-round repeat to look tight and uneven on the hook; the stated 16 stitches and 8 rows per 4 inches gauge only shows once blocked. Wet block before judging whether the pattern is on track.

One at a time —

Get the next pattern

Tested round by round before it is sent. No spam.