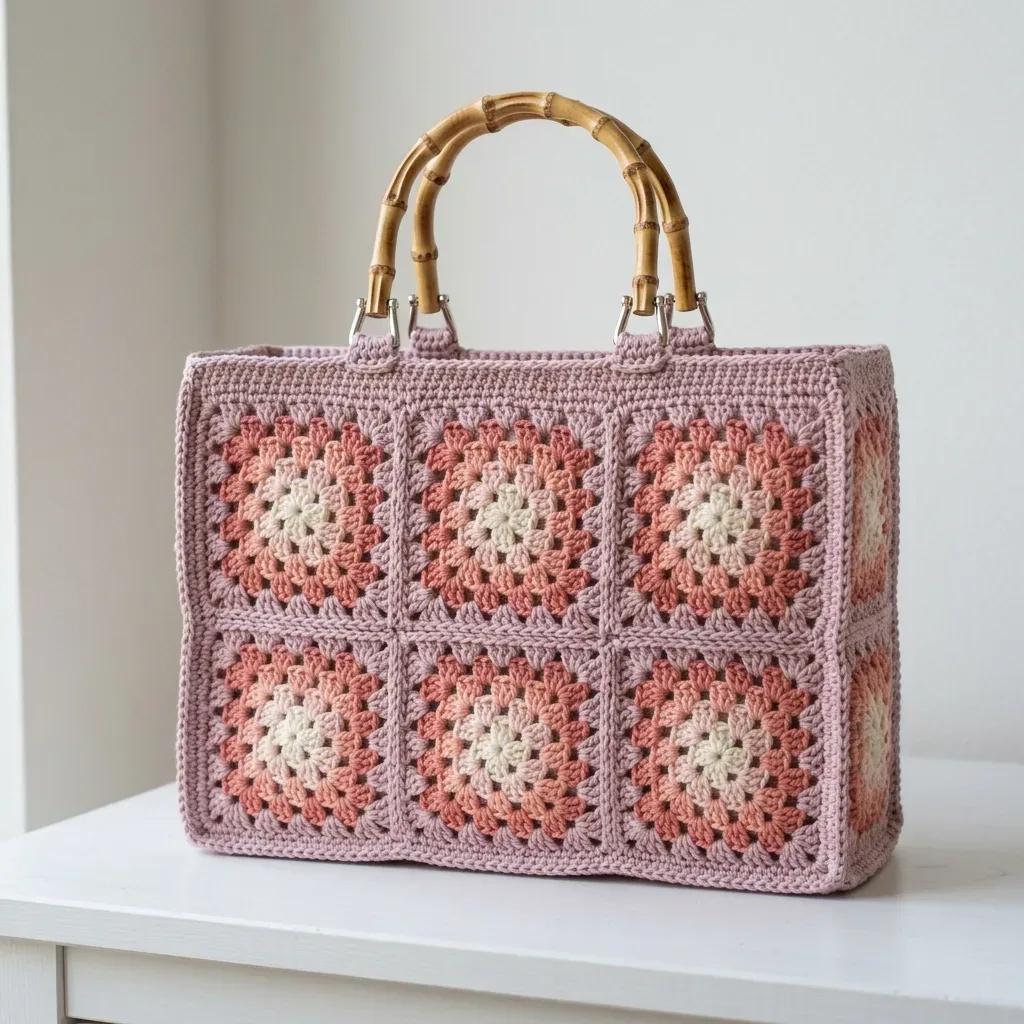
Made and counted by Wren —

Pink ombre granny square box purse pattern

4.0 mm hook, aran/worsted cotton: 19 granny squares form a 12 x 9.5 x 4 inch box purse.

Pink ombre granny square box purse pattern
Easy / Advanced BeginnerLevel
10-14 hoursTime
4.0 mmHook
Aran / WorstedYarn
Jump to the pattern

About this pattern

A structured box-shaped purse made from 19 granny squares in a cream, peach, rose, and mauve ombre, crocheted with aran or worsted cotton on a 4.0 mm hook. Squares are blocked to a true 4 inch square, joined into five panels, then assembled into a box body measuring 12 x 9.5 x 4 inches. A three-round top border finishes the opening, and bamboo handles (or 4 swivel clasps) complete the bag. Total time runs 10 to 14 hours.

This box purse is built from 19 individual granny squares worked in a four-shade ombre, joined into five panels, then assembled into a three dimensional box. Each square finishes at 4 inches after blocking, and that single number drives the whole build: get it right and the panels line up without easing. The finished bag measures 12 x 9.5 x 4 inches, with a 3-wide by 2-tall body and a one-square depth. Front and back panels each use 6 squares in a 3 by 2 grid.

Skill Level: Easy / Advanced Beginner. The whole project takes about 10 to 14 hours from start to finish. Finished size is measured after light blocking and excludes the bamboo handles.

The pattern

Written out round by round

Materials

Yarn

  • Aran or worsted weight cotton in four shades
  • Mauve (main color): 220 yards (200 m)

Rose

  • 130 yards (120 m)

Peach

  • 110 yards (100 m)

Cream

  • 90 yards (82 m)

Hook

  • 4.0 mm (US G/6) crochet hook

Notions

  • One pair of curved bamboo bag handles, approximately 5 to 6 inches (13 to 15 cm) wide
  • 4 swivel clasps if your handles do not include them
  • Tapestry needle
  • Stitch markers
  • Scissors

Yarn Suggestions

  • Paintbox Yarns Cotton Aran offers crisp stitch definition and a wide shade range
  • Lily Sugar’n Cream (worsted) is budget friendly and holds the box shape well
  • DROPS Paris provides smooth aran cotton with a soft matte finish
  • Cotton yarn is ideal for this project because it holds its shape beautifully and gives the finished tote those crisp, structured walls.

Abbreviations

  • ch = chain
  • sl st = slip stitch
  • sc = single crochet (insert hook, yarn over, pull through, yarn over, pull through both loops)
  • dc = double crochet (yarn over, insert hook, yarn over, pull through, yarn over, pull through two loops, yarn over, pull through remaining two loops)
  • sp = space
  • st(s) = stitch(es)
  • rep = repeat
  • beg = beginning
  • MC = main color
  • Granny cluster = 3 double crochet stitches worked into the same space
  • Corner = (3 dc, ch 2, 3 dc) worked into the same corner space

The Granny Square Pattern

Make 19 of these squares. Each square is four rounds, with one color per round. Join with a slip stitch to the top of the beginning ch 3 unless noted. Fasten off at the end of each round and join the next color in any corner space. Color Order: Cream center, then Peach, then Rose, then Mauve frame.

Round 1Cream Make a magic ring. Ch 3 (counts as dc), 2 dc in ring, ch 2, [3 dc in ring, ch 2] 3 times; join to top of beg ch 3. Fasten off. (12 dc, 4 corner spaces)

The magic ring, sometimes called a magic loop, lets you pull the center hole closed tightly. If you prefer, you can chain 4 and slip stitch to form a ring instead.

Round 2Peach Join in any corner sp. Ch 3, (2 dc, ch 2, 3 dc) in same sp, [ch 1, (3 dc, ch 2, 3 dc) in next corner sp] 3 times, ch 1; join. Fasten off. (24 dc)
Round 3Rose Join in any corner sp. Ch 3, (2 dc, ch 2, 3 dc) in same sp, ch 1, 3 dc in next ch-1 sp, ch 1, (3 dc, ch 2, 3 dc) in next corner sp; rep from twice more, ch 1, 3 dc in next ch-1 sp, ch 1; join. Fasten off. (36 dc)
Round 4Mauve Frame Join in any corner sp. Ch 3, (2 dc, ch 2, 3 dc) in same sp, (ch 1, 3 dc in next ch-1 sp) twice, ch 1, (3 dc, ch 2, 3 dc) in next corner sp; rep from twice more, (ch 1, 3 dc in next ch-1 sp) twice, ch 1; join. Fasten off. (48 dc, 16 clusters)

This mauve round is what gives the bag its tidy framed look once the squares are joined. Every square ends with the same four cluster sides and clean ch 2 corners, so they line up neatly during assembly.

Top Border

Three firm rounds give the opening a clean, self supporting rim that frames the granny squares and keeps the bag mouth open.

Round 1Mauve Join at any top corner. Sc evenly around the entire opening, working about 12 sc per square edge and 1 sc in each corner; join with sl st. (approximately 96 sc)
Round 2Ch 1, sc in each st around; join. (96 sc)
Round 3Ch 1, sc in each st around; join. Fasten off. (96 sc)

Handle Loops

Make 4 loops to carry the bamboo handles. Place two on the front rim and two on the back, spaced to match your handle width.

Handle LoopWith Mauve, join to the rim. Ch 10, skip about 2 inches (5 cm) along the rim, sl st down. Turn and work 14 sc back along the chain; fasten off and secure. (14 sc per loop)(14)

Assembly

Step 1Lightly steam or wet block all 19 squares to a true 4 inch (10 cm) square. Cotton holds its shape beautifully, and even, squared up edges make joining far easier. This step gives the finished tote its crisp, structured walls. Do not skip blocking — it makes such a difference in how professional your finished bag looks.
Step 2Group your 19 squares into five panels before joining the bag. Lay them out with the cream centers facing up and the ombre running the same direction across each panel. Front panel: 6 squares, arranged 3 wide x 2 tall. Back panel: 6 squares, 3 wide x 2 tall. Side panels (x2): 2 squares each, 1 wide x 2 tall. Base panel: 3 squares in a single row.
Step 3With Mauve and the tapestry needle, join squares using a whip stitch through the back loops only, working into each stitch along the touching edges. This keeps a soft ridge on the inside and an almost invisible seam on the right side. Step 1: Hold two squares right sides together. Anchor your yarn in the corner, then whip stitch loop to loop across the edge. You will work about 16 stitches per edge. Step 2: Join squares into rows first, then join the rows together to complete each full panel. Step 3: Press each finished panel flat and weave in the join tails. Important tip: Keep your join tension relaxed. Pulling the whip stitches too tight will pucker the seams and round off the box corners you are aiming for.
Step 4Now bring the five panels together into the structured box tote. Work with Mauve and the same back loop whip stitch throughout. Step 1: Start with the base (3 square row) flat. Join the lower long edge of the front panel to one long edge of the base. This covers 3 square edges. Step 2: Join the lower long edge of the back panel to the opposite long edge of the base. Again, 3 square edges. Step 3: Join the bottom edge of each side panel to the short ends of the base. This is 1 square edge on each side. Step 4: Stand the panels up and join the side panels to the front and back along the four vertical seams, closing the box. Each vertical seam covers 2 square edges. As you close the final vertical seams, gently coax each corner into a right angle. Cotton blocks square and will hold the shape once the top border is added.
Step 5Weave in all remaining ends on the inside and trim closely. Give the assembled bag a final light steam, shaping the corners square.
Step 6Optional: Add a fabric lining or a stiff base insert for extra structure and to carry heavier items. A piece of plastic canvas cut to fit the base works wonderfully for added stability.

Tester's notes

4.0 mm hook is the working size for all 19 squares and the top border; a half-size swap either direction changes the 4 inch square measurement.

Place a stitch marker in the first stitch of each round on the top border rounds so the join point stays easy to find across all 3 rounds.

Block every square to the same 4 inch square before joining; uneven squares show up immediately once panels are seamed together.

Each square changes color in the same fixed order: cream center, then peach, then rose, then a mauve frame. Carry or cut yarn consistently so the mauve frame reads as one continuous color across all 19 squares.

A plastic canvas base insert is optional, not required; it adds stiffness to the 4 inch deep base but does not change the 12 x 9.5 x 4 inch finished dimensions.

This pattern uses US crochet terms. UK crocheters should note that US single crochet (sc) equals UK double crochet (dc), and US double crochet (dc) equals UK treble crochet (tr).

Weave in your ends as you go rather than saving them all for the end; it saves a long finishing session once all 19 squares and panels are joined.

19 squares total breaks down as 6 for the front, 6 for the back, 2 per side (x2 sides), and 3 for the base panel.

Individual results may vary depending on your yarn, tension, hook size, and finishing technique; you may need small adjustments to match the finished project shown.

At a glance

Rounds8
Parts3
LevelEasy / Advanced Beginner
Time10-14 hours
Hook4.0 mm
YarnAran / Worsted

Gauge check

After the first granny square is complete, lay it flat and measure: it should read 4 inches (10 cm) square once lightly blocked.

Stitch-count checkpoints

  • Top Border · Round 2: 96 sts
  • Top Border · Round 3: 96 sts
  • Handle Loops · Handle Loop: 14 sts

If something looks wrong

A finished square measures larger or smaller than 4 inches.
Tension or hook size is off. Re-check with a 3.5 mm hook if squares run large, or a 4.5 mm hook if they run small, and confirm against the 4 inch target before continuing.
The assembled box does not hold its
This usually means the squares were joined unblocked. Blocking each of the 19 squares to a true 4 inch square before joining is what gives the walls their structure.
The top border opening looks uneven or
Round 1 of the top border needs about 12 sc per square edge plus 1 sc per corner for roughly 96 sc total; an uneven stitch count around the opening throws off rounds 2 through 3.
The ombre does not run the same direction across a panel.
Squares were laid out with mixed orientation before joining. Re-lay all squares in a panel with cream centers up and the ombre direction matched before seaming, per the panel layout.

Yarn substitutions

Acrylic worsted weightKeeps the 4.0 mm hook and the 4 inch square size, but drapes softer and the finished box holds its shape less firmly than cotton; a base insert becomes more useful.
Linen-cotton blend, aran weightProduces a stiffer fabric at the same 4.0 mm hook, which can push squares slightly past 4 inches; check gauge and consider dropping to 3.5 mm.
Bamboo-cotton blend, worsted weightAdds drape and a slight sheen while keeping stitch definition close to the original; squares may run a touch smaller, so a 4.5 mm hook can bring them back to 4 inches.
FAQs

Questions

Can the bag be made without the bamboo handles?

Yes. The pattern lists 4 swivel clasps as a materials option for cases where the handles do not already include them, so any handle with compatible rings can be attached instead.

How many squares go into the front and back panels?

The front panel uses 6 squares arranged 3 wide by 2 tall, and the back panel uses the same 6-square, 3 by 2 layout. The remaining squares from the 19 total complete the side and base panels.

Is lining the bag necessary?

No, lining is listed as an optional assembly step. A fabric lining or a plastic canvas base insert can be added afterward for extra structure, but the 12 x 9.5 x 4 inch shape holds without it once blocked.

One at a time —

Get the next pattern

Tested round by round before it is sent. No spam.