Made and counted by Wren —

Frosted cupcake hooded cape pattern in worsted weight

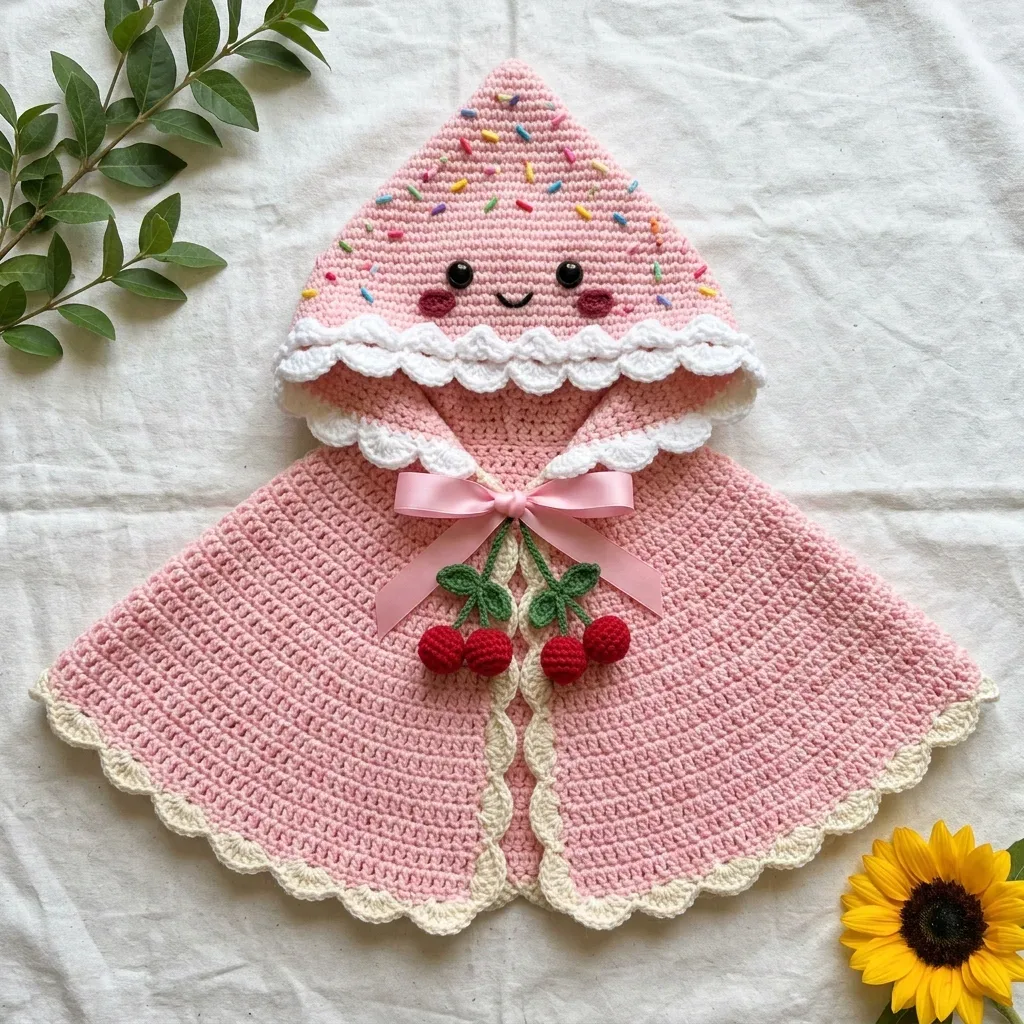
J/6.0mm hook, worsted weight yarn: a hooded cape with scalloped trim, kawaii face, and crocheted cherries.

Frosted cupcake hooded cape pattern in worsted weight
IntermediateLevel
12-18 hoursTime
6.0 mmHook
WorstedYarn
Jump to the pattern

About this pattern

A hooded cape worked for a child-sized frosted-cupcake theme: a 71-row flat hood decreasing to a point, joined to a 35-round cape body that expands through 8 increase points from a 72-stitch base. A two-round scallop border, a kawaii face with safety eyes, embroidered sprinkles, and small crocheted cherries finish it. Expect 12 to 18 hours plus extra time for embellishments.

This hooded cape builds in two main pieces: a flat triangular hood worked across 71 rows that narrows from a 72-stitch base to a point, then a cape body picked up directly from that same 72-stitch foundation edge and worked in 35 joined rounds that expand outward through 8 evenly spaced increase points. A two-round scallop border, repeated skip-2/5-dc-shell/skip-2, finishes the hem. The 72-stitch base count carries through both pieces, so matching it exactly before moving from hood to cape matters more than any other number in the pattern.

The pattern

Written out round by round

Materials

  • Main Color (MC): Pink worsted weight yarn, approximately 400 yards or 366 meters
  • Contrast Color A (CA): White or cream worsted weight yarn, approximately 80 yards or 73 meters
  • Contrast Color B (CB): Red worsted weight yarn, approximately 15 yards or 14 meters
  • Contrast Color C (CC): Green worsted weight yarn, approximately 10 yards or 9 meters

Sprinkle Colors

  • Small amounts of yellow, blue, green, orange, and red worsted weight yarn or embroidery floss in matching colors
  • US size J or 6.0 mm crochet hook for main work
  • US size I or 5.5 mm crochet hook for scallop edging (optional for a tighter border)
  • Stitch markers, at least 6
  • Tapestry needle
  • Two 9 mm black safety eyes
  • Pink or rose embroidery floss for cheeks and mouth
  • Polyester fiberfill for cherries
  • Scissors
  • Rust-proof pins for blocking

Abbreviations

  • ch = chain: wrap yarn over hook and pull through loop on hook
  • sl st = slip stitch: insert hook, yarn over, pull through stitch and loop on hook in one motion
  • sc = single crochet: insert hook, yarn over, pull up a loop (2 loops on hook), yarn over, pull through both loops
  • hdc = half double crochet: yarn over, insert hook, yarn over, pull up a loop (3 loops), yarn over, pull through all 3
  • dc = double crochet: yarn over, insert hook, yarn over, pull up a loop, yarn over and pull through 2 loops twice
  • tr = treble crochet: yarn over twice, insert hook, yarn over, pull up a loop, yarn over and pull through 2 loops three times
  • sc2tog = single crochet two together (decrease): insert hook in first stitch and pull up a loop, insert hook in next stitch and pull up a loop (3 loops on hook), yarn over and pull through all 3
  • inc = increase: work 2 sc in the same stitch
  • sk = skip
  • st(s) = stitch(es)
  • RS = right side
  • WS = wrong side
  • BLO = back loop only
  • PM = place marker

Cherry Bobble

Round 16 sc into magic ring. (6 sc)
Round 2Inc in each st around. (12 sc)
Round 3Sc in each st around. (12 sc)
Round 4Sc2tog around. (6 sc) Stuff lightly with fiberfill. Sl st to close. Fasten off leaving a tail for sewing.

Part 1: The Hood

The hood is a flat triangle worked in rows. It starts wide at the base and decreases at both edges to form the pointed top.

Foundation Chain: With MC and J hook, ch 73.

Round 1(WS): Sc in 2nd ch from hook, sc in each ch across. Turn. (72 sc)
Round 2(RS): Ch 1, sc2tog over first 2 sts, sc in each st across to last 2 sts, sc2tog. Turn. (70 sc)
Round 3Ch 1, sc in each st across. Turn. (70 sc)
Round 4Ch 1, sc2tog, sc across to last 2 sts, sc2tog. Turn. (68 sc)
Round 5Ch 1, sc in each st across. Turn. (68 sc) Continue this pattern of alternating decrease rows and plain rows:
Round 6Ch 1, sc2tog, sc across to last 2 sts, sc2tog. Turn. (66 sc)
Round 7Ch 1, sc in each st across. Turn. (66 sc)
Round 8Ch 1, sc2tog, sc across to last 2 sts, sc2tog. Turn. (64 sc)
Round 9Ch 1, sc in each st across. Turn. (64 sc)
Round 10Ch 1, sc2tog, sc across to last 2 sts, sc2tog. Turn. (62 sc)
Round 11Ch 1, sc in each st across. Turn. (62 sc)
Round 12Ch 1, sc2tog, sc across to last 2 sts, sc2tog. Turn. (60 sc)
Round 13Ch 1, sc in each st across. Turn. (60 sc)
Round 14Ch 1, sc2tog, sc across to last 2 sts, sc2tog. Turn. (58 sc)
Round 15Ch 1, sc in each st across. Turn. (58 sc)
Round 16Ch 1, sc2tog, sc across to last 2 sts, sc2tog. Turn. (56 sc)
Round 17Ch 1, sc in each st across. Turn. (56 sc)
Round 18Ch 1, sc2tog, sc across to last 2 sts, sc2tog. Turn. (54 sc)
Round 19Ch 1, sc in each st across. Turn. (54 sc)
Round 20Ch 1, sc2tog, sc across to last 2 sts, sc2tog. Turn. (52 sc)
Round 21Ch 1, sc in each st across. Turn. (52 sc)
Round 22Ch 1, sc2tog, sc across to last 2 sts, sc2tog. Turn. (50 sc)
Round 23Ch 1, sc in each st across. Turn. (50 sc)
Round 24Ch 1, sc2tog, sc across to last 2 sts, sc2tog. Turn. (48 sc)
Round 25Ch 1, sc in each st across. Turn. (48 sc)
Round 26Ch 1, sc2tog, sc across to last 2 sts, sc2tog. Turn. (46 sc)
Round 27Ch 1, sc in each st across. Turn. (46 sc)
Round 28Ch 1, sc2tog, sc across to last 2 sts, sc2tog. Turn. (44 sc)
Round 29Ch 1, sc in each st across. Turn. (44 sc)
Round 30Ch 1, sc2tog, sc across to last 2 sts, sc2tog. Turn. (42 sc)
Round 31Ch 1, sc in each st across. Turn. (42 sc)
Round 32Ch 1, sc2tog, sc across to last 2 sts, sc2tog. Turn. (40 sc)
Round 33Ch 1, sc in each st across. Turn. (40 sc)
Round 34Ch 1, sc2tog, sc across to last 2 sts, sc2tog. Turn. (38 sc)
Round 35Ch 1, sc in each st across. Turn. (38 sc)
Round 36Ch 1, sc2tog, sc across to last 2 sts, sc2tog. Turn. (36 sc)
Round 37Ch 1, sc in each st across. Turn. (36 sc)
Round 38Ch 1, sc2tog, sc across to last 2 sts, sc2tog. Turn. (34 sc)
Round 39Ch 1, sc in each st across. Turn. (34 sc)
Round 40Ch 1, sc2tog, sc across to last 2 sts, sc2tog. Turn. (32 sc)
Round 41Ch 1, sc in each st across. Turn. (32 sc)
Round 42Ch 1, sc2tog, sc across to last 2 sts, sc2tog. Turn. (30 sc)
Round 43Ch 1, sc in each st across. Turn. (30 sc)
Round 44Ch 1, sc2tog, sc across to last 2 sts, sc2tog. Turn. (28 sc)
Round 45Ch 1, sc in each st across. Turn. (28 sc)
Round 46Ch 1, sc2tog, sc across to last 2 sts, sc2tog. Turn. (26 sc)
Round 47Ch 1, sc in each st across. Turn. (26 sc)
Round 48Ch 1, sc2tog, sc across to last 2 sts, sc2tog. Turn. (24 sc)
Round 49Ch 1, sc in each st across. Turn. (24 sc)
Round 50Ch 1, sc2tog, sc across to last 2 sts, sc2tog. Turn. (22 sc)
Round 51Ch 1, sc in each st across. Turn. (22 sc)
Round 52Ch 1, sc2tog, sc across to last 2 sts, sc2tog. Turn. (20 sc)
Round 53Ch 1, sc in each st across. Turn. (20 sc)
Round 54Ch 1, sc2tog, sc across to last 2 sts, sc2tog. Turn. (18 sc)
Round 55Ch 1, sc in each st across. Turn. (18 sc)
Round 56Ch 1, sc2tog, sc across to last 2 sts, sc2tog. Turn. (16 sc)
Round 57Ch 1, sc in each st across. Turn. (16 sc)
Round 58Ch 1, sc2tog, sc across to last 2 sts, sc2tog. Turn. (14 sc)
Round 59Ch 1, sc in each st across. Turn. (14 sc)
Round 60Ch 1, sc2tog, sc across to last 2 sts, sc2tog. Turn. (12 sc)
Round 61Ch 1, sc in each st across. Turn. (12 sc)
Round 62Ch 1, sc2tog, sc across to last 2 sts, sc2tog. Turn. (10 sc)
Round 63Ch 1, sc in each st across. Turn. (10 sc)
Round 64Ch 1, sc2tog, sc across to last 2 sts, sc2tog. Turn. (8 sc)
Round 65Ch 1, sc in each st across. Turn. (8 sc)
Round 66Ch 1, sc2tog, sc across to last 2 sts, sc2tog. Turn. (6 sc)
Round 67Ch 1, sc in each st across. Turn. (6 sc)
Round 68Ch 1, sc2tog, sc across to last 2 sts, sc2tog. Turn. (4 sc)
Round 69Ch 1, sc in each st across. Turn. (4 sc)
Round 70Ch 1, sc2tog twice. Turn. (2 sc)
Round 71Ch 1, sc2tog. (1 sc) Fasten off leaving a 12-inch sewing tail. Checkpoint: The hood panel should measure approximately 18 inches wide at the base and approximately 9 inches tall from base to point. It should look like a tall triangle.
Part 3: Cape Body

The cape is worked in joined rounds, picking up stitches from the foundation chain edge of the hood base.

Cape Setup Round (Round 1):

Rejoin MC at center back of the hood base. Working into the BACK LOOPS ONLY of the original 72 foundation chain stitches, sc in each of the 72 sts around. PM at center back. Join with sl st to first sc. (72 sc)

Round 2Ch 1, sc in same st, sc in each st around. Join. (72 sc) Now begin the semicircular expansion. Increases are placed at 8 evenly spaced points. With 72 sts, place markers at sts 9, 18, 27, 36, 45, 54, 63, and 72.
Round 3Increase round Ch 1, (sc in each st to marked st, 2 sc in marked st) repeat 8 times around. Join. (80 sc)
Round 4Ch 1, sc in each st around. Join. (80 sc)
Round 5Increase round Ch 1, (sc 10, inc) repeat 8 times. Join. (88 sc)
Round 6Ch 1, sc in each st around. Join. (88 sc)
Round 7Increase round Ch 1, (sc 11, inc) repeat 8 times. Join. (96 sc)
Round 8Ch 1, sc in each st around. Join. (96 sc)
Round 9Increase round Ch 1, (sc 12, inc) repeat 8 times. Join. (104 sc)
Round 10Ch 1, sc in each st around. Join. (104 sc)
Round 11Increase round Ch 1, (sc 13, inc) repeat 8 times. Join. (112 sc)
Round 12Ch 1, sc in each st around. Join. (112 sc)
Round 13Increase round Ch 1, (sc 14, inc) repeat 8 times. Join. (120 sc)
Round 14Ch 1, sc in each st around. Join. (120 sc)
Round 15Increase round Ch 1, (sc 15, inc) repeat 8 times. Join. (128 sc)
Round 16Ch 1, sc in each st around. Join. (128 sc)
Round 17Increase round Ch 1, (sc 16, inc) repeat 8 times. Join. (136 sc)
Round 18Ch 1, sc in each st around. Join. (136 sc)
Round 19Increase round Ch 1, (sc 17, inc) repeat 8 times. Join. (144 sc)
Round 20Ch 1, sc in each st around. Join. (144 sc)
Round 21Increase round Ch 1, (sc 18, inc) repeat 8 times. Join. (152 sc)
Round 22Ch 1, sc in each st around. Join. (152 sc)
Round 23Increase round Ch 1, (sc 19, inc) repeat 8 times. Join. (160 sc)
Round 24Ch 1, sc in each st around. Join. (160 sc)
Round 25Increase round Ch 1, (sc 20, inc) repeat 8 times. Join. (168 sc)
Round 26Ch 1, sc in each st around. Join. (168 sc)
Round 27Increase round Ch 1, (sc 21, inc) repeat 8 times. Join. (176 sc)
Round 28Ch 1, sc in each st around. Join. (176 sc)
Round 29Increase round Ch 1, (sc 22, inc) repeat 8 times. Join. (184 sc)
Round 30Ch 1, sc in each st around. Join. (184 sc)
Round 31Increase round Ch 1, (sc 23, inc) repeat 8 times. Join. (192 sc)
Round 32Ch 1, sc in each st around. Join. (192 sc)
Round 33Increase round Ch 1, (sc 24, inc) repeat 8 times. Join. (200 sc)
Round 34Ch 1, sc in each st around. Join. (200 sc)
Round 35Increase round Ch 1, (sc 25, inc) repeat 8 times. Join. (208 sc)
Round 36Ch 1, sc in each st around. Join. Do not fasten off. (208 sc) Checkpoint: After Round 36, the cape body should measure approximately 13 inches from the neckline pickup row to the last round.

Part 4: Cape Hem Scallop Border

The hem has 208 stitches. For scallops to divide evenly, we need a count divisible by 6.

Round 37Adjustment round Ch 1, sc in each st around, working sc2tog at 4 evenly spaced points (approximately every 52 sts). Join. (204 sc)Place decreases at approximately sts 26, 78, 130, and 182. This removes 4 stitches. 204 divided by 6 equals 34 scallops.
Round 38(Scallop Hem, worked in CA): Join CA with sl st to any st. (Sl st in first st, sk 2 sts, 5 dc in next st, sk 2 sts) repeat 34 times, ending with sl st to first sl st. (34 scallops)Fasten off CA. Weave in end.

Hood Seaming

Fold the hood triangle in half with right sides together, aligning the two long diagonal side edges. Using your tapestry needle and matching MC yarn, whipstitch or mattress stitch the two diagonal edges together from the point downward. Leave the wide base open. This forms the cone shape. Turn right side out. The point should be sharp and centered.

Part 2: Hood Ruffle and Scallop Trim

Round 1The ruffle has two steps: first a foundation row of sc around the hood base using CA (white), then the scallop stitch pattern.

Step 1: Hood Base Foundation Row

Round 2With RS of assembled hood facing, join CA at the base of the hood seam (back center base of the cone opening). Pick up and sc in each of the 72 foundation chain stitches around the base of the hood opening. Join with sl st to first sc. (72 sc)

Step 2: Scallop Row

Round 3Working into the 72 sc foundation round just made. The scallop pattern requires a stitch count divisible by 6. 72 divided by 6 equals 12 scallops.(72)
Round 4Sl st in first sc, (sk 2 sc, 5 dc in next sc, sk 2 sc, sl st in next sc) repeat 11 more times. (12 scallops total)Fasten off CA. Weave in end.(5)

Checkpoint: The ruffle around the hood base should consist of 12 white scallop shells. When worn, this ruffle frames the face and sits at the neckline.

Part 5: Front Opening Border

With RS facing, join CA at the top right front corner of the cape. Work sc evenly down the right front opening edge, approximately 36 sc down to hem. Fasten off.

For the left front edge, join CA at hem bottom left, sc 36 evenly up to top left. Fasten off.

Each front edge has 36 sc. 36 divided by 6 equals 6 scallops per edge.

Right front scallop: With CA, working from top to bottom, (sl st in first st, sk 2 sts, 5 dc in next st, sk 2 sts) repeat 6 times. Fasten off.

Left front scallop: With CA, working from bottom to top, (sl st in first st, sk 2 sts, 5 dc in next st, sk 2 sts) repeat 6 times. Fasten off.

Weave in all CA ends.

Part 6: Sprinkle Embellishments on Hood

Thread a tapestry needle with a short length (approximately 4 inches) of each sprinkle color. Work short straight stitches approximately 1/4 to 3/8 inch long scattered randomly across the upper two-thirds of the hood cone. Angle each stitch slightly differently, as real sprinkles are randomly oriented. Work approximately 20 to 30 sprinkle stitches total, distributing colors evenly.

Part 7: Kawaii Face

Step 1: Insert safety eyes approximately 2.5 inches above the base ruffle, centered on the front face of the hood cone, spaced approximately 1.5 inches apart. Lock the washers firmly on the inside.

Step 2: Cheeks. Using pink yarn or embroidery floss, embroider a small circle of 4 to 5 stitches below and slightly outside each eye. The cheeks should be approximately 3/4 inch in diameter.

Step 3: Smile. Using rose or dark pink embroidery floss, embroider a small curved line below the eyes, centered between them. The smile should be approximately 3/4 inch wide, gently curved upward at each end.

Part 8: Crocheted Cherries

Make 3 Cherry Bobbles using CB (red) as described in Special Stitches.

Cherry Stems: With CC (green), ch 10 for each stem. Sl st back along the chain. Fasten off.

Cherry Leaves: With CC (green), ch 5. Sc in 2nd ch from hook, hdc, dc, sl st in last ch. This forms one small leaf. Make 6 leaves total.

Assembly: Arrange 3 cherries in a cluster. Sew their stems together at a central joining point. Attach the leaves at the stem junctions.

Attach the assembled cherry cluster to the center front of the cape, just below the ribbon tie point, approximately 1 inch below the ruffle line. Sew securely.

Part 9: Ribbon Tie

Cut the 24-inch satin ribbon in half or use as one bow. Thread the center of the ribbon through the front center of the cape just below the ruffle using a tapestry needle, pulling both ends to the front evenly. Tie into a bow. Trim ribbon ends at an angle to prevent fraying.

Assembly

Step 1Weave in all remaining yarn ends securely. Wet block by soaking in lukewarm water for 20 minutes, gently pressing out excess water in a towel, and laying flat on a blocking mat. Pin the hem scallops open and the front edges straight. Allow to dry completely.
Step 2For acrylic yarn, steam blocking works well. Hold a steam iron 1 to 2 inches above the surface without direct contact to relax the stitches.

Tester's notes

Set all 8 increase markers before Round 3 of the Cape Body — a missed marker stalls the jump from 72 sc to 80 sc and throws off every later increase round.

Row 1 of the Hood fixes the 72 sc base; count stitches before turning into Row 2, since the sc2tog decreases on both edges depend on that starting number staying accurate.

CB (15 yd) and CC (10 yd) are small quantities — pre-wind or measure them before starting sprinkle embroidery so a motif does not run short mid-row.

Stuff the Cherry Bobble lightly and close the Round 4 sc2tog with a sl st before shaping; packing fiberfill in first distorts the 6-st closure.

At a glance

Rounds116
Parts11
LevelIntermediate
Time12-18 hours
Hook6.0 mm
YarnWorsted

Gauge check

After Round 2 of the Cape Setup (72 sc, joined), lay the piece flat and check that it sits without cupping or rippling at the edge.

No swatch gauge is given, so judge entirely by that flat lie: if it cups, size up the hook; if it ripples, size down, before Round 3 adds the first increases.

Stitch-count checkpoints

  • Cherry Bobble · Round 1: 6 sts
  • Cherry Bobble · Round 2: 12 sts
  • Cherry Bobble · Round 3: 12 sts
  • Part 1: The Hood · Round 24: 48 sts
  • Part 1: The Hood · Round 47: 26 sts
  • Part 1: The Hood · Round 70: 2 sts

If something looks wrong

The cape body cups instead of lying flat after several rounds.
One or more of the 8 markers in Round 3 got skipped, so the stitch count never reaches 80; recount around and add the missing increase at each marked stitch.
The hood point looks blunt instead of coming to a sharp tip.
A sc2tog decrease was dropped on one edge somewhere across the 71 rows, so the two sides narrow unevenly; check that both edges carry matching counts row by row.
The scallop border lies flat instead of forming raised bumps.
The 5-dc shell landed in a skipped stitch instead of the marked one; recheck the skip-2, 5-dc-in-next, skip-2 sequence, and try the I/5.5 mm hook for a tighter shell.
The Cherry Bobble looks lumpy or sits off-center after stuffing.
Fiberfill went in before the Round 4 sc2tog closed evenly; close the sl st first with a light stuffing amount, then adjust shape through the finished fabric.

Yarn substitutions

Acrylic, worsted weightKeeps the J/6.0 mm hook and all stitch counts unchanged; holds the scallop shape stiffer and stays machine washable.
Superwash wool, worsted weightAdds weight and drape through the 35-round cape body, so block more firmly to open the scallop border flat.
Cotton-acrylic blend, DK held doubleSharpens stitch definition for the sprinkle embroidery but may need the I/5.5 mm hook instead of J/6.0 mm to hit matching counts, and adds firmness when stuffing the cherries.
FAQs

Questions

Can the hood and cape use different colors from the 400-yard MC estimate?

Yes, but check yardage before splitting. The hood (71 rows off a 72-chain foundation) and the cape body (35 rounds from that same 72-stitch edge) together account for the full 400 yards, so dividing the color midway risks running short on one piece.

Is the I/5.5 mm hook required?

No. The pattern lists the I/5.5 mm hook only as an option for a tighter scallop border. The J/6.0 mm hook used throughout the rest of the piece still completes the skip-2, 5-dc, skip-2 shell.

How much of the 12 to 18 hour estimate covers the embellishments?

The estimate covers the main construction — the 71-row hood and 35-round cape body. Parts 6 through 9 (sprinkles, kawaii face, cherries, ribbon tie) add time beyond that window, so budget extra sessions for those rather than rushing them at the end.

One at a time —

Get the next pattern

Tested round by round before it is sent. No spam.