Made and counted by Wren —

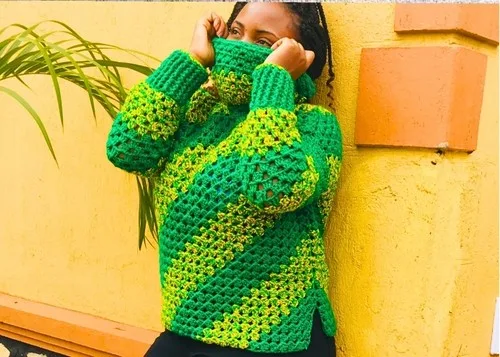
Diagonal granny square sweater made from two joined squares

6mm hook, chunky yarn: two diagonal granny squares join into a full sweater with sleeves and collar.

Diagonal granny square sweater made from two joined squares
IntermediateLevel
4-6 hoursTime
6 mmHook
ChunkyYarn
Jump to the pattern

About this pattern

A garment built from 2 diagonal granny squares (6 rounds each) that are squared off, then joined at 2 shoulders and 2 sides to form the body. Sleeves are added at the armhole and worked for 2 rounds before 3 rounds of fpdc/bpdc cuff ribbing. A 6mm hook and chunky yarn keep gauge checks and joins quick. Neckline finishes with a 4-round collar; color changes every six rows are optional.

This sweater builds from 2 diagonal granny squares, each grown corner-to-corner over 6 rounds before the body is squared off and joined at the shoulders and sides. Sleeves attach directly at the armhole and work flat for 2 rounds before cuff ribbing takes over for 3 rounds of alternating fpdc and bpdc. The number that matters most is 2: two squares, worked to matching size, are what turns a corner motif into a wearable garment. A 6mm hook and chunky yarn keep the fabric fast to produce and easy to check row by row.
The pattern

Written out round by round

Materials

  • Chunky A4 Ply yarn or Robin 100% Acrylic yarn (two colors optional)
  • 6mm hook
  • Scissors
  • Tapestry needle

Abbreviations

  • ch = chain
  • dc = double crochet
  • sc = single crochet
  • sl st = slip stitch
  • fpdc = front post double crochet
  • bpdc = back post double crochet
  • sc2tog = single crochet 2 together
  • MR = magic ring

Diagonal Granny Square

Make 2
Round 1Start with a magic ring; ch 4 (counts as dc plus ch 1); 3 dc inside ring; ch 1, then 1 dc into ring; tighten ring.
Round 2Ch 4, turn; 3 dc into first chain space; ch 1, skip 3 stitches; 3 dc into next space, ch 1, 1 dc same space.
Round 3Ch 4, turn; 3 dc into first chain space; ch 1, skip 3 stitches; 3 dc into next space; ch 1, 3 dc into next space; ch 1, 1 dc, turn.Repeat Round 3, increasing rows, until piece measures shoulder to shoulder.Change colors every six rows, optional.
Round 4Squaring the Triangle Ch 3, turn, skip first chain space; skip 3 stitches, make 3 dc into next chain space; ch 1, skip 3, make 3 dc, repeat until end; end row with 1 dc, no chain before ending.
Round 5Ch 3, turn, skip next 3 stitches; make 3 dc in next chain space; continue ch 1, skip 3, make 3 dc and finish with 1 dc.Repeat Round 5 until there is only one cluster left.
Round 6Last row Ch 3, turn; make 3 dc in last chain space; end with 1 dc, ch 1; cut yarn.Make second large square identical to the first.

Sleeves

Make 2
Round 1Attach yarn at armhole; ch 3 (counts as dc), make 2 dc in same space; ch 1, skip one space, make 3 dc in next space, repeat around; join with slip stitch.
Round 2Ch 3, turn; make 2 dc in next space; continue ch 1, 3 dc into spaces around.Repeat, turning every row, until rows reach 24 or preferred length.

Cuff Ribbing

Make 2
Round 1Make one round of sc, decreasing sc2tog over clusters.
Round 2Ch 3; work fpdc, bpdc alternating around.
Round 3Ch 3, turn; fpdc on fpdc, bpdc on bpdc, for ribbing rows.Continue for nine rows total for cuffs.

Optional: switch color and add single crochet edging.

Neckline Collar

Round 1Attach yarn at neckline; ch 3, make 2 dc in same space.
Round 2Ch 1, make 3 dc in next space, repeat around; slip stitch join.
Round 3Ch 3, make 2 dc in same space, then 3 dc in each chain space with no chains between.
Round 4Ch 3, turn; continue 3 dc in each space.Work 12 rows total, or adjust height using color changes if desired.

Assembly

Step 1Lay both squares together matching corners.
Step 2Mark neck opening size.
Step 3Attach yarn at shoulder edge and join using single crochet, two sc per space.
Step 4Repeat for both shoulders.
Step 5Mark armhole opening size.
Step 6Attach yarn at armhole edge and join sides using sc.
Step 7Leave bottom open if desired; repeat both sides.
Step 8Turn sweater right side out.

Tester's notes

6mm hook: keep it constant across both squares, both sleeves, and both cuffs so the finished panels match in size before assembly.

Mark the corner chain space of each round on the Diagonal Granny Square; it is easy to lose track of which space takes the 3-dc cluster once the piece grows past Round 4.

Tension check: Round 4 (Squaring the Triangle) changes the chain count to ch 3 and skips the first chain space — work this round slightly looser than Rounds 1-3 to keep the corner from puckering.

Color changes are optional and specified only at six-row intervals for the squares; carry or cut yarn at the start of a round, not mid-round, to keep the diagonal line clean.

No stuffing is used in this pattern; skip any stuffing step and focus tension checks on flat lay instead.

Work in progress

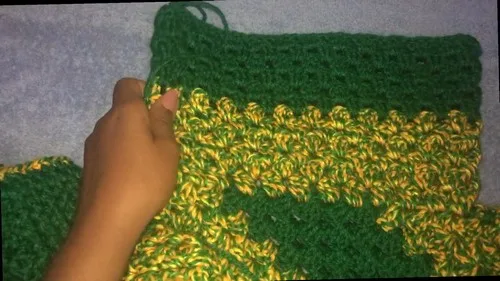
Diagonal granny square sweater made from two joined squares — photo 2
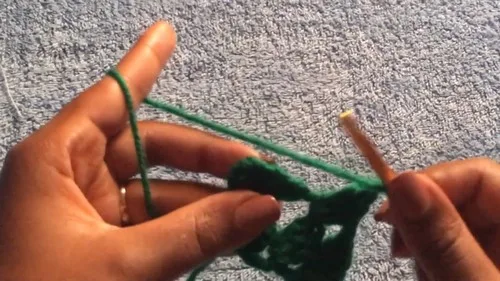
Diagonal granny square sweater made from two joined squares — photo 3

At a glance

Rounds15
Parts4
LevelIntermediate
Time4-6 hours
Hook6 mm
YarnChunky

Gauge check

After Round 3 of one Diagonal Granny Square, lay it flat and check that the triangle sits square with straight, un-cupped edges rather than curling at the corners.

If it cups, size the hook up from 6mm; if the triangle grows loose and floppy, size down before starting the second square so both match.

If something looks wrong

The granny square cups instead of lying flat.
Round 4's stitch count is tightening relative to the triangle's growth. Loosen the ch 3 turn and the first 3-dc cluster of that round, and re-check flat lay before starting Round 5.
The two squares are noticeably different sizes at assembly.
One square was likely worked with a different hook or tighter tension partway through. Re-block or re-work the smaller square's outer rounds before joining shoulders, since Step 1 of assembly requires matching corners.
The shoulder seam puckers after joining with single crochet.
Too many sc were worked per space instead of the specified two sc per space. Rip back the seam and rejoin at two sc per space evenly along the shoulder edge.
The cuff ribbing flares instead of hugging the wrist.
fpdc and bpdc are not landing on their matching stitch type from the row below, which flattens the rib. Work Round 3 by checking each stitch against the post below it (fpdc on fpdc, bpdc on bpdc) before continuing the nine total ribbing rows.

Yarn substitutions

Wool-acrylic blend, chunky weightAdds warmth and slightly more drape than straight acrylic; hook stays at 6mm, but squares may block half a size larger, so measure shoulder-to-shoulder before repeating Round 3.
100% cotton, worsted weightProduces a heavier, less stretchy fabric with crisper stitch definition on the fpdc/bpdc ribbing; size up to a 6.5mm hook to keep the same overall dimensions.
Acrylic, bulky weight (one step up from chunky)Speeds up the 6-round squares and reduces total row count needed to reach shoulder-to-shoulder length, but the finished sweater runs bigger; consider a 5.5mm hook to compensate.
FAQs

Questions

How is the sweater size adjusted?

Length and width are controlled by repeating Round 3 until the square measures shoulder to shoulder, then Round 5 until only one cluster remains. Sleeve length is adjusted the same way, repeating rounds until 24 rows or the preferred length is reached.

Do both diagonal granny squares need to match exactly?

Yes. Assembly Step 1 requires laying both squares together with corners matching, so any difference in round count or tension between the two will show at the shoulder and side seams.

Is the color change in the squares required?

No, changing color every six rows is listed as optional in the pattern. A single color worked straight through all 6 rounds per square is equally valid.

One at a time —

Get the next pattern

Tested round by round before it is sent. No spam.