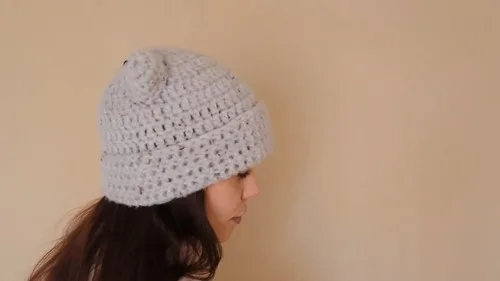
Made and counted by Wren —

Crochet bear beanie pattern with ears for beginners

Worsted-weight yarn, basic hook: two-piece beanie with bear ears sewn on at round 3, 7-round crown, beginner level.

Crochet bear beanie pattern with ears for beginners
BeginnerLevel
3-5 hoursTime
WorstedYarn
Jump to the pattern

About this pattern

This is a beginner two-piece crochet hat: a 7-round top-down beanie body and two 4-round ears sewn onto the hat starting at round 3 of the increase section. The beanie opens with 10 DC into a chain-5 ring; each ear opens with 12 SC into a chain-4 ring, then increases in round 2. No stuffing or extra shaping beyond sewing is required for assembly.

This beanie is a two-piece build: a top-down hat body worked in 7 rounds from a chain-5 ring, plus two ears worked separately in 4 rounds each from a chain-4 ring. The body starts with 10 DC into round 1, and each ear starts with 12 SC into round 1 before increasing in round 2. The number that matters most is round 3 of the beanie — that is where both ears get sewn on, so the hat's increase pattern needs tracking accurately up to that point.

Using simple crochet stitches like Double Crochet (DC) and Single Crochet (SC), this beanie creates a cute and cozy accessory perfect for any adult. The pattern lets you customize the beanie with your favorite yarn colors for the hat body and the ears.
The pattern

Written out round by round

Materials

  • Worsted weight yarn
  • Crochet hook (size to suit your yarn)
  • Yarn needle (for sewing the ears onto the hat)
  • Scissors (to cut the long tail before fastening off)

Abbreviations

  • sc = single crochet
  • dc = double crochet

Beanie (Hat Body)

Crown (Increasing Rounds)

Start: Create a slip knot.

Chain: Chain up 5.

Ring: Slip stitch into the first chain to form a ring. Hold the tail tight and crochet over it.

Round 1Chain 2. 10 DC into the center of the ring. Slip stitch to close.
Round 2Chain 2. [2 DC in each stitch] around. Slip stitch to close.
Round 3Chain 2. [1 DC, 2 DC in the next stitch] repeated around. Slip stitch to close.
Round 4Chain 2. [1 DC in next 2 stitches, 2 DC in the next stitch] repeated around. Slip stitch to close.
Round 5Chain 2. [1 DC in next 3 stitches, 2 DC in the next stitch] repeated around. Slip stitch to close.
Round 6Chain 2. [1 DC in next 4 stitches, 2 DC in the next stitch] repeated around. Slip stitch to close.

Hat Side (Non-Increasing Rounds)

Rounds 7–16Chain 2. [1 DC in each stitch] around. Slip stitch to close. Repeat this round 10 times to build the sides of the hat.

Ears (Make 2)

Start: Create a slip knot.

Chain: Chain up 4.

Ring: Slip stitch the first chain to form a ring.

Round 1Chain 1. 12 SC into the center of the ring. Slip stitch into the first SC to close.
Round 2Chain 1. [1 SC in next stitch, 2 SC in the next stitch] repeated around. Slip stitch to close.
Round 3Chain 1. [1 SC in each stitch] around. Slip stitch to close.
Round 4Chain 1. [1 SC in each stitch] around. Slip stitch to close. Finish: Cut a long tail for sewing and fasten off.

Assembly

Step 1Thread the long tail of the ear onto a yarn needle.
Step 2Position the ear on the side of the beanie, starting the bottom edge of the ear at Round 3 of the beanie's increasing section.
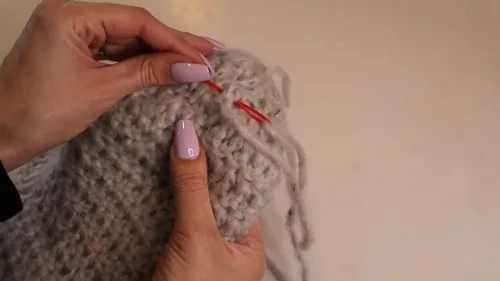
Step 3Sew the ear onto the hat by passing the needle around the edge of the ear and into the stitches of the hat.
Step 4Secure the yarn on the inside of the hat by weaving it through stitches and tying a double knot.
Step 5Repeat the process for the second ear.
Step 6Weave in all remaining ends.

Tester's notes

Round 1 of the beanie uses 10 DC into the ring; recount before starting round 2's increases, since an off-count here compounds across all 7 rounds.

Round 1 of each ear uses 12 SC into the ring; work both ears from the same count so they match before sewing either one on.

Round 2 of the ear increases around the previous round; check the stitch count at the end of that round against round 1's 12 to confirm the increase landed evenly on both ears.

Ears attach starting at round 3 of the beanie's increasing section; mark round 3 on both sides of the hat with scrap yarn before sewing so the ears sit level.

Ears are sewn on flat, not stuffed; keep tension even while whip-stitching around the edge so the ear fabric doesn't pucker against the 7-round hat body.

The pattern allows you to customize the beanie with your favorite yarn colors for the hat body and the ears.

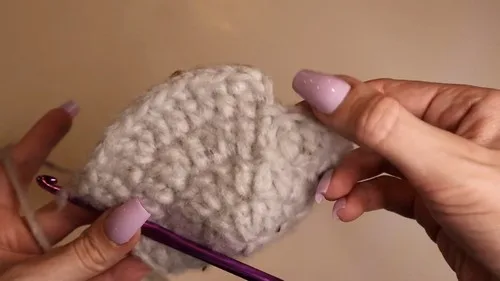
Work in progress

Crochet bear beanie pattern with ears for beginners — photo 2
Crochet bear beanie pattern with ears for beginners — photo 3

At a glance

Rounds11
Parts2
LevelBeginner
Time3-5 hours
YarnWorsted

Gauge check

After round 1 of the beanie (10 DC into the chain-5 ring), the circle should lie flat without cupping or rippling at the edges.

If it domes or ruffles, change hook size up or down and rework round 1, since the pattern gives no stitch gauge and fit is judged by how flat that first round lies.

If something looks wrong

The crown cups or cones instead of
The increase count after round 1's 10 DC is off; frog back to round 1, recount to 10, and redo each increase round before moving on.
The two ears come out different sizes.
One ear likely missed a stitch in round 1's 12 SC or in round 2's increase; count both ears stitch for stitch before sewing either to the hat.
The ears sit at different heights on the head.
The starting point wasn't marked consistently; place a stitch marker at round 3 of the beanie on both sides before starting the sew-on so each ear begins at the same round.
The seam where the ear meets the hat
The sewing tension is tighter than the crochet tension; loosen the whip stitch around the ear edge and match it stitch-for-stitch into the hat's existing loops instead of pulling tight.

Yarn substitutions

Cotton, worsted weightProduces a stiffer ear that holds its shape without stuffing, but the beanie body loses stretch; size up a hook half a step to keep the 7-round crown from drawing in tight.
Acrylic-wool blend, worsted weightKeeps the same stitch counts workable (10 DC round 1 of the beanie, 12 SC round 1 of the ears) while adding a softer drape to the hat body and more give when sewing ears on.
Chunky-weight acrylicMakes both the beanie and ears larger overall from the same round counts, so expect a bigger finished circumference and a larger hook; ear placement at round 3 will sit higher up the crown than with worsted weight.
FAQs

Questions

Can the ears be crocheted in a different color than the hat?

Yes. Both ears are worked as separate pieces starting from their own chain-4 ring, so any color works as long as both ears use the same yarn so they match.

Do the ears need stuffing to stand up?

No. The ears are sewn flat onto the hat using the whip stitch described in assembly, with no stuffing step included in the pattern.

Why do the ears attach at round 3 of the beanie instead of the top?

Round 3 falls partway down the hat's increasing section, which puts the ears at a height that reads as ear-like rather than sitting at the very crown. Starting both ears at the same round keeps them level with each other.

One at a time —

Get the next pattern

Tested round by round before it is sent. No spam.