Made and counted by Wren —

Crochet Bow Handbag Pattern: Autumn Striped Tote

Crochet a striped autumn bow handbag with braided handles, wood button tabs, and a crab stitch rim. A cozy worsted cotton bag pattern for fall.

IntermediateLevel
6-9 HoursTime
4.5 mmHook
WorstedYarn
Jump to the pattern

At a glance

Crochet the rectangular base flat in golden mustard until it reaches its full length and width.

Pick up stitches evenly around all four edges of the base to start working the body in the round.

Work the cream setup rounds, then stripe through rust, taupe, mustard, and burnt orange sections up the sides.

Finish the top with a cream rim round followed by a crab stitch edge for a polished, corded finish.

Crochet four small handle tabs and sew them in place along the front and back of the rim.

Make the closure loop and attach a button or magnetic snap to secure the bag shut.

Braid two handles and sew them to the tabs, shaping each into a soft arch above the rim.

Crochet the large bow and stitch it to the front, then attach the optional removable shoulder strap hardware.

About this pattern

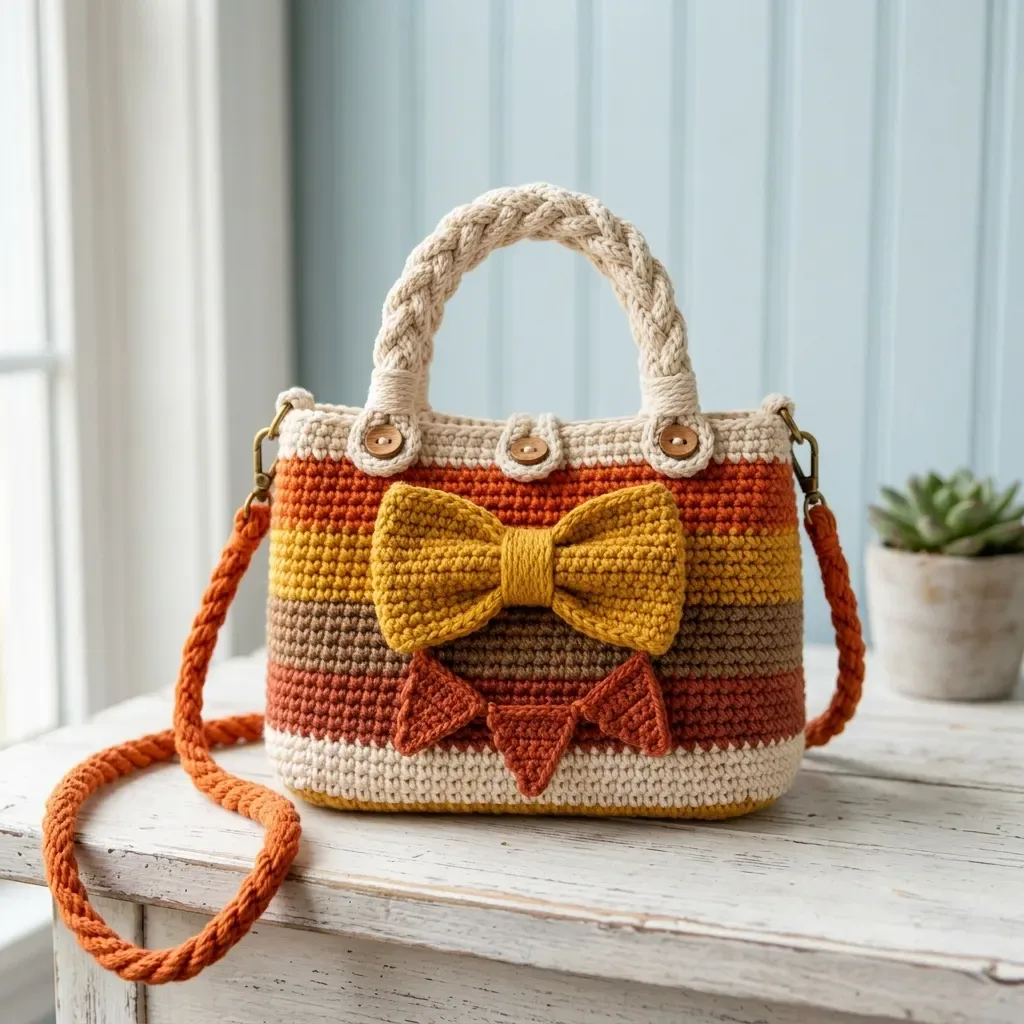
This bow handbag is a sturdy, striped little tote that pulls together everything I love about autumn crochet — warm mustard, rust, burnt orange, and taupe layered in bands around a flat cotton base, finished with a cheerful bow and braided handles. It's the kind of bag that feels handmade in the best way, structured enough for everyday errands but still soft and squishy in your hands. Perfect for crocheters who want a functional project that doubles as a statement accessory for fall.

You'll work a flat rectangular base first, then pick up stitches around all four sides to build the body in the round entirely in single crochet, so the technique stays approachable even while the color sequence keeps things interesting. Back loop only work isn't required here, but you will practice clean color changes, a crab stitch rim, and simple applique-style pieces like the handle tabs and bow. Expect an intermediate-friendly project, roughly 6 to 9 hours total once you count the base, body, rim, tabs, bow, and assembly.

The finished bag measures about 9 inches wide and 6 inches tall, sturdy enough to hold its shape with an optional plastic canvas base insert, and substantial enough to double as a market tote or a special gift for the crocheter in your life who loves fall colors. With its braided handles, button-and-loop closure, and optional removable shoulder strap, it feels like a boutique piece rather than a handmade project — cozy, warm-toned, and ready for pumpkin patches or Sunday errands alike.

Variations

The stripe sequence is where this bag really lets you play. Swap the cream, rust, taupe, mustard, and burnt orange for a winter palette of cream, forest green, and deep burgundy, or go coastal with navy, sand, and seafoam for a spring version of the same silhouette. If you want a bolder look, widen the stripes by extending each color block from 5 rounds to 7 or 8, which will naturally use a bit more yardage per color but keep the same overall body height. For a smaller everyday pouch, chain fewer stitches for the base — try 28 instead of 37 — and adjust your setup round stitch count to match, which shrinks the whole bag proportionally. Yarn-wise, this pattern loves worsted cotton for its stitch definition and structure, but a cotton-linen blend would add drape if you prefer a slouchier silhouette, while a cotton-acrylic blend keeps costs down without sacrificing durability. If wood buttons aren't your style, swap them for leather buttons or antiqued brass shank buttons to shift the whole mood from rustic to vintage. You could also skip the braided handles entirely and single crochet over a length of cotton cording for a smoother, more tailored handle finish. For gifting, work the bow in a single accent color that pops against the striped body — a deep plum bow against cream and rust stripes is stunning. And if you want to make it reversible in feel, line the inside with a printed cotton fabric that peeks out at the top rim, echoing one of your stripe colors for a coordinated finish.

I adore how this bag builds itself in such a logical, satisfying way — flat base first, then you just pick up stitches around the whole rectangle and suddenly you're working in the round like magic. Watching the stripe sequence climb from cream to rust to taupe to mustard to burnt orange feels like painting with yarn, and the crab stitch rim gives that lovely knotted, polished edge that makes the whole piece look store-bought. The handle tabs are such a clever detail — little folded loops secured with wood buttons that feel both decorative and genuinely functional. And don't get me started on the bow. Attaching that oversized bow to the front turns a simple striped tote into something with real personality, the kind of bag that gets compliments at the farmers market. Braiding the handles yourself instead of just chaining a strap adds texture and strength exactly where you need it. Every part of this pattern, from the sturdy single crochet body to the optional plastic canvas base, was clearly designed by someone who wanted a bag you'd actually carry, not just admire on a shelf.
Common mistakes

  • Losing track of the stitch count when picking up stitches around the base for the setup round.Place stitch markers at each corner of the base before you begin the setup round so you always know exactly where each side starts and ends.
  • Forgetting to place the side markers after stitches 24 and 72 before shaping the body.Mark these points as soon as you finish the setup round so folding the body into its rectangular shape later is quick and accurate.
  • Working the crab stitch rim in the wrong direction, which twists the stitch and loses its signature corded texture.Crab stitch is worked left to right for right-handed crocheters instead of the usual right to left, so double check your direction before starting round 29.
  • Attaching the handle tabs off-center or at mismatched heights on the front and back.Measure and mark stitches 15, 33, 63, and 81 with locking stitch markers before sewing so both tabs on each side line up symmetrically.
  • Skipping the optional plastic canvas base and ending up with a bag that slumps.Cut a piece of plastic canvas slightly smaller than the finished base and slip it in before closing up the bottom for a bag that holds its shape when standing.

The pattern

Written out round by round

Materials

Yarn

  • Worsted weight cotton or cotton-blend yarn, approximately 410 yards (375 meters) total, divided as follows:

Cream

  • 110 yards

Burnt orange

  • 80 yards

Golden mustard

  • 85 yards

Taupe

  • 65 yards

Rust

  • 70 yards

Recommended yarns

  • Lily Sugar’n Cream Solids, Paintbox Yarns Recycled Cotton Worsted, or Lion Brand 24/7 Cotton. Any #4 worsted weight cotton that gives you a firm fabric at gauge will work beautifully. If you prefer a softer acrylic blend, go down a hook size if the body feels floppy.

Hooks

  • US 7 / 4.5 mm for the bag body
  • US G-6 / 4.0 mm for the appliques

Notions

  • 4 stitch markers
  • Yarn needle
  • Scissors
  • 4 wood buttons, approximately 5/8 inch (16 mm)
  • Magnetic snap or button closure
  • 2 D-rings
  • 2 swivel clasps

Optional

  • firm bag base or plastic canvas

Optional

  • fabric lining

Abbreviations

  • ch = chain: yarn over, pull through loop on hook
  • sl st = slip stitch: insert hook, yarn over, pull through stitch and loop on hook in one motion
  • sc = single crochet: insert hook, yarn over, pull up a loop (2 loops on hook), yarn over, pull through both loops
  • BLO = back loop only: work into only the back loop of the stitch instead of both loops
  • st(s) = stitch(es)
  • rnd = round
  • RS = right side (the pretty side facing out)
  • WS = wrong side (the inside)
  • inc = increase: work 2 single crochet stitches into the next stitch
  • rep = repeat
  • rem = remain or remaining
  • Standing sc = Make a slip knot on your hook, insert hook in the indicated stitch, yarn over and pull up a loop, yarn over and pull through both loops. This lets you join a new color without a chain.
  • Invisible join = Cut yarn, pull tail through last stitch, thread needle, insert under both loops of first stitch of round, then down through top of last stitch. This creates a seamless finish.
  • Crab stitch (reverse single crochet) = Working left to right instead of right to left, insert hook in previous stitch, yarn over, pull up a loop, yarn over and pull through both loops. It creates a nice corded edge.
  • Surface slip stitch = Hold yarn on inside of work, insert hook from front to back, pull up a loop and pull it through loop on hook.

Base

Worked flat in golden mustard yarn with the 4.5 mm hook.

Checkpoint: base should measure approximately 9 x 2.75 to 3 inches (23 x 7 to 7.5 cm). Optional plastic canvas cut slightly smaller than the base may be added now for extra structure.

Chain 37.

  1. Round 1Single crochet in 2nd chain from hook and in each chain across. Chain 1, turn. (36 sc)
  2. Round 2through 12: Single crochet in each stitch across. Chain 1, turn after rows 2 through 11 only. Do not chain or turn after row 12. (36 sc)

Body

Stripe order from bottom: cream, rust, taupe, mustard, burnt orange, cream.

Checkpoint: body should measure approximately 6 inches (15 cm) tall from the base edge. Fold lightly at the side markers (after stitches 24 and 72) to form the rectangular silhouette.

Setup Round: With cream yarn and right side facing, single crochet 36 across the long edge, single crochet 12 evenly down the short side edge, single crochet 36 across the foundation chain edge, single crochet 12 evenly up the remaining short side edge. Join with slip stitch to first single crochet. (96 sc)

  1. Round 1through 4 (cream): Chain 1, single crochet in each stitch around. Join. (96 sc)
  2. Round 5through 9 (rust): Chain 1, single crochet in each stitch around. Join. (96 sc)
  3. Round 10through 14 (taupe): Chain 1, single crochet in each stitch around. Join. (96 sc)
  4. Round 15through 19 (golden mustard): Chain 1, single crochet in each stitch around. Join. (96 sc)
  5. Round 20through 23 (burnt orange): Chain 1, single crochet in each stitch around. Join. (96 sc)
  6. Round 24through 27 (cream): Chain 1, single crochet in each stitch around. Join. (96 sc)

Handle Tabs

Make 4

Use cream yarn and the 4.5 mm hook.

Chain 9.

  1. Round 1Single crochet in 2nd chain from hook and in each chain across. Chain 1, turn. (8 sc)
  2. Round 2through 5: Single crochet in each stitch across. Chain 1, turn. (8 sc)
  3. Round 6(buttonhole row): Single crochet 2, chain 4, skip 4 stitches, single crochet 2. Fasten off. (4 sc + ch-4 loop)

Closure Loop

  1. Round 1At top center front, join cream yarn at stitch 24. Chain 10, slip stitch into the same stitch to form a loop, turn, work 12 single crochet around the chain loop, slip stitch into the rim. Fasten off.

Large Bow

Use the 4.0 mm hook for crisp edges.

Bow Panel:

Chain 23.

  1. Round 1Single crochet in 2nd chain from hook and in each chain across. Chain 1, turn. (22 sc)
  2. Round 2through 10: Single crochet in each stitch across. Fasten off after row 10. (22 sc)

Top Rim

Continue with cream yarn.

Optional lining note: if adding a fabric lining, sew it in after the hardware is attached, catching the lining just below round 28 so the rim remains clean and visible.

  1. Round 28(cream): Chain 1, single crochet in each stitch around. Join. (96 sc)
  2. Round 29(cream): Work crab stitch in each stitch around. Use an invisible join to finish. (96 crab stitches)(96)

Braided Handles

Make 2

Cut 9 strands of cream yarn, each 28 inches (71 cm) long. Knot one end securely. Divide into 3 groups of 3 strands each. Braid firmly until you reach 13 inches (33 cm). Knot the other end.

Wrap each raw end with cream yarn for about 1 inch (2.5 cm) to create a clean finished look.

Removable Shoulder Strap

Cut 12 strands of burnt orange yarn, each 88 inches (224 cm) long. Braid into a 38 to 40 inch (96.5 to 101.5 cm) strap.

Thread the ends through swivel clasps or D-rings, fold back 1 inch (2.5 cm), and wrap or sew securely.

Assembly

Step 1

Handle Tabs placement: fold each tab over the rim. Front tabs center over stitches 15 and 33. Back tabs center over stitches 63 and 81. Sew the lower edge to the inside of the bag, then place a button on the outside through the loop.

Step 2

Sew one button or install a magnetic snap on the inside back center to correspond with the closure loop.

Step 3

Sew one braided handle to the front tabs and one to the back tabs, shaping each into a 4.5 to 5 inch (11.5 to 12.5 cm) arch above the rim.

Step 4

Attach D-rings at the side markers: between stitches 48 and 49 on one side, and between stitches 96 and 1 on the other. Stitch through several layers for strength.

Important notes

Work all body rounds with the right side facing you, joining each round with a slip stitch to the first single crochet plus a chain 1 that does not count as a stitch.

Keep a consistent tension throughout the striped body rounds so all five color sections stack evenly and the finished piece measures close to 6 inches tall.

If you're left-handed, the same instructions work perfectly, but mark your front center and side points clearly before attaching hardware since placement will mirror the written pattern.

Add the fabric lining, if using, only after all hardware and handles are attached, catching it just below round 28 so the crab stitch rim stays visible and clean.

Use the smaller G-6 hook only for the appliques like the bow and closure loop so those pieces stay firm and well-defined against the looser body fabric.

Weave in all ends securely as you finish each color section rather than leaving them until the end, since a bag this structured shows every loose thread.

Work body rounds with the right side facing you. Join each round with a slip stitch to the first single crochet and chain 1. The turning chain does not count as a stitch.

Color changes: change color on the final yarn over of the last single crochet before joining. This keeps color transitions clean.

Left-handed crocheters can work the same instructions; placement will be mirrored, so mark front center and side points before attaching hardware.

Gauge: 16 single crochet stitches and 18 rounds equals 4 inches (10 cm), blocked. Base check: 36 single crochet stitches should measure about 9 inches (23 cm); 12 rows should measure about 2.75 to 3 inches (7 to 7.5 cm). Applique gauge is less critical, but use the smaller hook for crisp edges.

FAQs

Frequently asked questions

What yarn weight and hook size does this bag use?

It calls for worsted weight cotton or cotton-blend yarn with a US 7 (4.5mm) hook for the body and base, plus a smaller US G-6 (4.0mm) hook for the bow and other appliques. Cotton gives the bag the crisp structure it needs to hold its shape.

How much yarn do I need for each color?

In total you'll need about 410 yards: roughly 110 yards cream, 80 yards burnt orange, 85 yards golden mustard, 65 yards taupe, and 70 yards rust. It's a good idea to buy one extra skein of your main color in case your tension runs slightly looser.

Does this bag need a lining or a stiff base insert?

Both are optional but recommended. A piece of plastic canvas cut to fit the base adds structure so the bag stands upright, and a fabric lining sewn in after the hardware is attached gives a polished, finished interior.

How do I attach the braided handles and shoulder strap?

The braided handles sew directly onto the front and back handle tabs, shaped into a 4.5 to 5 inch arch above the rim, while the removable shoulder strap attaches separately using the D-rings and swivel clasps for versatility.

Can I make this bag smaller or bigger?

Yes, adjust the base chain length and setup round stitch count proportionally, and add or remove full stripe rounds in the body to change the height while keeping the color sequence intact.

One at a time —

Get the next pattern

Tested round by round before it is sent. No spam.