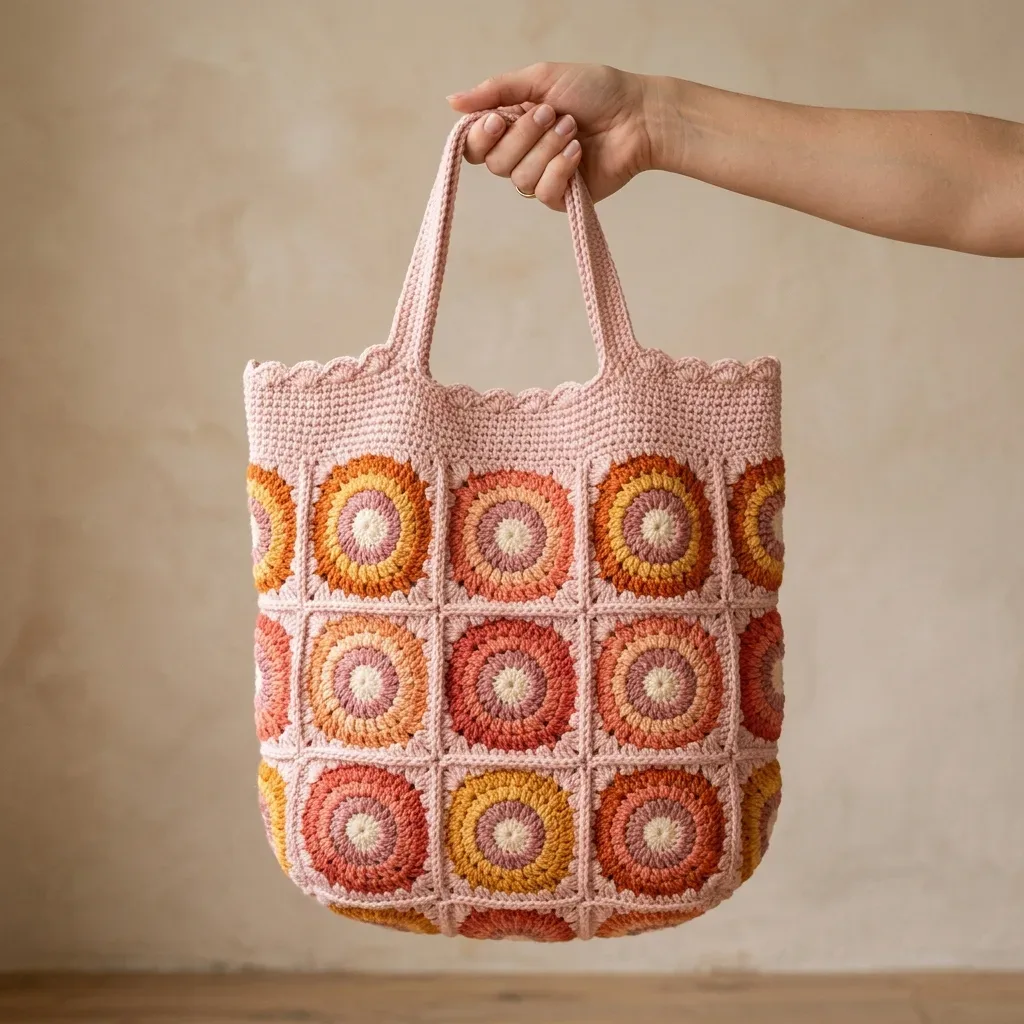
Main Pattern
Round 1Cream Make a magic ring (MR). Chain 3 (this counts as your first double crochet). Work 11 double crochet stitches into the ring. Join to the top of the starting chain-3 with a slip stitch. Fasten off and pull the magic ring closed.(12)
Round 2Dusty Rose Join your accent color to any stitch. Chain 3 (counts as dc), then work 1 dc in the same stitch. Work 2 dc in each stitch around. Join to the top of the chain-3. Fasten off.(24)
Round 3Peach Join color. Chain 3 (counts as dc), dc in same stitch, dc in next stitch. Work 2 dc in next stitch, dc in next stitch. Repeat from * around. Join. Fasten off.(36)
Round 4Gold Join color. Chain 3 (counts as dc), dc in same stitch, dc in next 2 stitches. Work 2 dc in next stitch, dc in next 2 stitches. Repeat from * around. Join. Fasten off.Round 5 (Blush) This round squares off the circle. The treble stitches pull the corners out while the shorter stitches flatten each side. You’ll work four matching repeats, one corner per repeat.Join blush in any stitch. Chain 1. Single crochet in next stitch, half double crochet in next stitch, double crochet in next 2 stitches, treble crochet in next 2 stitches, work corner (tr, ch 2, tr) in next stitch, treble crochet in next 2 stitches, double crochet in next 2 stitches, half double crochet in next stitch. Repeat from * three more times (4 times total). Join to first sc. Fasten off.(52 stitches + 4 corner spaces)(48)
Building the Ombre Effect
Here’s where the magic happens. The sunset effect comes from where you place each accent color , not from following one fixed sequence. Keep cream centers and blush squares on every motif, then vary Rounds 2 through 4.
Top row motifs: Lean into golden yellow, peach, and soft orange for a sunlit look.
Middle row motifs: Mix rose, peach, and orange evenly.
Bottom row motifs: Bring in terracotta and deep orange so the color settles warmest at the base.
Pro tip: Aim for gentle variation rather than perfect matching. Neighboring motifs reading slightly differently is what gives the bag its hand-dyed, sunset glow. Lay your motifs out before joining and shuffle them around until the gradient feels right to you. Trust your eye.
Joining the Motifs and Creating the Base Layout
Arrange your 24 completed motifs into a panel that is 8 motifs across and 3 motifs down . The 8-wide direction will wrap around the bag.
Joining
With blush yarn and a yarn needle, whipstitch motifs together through the back loops only. Join all columns first, then join all rows.
(8 x 3 panel)
Tip: Block the flat panel before seaming. Crisp, square motifs join far more neatly and keep the grid lines straight.
Forming the Tube
Bring the two short side edges together and whipstitch them to form a tube. You now have a cylinder that is 8 motifs around.
Closing the Base
Flatten the tube so the side seam sits at one edge. Whipstitch the bottom edge closed straight across. This seam gives the bag its soft, rounded base.
The Top Band The band is worked in continuous joined rounds in blush around the top opening of the tube.
Foundation
With blush yarn, chain 7.
Round 1Half double crochet in the 2nd chain from hook and in each chain across. (6 hdc)
Round 2through 40 Chain 1, turn. Half double crochet in each stitch across. (6 hdc)Finishing the Handles Fasten off, leaving a long tail for sewing.
Attaching the Handles
Sew each handle to the inside of the band. Anchor the ends about 5 inches (13 cm) apart , making sure the front handle placement matches the back handle placement. Stitch through both the handle ends and the band several times for strength.
Tip: For a sturdier carry, work the handles a stitch or two wider, or hold the yarn double. Cotton softens with use, so a firm tension here keeps them from stretching over time.
Finishing Your Sunset Ombre Bag Weaving in Ends
Weave in all ends on the wrong side of the work, threading tails into matching colors so they disappear completely.
Final Blocking
Give the whole bag a final light steam or wet block. Ease it into shape over a towel-stuffed form to help it hold its silhouette.
Checking Seams
Examine the base seam and handle joins. Reinforce any loose spots with extra stitches now so you don’t have to fix them later.
Care Instructions
Cotton yarn blooms and softens beautifully after its first wash. The stitches even out and the motifs settle into crisp squares, so don’t worry if the fabric feels firm straight off the hook.
Hand wash in cool water with a gentle detergent Do not wring. Press water out gently between towels Reshape and dry flat, away from direct heat or sunlight
Store loosely stuffed so the brim keeps its shape Customizing Your Bag Want to make this pattern your own? Here are some ideas:
Smaller bag: Work Rounds 1 through 3 only (skip Round 4) for approximately 3-inch motifs. You can also drop to a 3.5 mm hook throughout for a denser, smaller fabric.
Deeper tote: Add a fourth row of motifs (32 motifs total) before seaming for extra capacity.
Longer handles: Add rows to each handle in pairs to keep the front and back handles even.
Calmer palette: Limit your accents to just three close shades for a subtler, more tonal gradient.
You Did It!
Thank you so much for choosing this pattern. I hope you love making this bag as much as I loved designing it. There’s something really special about carrying something you made with your own hands, especially when it reminds you of warm summer evenings and the last light of day.
If you make this bag, I would absolutely love to see it! Share your finished project on Instagram or Facebook and tag me so I can admire your work. Every maker puts their own spin on a pattern, and I’m always amazed by the color combinations people choose.
If this pattern made your project list, go ahead and save it to your Pinterest boards so you can find it easily when you’re ready to start. And if you do make one, drop a comment below. I read every single one and love hearing how your projects turn out!