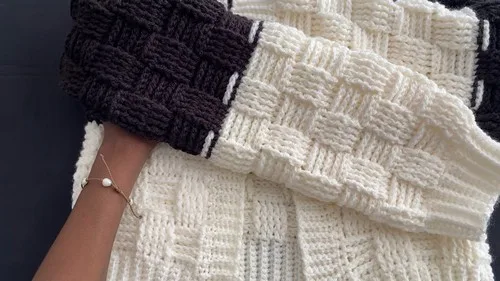
Made and counted by Wren —

Basket weave crop cardigan pattern notes

A basket weave crop cardigan made from 3 panel types using worsted weight yarn and a crochet hook, finished with a contrasting

Basket weave crop cardigan pattern notes
IntermediateLevel
4-6 hoursTime
WorstedYarn
Jump to the pattern

About this pattern

A basket weave crop cardigan made from 5 panels: 1 back panel (2 rounds), 2 front panels (1 round each), and 2 sleeve panels (1 round each), all starting from a chain-11 band and worked in worsted weight yarn. Assembly takes 6 steps, including a contrasting-color border at the neckline and hem.

This basket weave crop cardigan builds from five flat panels: one back panel worked in 2 rounds starting from a chain-11 band, two front panels each worked in 1 round, and two sleeve panels each worked in 1 round. All three panel types use the basket weave stitch pattern, with the back panel's bottom rows single crocheted in the back loop only. Six assembly steps join the panels, attach the sleeves, and add a contrasting-color border at the neckline and hem.

The pattern

Written out round by round

Materials

  • Worsted weight yarn in desired color
  • Crochet hook (size not specified — choose based on your gauge and yarn weight)
  • Scissors
  • Yarn needle

Back Panel

Foundation Chain: creates the band for the bottom part of the sweater before the back-loop single crochet rows begin.

Round 1Chain 11 to create the band for the bottom part of the sweater.Row 1 - Row X (desired length): work single crochet in the back loop for each row, maintaining the stitch count, and repeat these rows until the back panel reaches the desired length.
Rows 2+Row X Single crochet in the back loop for each row, maintaining the stitch count. Repeat the single crochet rows until you reach the desired length for the back panel.

Sleeve Panels

Make 2

Prepare the Sleeve Panels: increase stitches as needed so the sleeve accommodates the arm size appropriately.

Round 1Increase the number of stitches in the sleeve panels to accommodate the arm size appropriately; use the basket weave stitch pattern for the sleeves, adjusting the stitch count to ensure a comfortable fit.

Front Panels

Make 2

Create Two Front Panels: each front panel follows a similar pattern to the back panel, with the width adjusted as needed.

Round 1Follow a similar pattern to the back panel, adjusting the width as needed; use the basket weave stitch pattern to match the back panel.

Assembly

Step 1Align the front panels against the back panel and stitch them together at the top.
Step 2Secure the sleeve panels to the sides of the main body panels to complete the sweater structure.
Step 3Use a contrasting color yarn to create a border around the neckline and bottom part of the sweater.
Step 4Incorporate single crochet and slip stitch techniques for the border.
Step 5Weave in any loose ends for a clean finish.
Step 6Ensure all components are securely attached and aligned for a polished final look.

Tester's notes

Hook size isn't fixed in the materials list — choose a hook that gives a firm, even basket weave fabric before starting the chain-11 band, since basket weave distorts fast with the wrong hook.

2 rounds make up the full back panel; mark the end of round 1 so round 2's back-loop-only single crochet rows land on the correct side.

1 round is listed for each front panel and each sleeve panel, but that round repeats to desired length — track row count with a stitch marker, not by eye, so both front panels and both sleeve panels match.

Tension on back-loop-only single crochet runs tighter than regular single crochet — check it every few rows against the chain-11 band width so the panel doesn't narrow as it grows.

At a glance

Rounds4
Parts3
LevelIntermediate
Time4-6 hours
YarnWorsted
FAQs

Questions

Can the front panels and sleeve panels be worked at the same time?

Yes, since each is listed as only 1 round that repeats to length. Working one front panel and one sleeve panel side by side helps match row counts before duplicating the second front and sleeve panels.

Why does the pattern only list 2 rounds for the back panel?

Round 1 sets the chain-11 band, and round 2 covers the repeated back-loop-only single crochet that continues until the panel reaches the desired length. So the count of 2 rounds marks instruction steps, not total rows.

Does the border need a different hook?

The materials list doesn't specify a separate hook for the border, so use the same hook used for the rest of the cardigan. Only the yarn color changes for the border's single crochet and slip stitch rows in step 3.

One at a time —

Get the next pattern

Tested round by round before it is sent. No spam.