Made and counted by Wren —

White-Green Mandala Crochet Carpet Pattern

Make a stunning White-Green Mandala Crochet Carpet with color-change rounds, textured stitches, and a scallop or picot border for a polished finish.

IntermediateLevel
6-10 HoursTime
9 mmHook
WorstedYarn
Jump to the pattern

At a glance

Begin by working the foundation circle to establish the flat center of your mandala.

Build outward through the color-change rounds, alternating white and green as directed.

Keep increases even each round so the piece stays flat rather than cupping.

Work the textured shell round in white for a raised, scalloped surface effect.

Add the cluster round in green, grouping three double crochets into single stitches for texture.

Weave in color-change ends neatly as you go to keep the back tidy.

Finish the outer edge with either the scallop or picot border for a decorative frame.

Block the finished carpet flat to smooth out any curling before displaying it.

About this pattern

This White-Green Mandala Crochet Carpet transforms simple rounds of double crochet and single crochet into a striking geometric floor piece. Starting from a foundation circle and building outward with deliberate color changes between white and green, this design captures the hypnotic symmetry mandalas are famous for. It's perfect for crocheters who love watching a pattern bloom round by round and want a functional piece that doubles as art for their living room, nursery, or reading nook.

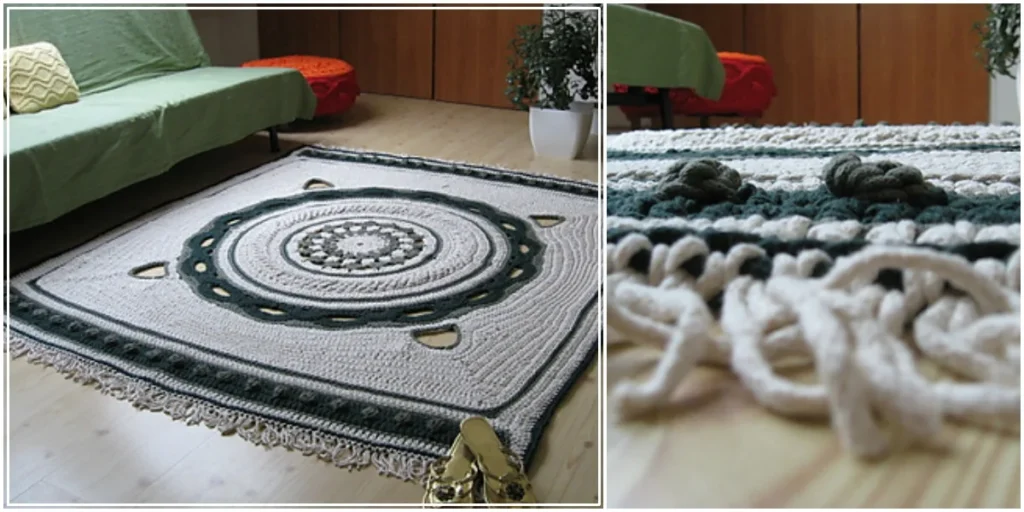
Once finished and edged with either a scallop or picot border, this mandala carpet lies flat with crisp white-and-green contrast radiating from its center. The finished texture feels substantial thanks to the clustered and shell rounds, giving it a slightly raised, tactile quality underfoot or on a wall. It makes a gorgeous handmade housewarming gift, a meditation-space accent, or a treasured centerpiece you'll be proud to say you made round by round.

Variations

This mandala is endlessly customizable once you get comfortable with the basic construction. Swap the white-green palette for a moodier look using Wool-Ease in Charcoal and Cranberry for a fall-ready throw rug, or go coastal with Bernat Blanket in Seafoam and Cream for a beachy accent piece. For a nursery version, try soft pastels like Caron Simply Soft in Blush and Mint — the shell and cluster texture rounds will read as delicate lace-like detailing against gentle colors. If you want a smaller trivet or coaster-style mandala, simply stop after the foundation circle and just two or three of the color-change rounds, then work your chosen border directly onto that smaller circumference — you'll still get the full visual impact in miniature. Conversely, to scale up to a true statement rug, repeat the color-change round structure with additional increase rounds beyond the five given, always keeping your stitch count even so the piece lies flat rather than ruffling or cupping. Consider working the cluster round in a metallic or variegated yarn like Metallic for a touch of shimmer that catches the light beautifully. Seasonal thinkers could rework this in deep green and burgundy for a wintery accent, or sunny yellow and white for a summer sunburst mandala perfect for a porch. For texture lovers, try alternating the shell-effect textured round and the 3-dc cluster round throughout instead of using them just once each, creating a fully dimensional, richly tactile surface from center to border. Whichever direction you take it, this pattern's structure is flexible enough to become a true reflection of your own style.

I adore how this mandala carpet turns basic stitches into something that looks so intentional and artful. Starting with that simple foundation circle and watching it expand through the color-change rounds feels almost meditative — every round brings a new burst of white or green and a fresh sense of progress. The textured round, with its 3-dc shell effect skipping a stitch for contrast, gives the surface a lovely dimensional quality that flat rugs just don't have. And that cluster round in green, where you work 3 dc together into one stitch, adds these little raised bumps that are so satisfying to feel under your fingers as you go. Choosing between the scallop border (all ruffly and bold) or the delicate picot edge lets you finish the piece with your own personal signature. I love that this pattern rewards patience without demanding advanced techniques — it's approachable enough to enjoy on a lazy afternoon but detailed enough to keep you genuinely engaged round after round. By the time you tie off that final border stitch, you'll have a piece that feels like wearable art for your floor.
Common mistakes

  • Losing track of stitch countPlace a stitch marker at the start of each round and recount your stitches before beginning the next round, adjusting increases evenly around the circle.
  • Carrying yarn sloppilyCarry the unused color loosely inside your stitches when possible, or cut and rejoin cleanly at the end of each round, weaving in ends as you go to keep transitions crisp.
  • Working the shell-effect textured roundCount carefully to skip exactly one stitch between each shell repeat, and use a marker every few repeats to confirm your spacing stays consistent all the way around.
  • Working the 3-dc cluster roundKeep your tension relaxed on the cluster stitches, and block the piece gently with steam or a light misting after completing this round to relax the fabric back into shape.
  • Choosing the scallop or picot borderCount your outer round's stitches first and adjust the border repeat (5 dc/skip 2/sc for scallop, or the ch-3 picot repeat) so it divides evenly around the full circumference.
  • Skipping a blocking step, leavingWet or steam block the finished piece on a flat surface, pinning the border gently into shape and letting it dry completely before use.

The pattern

Written out round by round

Materials

  • Cotton twine, white/undyed - approximately 1500 meters
  • Cotton twine, olive/khaki green - approximately 350 meters
  • Cotton twine, dim green - approximately 450 meters
  • 9mm crochet hook (approximately US size M/N)

Abbreviations

  • ch = chain
  • st = stitch
  • sts = stitches
  • sl st = slip stitch
  • dc = double crochet
  • sc = single crochet

Step 1: Start with the Foundation Circle

Begin the mandala with a magic ring, which will serve as the center of your carpet.

Magic Ring : Create a magic ring with white yarn.

  1. Round 1Ch 2 (counts as first dc), work 11 dc into the ring. Sl st to the top of the starting ch 2 to join. (12 sts total).(12)

Tip : Pull the ring tight to close any gaps in the center.

Step 2: Build the Mandala with Color Changes

The mandala effect is achieved by alternating rounds of white and green. Each round typically increases to keep the carpet flat and circular.

  1. Round 2(Green): Ch 2, dc in the same st, 2 dc in each st around . Join with sl st. (24 sts).(24)
  2. Round 3(White): Ch 2, dc in the same st, 1 dc, 2 dc in next st around. Join with sl st. (36 sts).(36)
  3. Round 4(Green): Ch 2, dc in the same st, 2 dc, 2 dc in next st around. Join with sl st. (48 sts).Continue alternating colors and adding one more dc between increases in each new round to create a smooth, expanding circle. For instance:(48)
  4. Round 5(White): 3 dc, 2 dc in next st
  5. Round 6(Green): 4 dc, 2 dc in next stRepeat these rounds, following the increase pattern until your mandala reaches the desired size.

Step 3: Add Texture and Pattern Variations

Enhance your mandala with textured stitches like puff stitches, clusters, or shell stitches to add dimension.

  1. Textured Round(White): 3 dc in next st, skip 1 st, sc in next st for a shell effect.
  2. Cluster Round(Green): Work 3 dc together in one st , sc in next st, repeat.

Step 4: Finish with a Decorative Border

A well-chosen border completes the look of your mandala carpet.

  1. Border Round(White): Work a picot or scallop edge for a decorative finish.
  2. Scallop Border5 dc in same st, skip 2 sts, sc in next st , repeat.
  3. Picot Bordersc, ch 3, sl st into first ch, sc in next st , repeat around

Important notes

💡 Use a hook one size larger than you'd normally choose for the yarn weight — a looser gauge helps keep this many increase and cluster rounds from puckering.

💡 Place a locking stitch marker at the beginning of every round throughout the foundation circle and color-change section so you never lose your place mid-round.

💡 Wind your green and white yarn into separate small cakes or bobbins before starting so you can grab the correct color instantly during each color-change round.

💡 Work the 3-dc cluster round with a slightly relaxed tension, since pulling too tight here is the most common cause of a cupped, non-flat mandala.

💡 Test your scallop or picot border repeat on a small swatch first if you're unsure how it will divide evenly around your finished carpet's total stitch count.

📏 The original White-Green Mandala Carpet was made with three shades of cotton twine (1500 m white/undyed, 350 m olive/khaki, and 450 m dim green) on a 9mm hook, took about 15 hours to complete, and finished at approximately 160 x 200 cm before the border was added — your gauge and finished size will vary with your own yarn and hook choice.

FAQs

Frequently asked questions

What yarn weight works best for the White-Green Mandala Crochet Carpet?

The original carpet was made with cotton twine — worsted weight cotton or cotton-blend yarn also works beautifully, giving good structure and stitch definition for the shell and cluster texture rounds along with drape and durability for foot traffic.

Can I make this mandala carpet a different size?

Yes — simply add or reduce the number of color-change rounds worked after the foundation circle to grow or shrink the finished diameter. Just keep your stitch increases even each round so the piece continues to lie flat. The original design finished at approximately 160 x 200 cm before the border.

Should I choose the scallop border or the picot border?

The scallop border gives a bolder, ruffled edge with its 5-dc fan repeats, while the picot border offers a more delicate, pointed finish. Choose scallop for a statement rug and picot if you want a subtler, refined edge.

How do I keep the mandala from curling or cupping as I work?

Keeping your tension relaxed, especially through the cluster round, and checking that your increases stay even each round are the biggest factors. A final wet or steam block will also help flatten any minor curling.

Is this pattern a good project for a beginner?

It's best suited to an intermediate crocheter who is already comfortable with basic increases and simple color changes. The shell and cluster texture rounds add a bit of complexity that beginners may find challenging without prior in-the-round experience.

One at a time —

Get the next pattern

Tested round by round before it is sent. No spam.