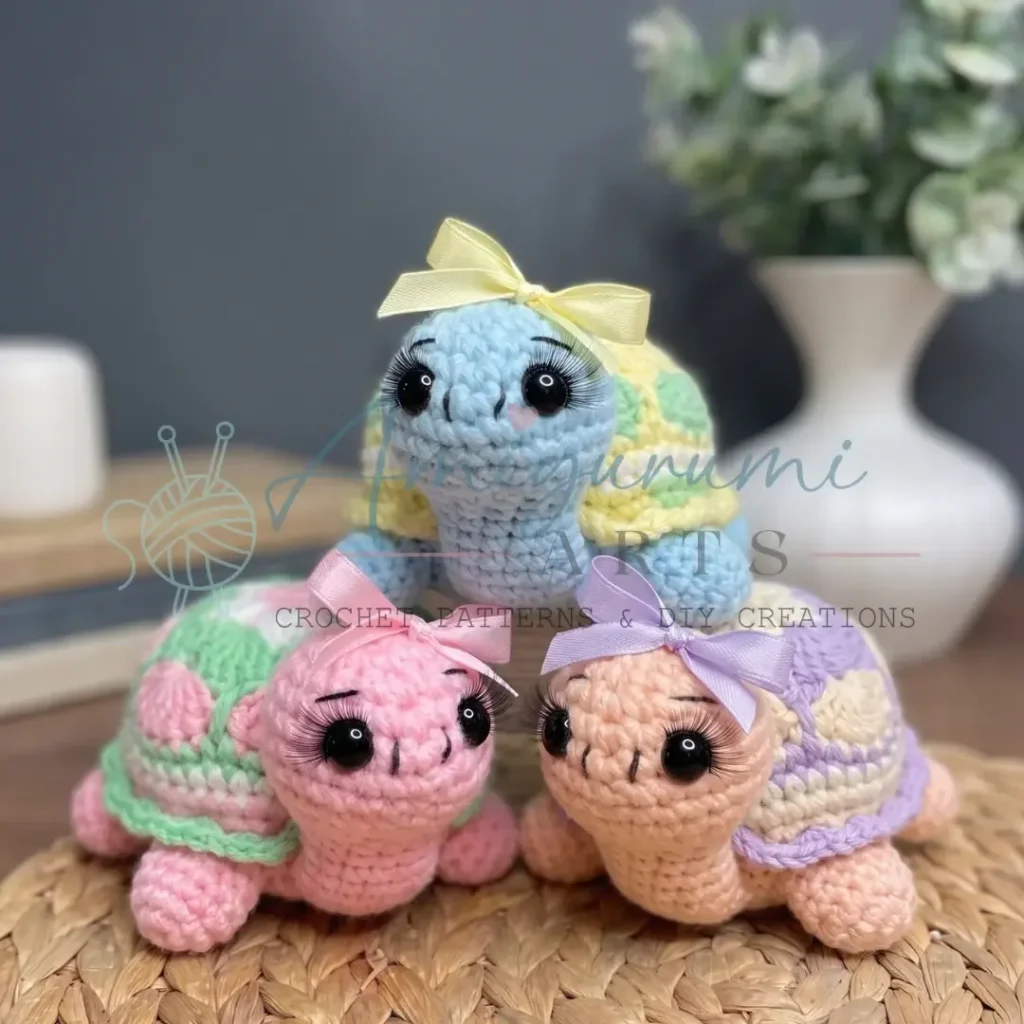
Made and counted by Wren —

How to crochet Tata the turtle amigurumi, piece by piece

Hook one size smaller than your yarn label; any weight works. Makes Tata the turtle amigurumi, 7-piece assembly.

How to crochet Tata the turtle amigurumi, piece by piece
BeginnerLevel
4-6 hoursTime
6 mmHook
Any WeightYarn
Jump to the pattern

About this pattern

Tata the Turtle is a beginner amigurumi: a Belly worked in continuous spiral rounds from 6 sc in a magic ring up to 12 in round 2, over 7 rounds total, plus a separately joined African Flower motif Shell, four Legs, one Head, and one Tail, all pinned then whipstitched to the Belly in that order. No gauge is critical; yarn weight alone sets the finished size.

Tata the Turtle is an amigurumi built from five separate pieces — Belly, Head, four Legs, and Tail — worked in continuous spiral rounds, plus one Shell worked separately as a joined African Flower motif and sewn on last. The Belly starts with 6 sc in a magic ring, increases to 12 in round 2, and runs for 7 rounds total before being flattened and closed through both layers, unstuffed. The number that matters most: 4 legs, placed evenly around the Belly's edge before any permanent sewing happens.
The pattern

Written out round by round

Materials

Yarn

  • Any weight and fiber composition; yarn thickness will directly determine Tata’s finished size (lighter yarn = smaller turtle, bulkier yarn = larger turtle)

Colors needed

  • At least one main color for the belly and body parts; one or more contrasting colors for the shell (optional)

Hook size

  • Choose a hook appropriate for your yarn weight (typically one size smaller than the yarn label recommends, for tight amigurumi fabric)

Safety eyes

  • 6 mm diameter, 2 pieces (or substitute beads, half-beads, or buttons)

Stuffing

  • Polyester fiberfill

Stitch markers

  • 1–2, to track the beginning of each round
  • Yarn needle / tapestry needle
  • Black sewing thread (for embroidering the eyebrows and nose)
  • Sewing needle
  • Scissors

Optional

  • A small ribbon or bow for decoration

Abbreviations

  • ch = Chain
  • dc = Double Crochet
  • dec = Invisible Decrease (insert hook through front loop of next 2 sts, yo, pull through both loops, yo, pull through remaining 2 loops)
  • inc = Increase (2 sc in the same stitch)
  • MR = Magic Ring
  • sc = Single Crochet
  • sl st = Slip Stitch
  • st / sts = Stitch / Stitches

Belly (Make 1)

Round 16 sc in MR. (6)Step by step: sc in each st around. (6).

Do not stuff. Pinch the open end flat and close by crocheting across the flattened edge, working through both layers.

Round 2inc in each st around. (12)Step by step: sc in each st around. (12).

Do not stuff. Pinch the open end flat with your fingers and close the opening by crocheting across the flattened edge, working through both layers.

Round 3sc, inc repeat 6 times around. (18)
Round 42 sc, inc repeat 6 times around. (24)Step by step: sc in each st around. (24); dec 12 times around. (12); sc in each st around. (12).Stuff the face portion of the head firmly with fiberfill. Stuff the neck section (Rnds 10–16) very loosely — it needs to remain flexible. Pinch the neck flat with your fingers and close the opening by crocheting or whipstitching across the flattened edge.Step by step: Attach safety eyes and embroider the nose and eyebrows before closing the neck.
Round 53 sc, inc repeat 6 times around. (30)
Round 64 sc, inc repeat 6 times around. (36)
Round 75 sc, inc repeat 6 times around. (42)Fasten off, leaving a long yarn tail for assembly.

Shell (Make 1)

Round 1The Shell is worked from a diagram based on the African Flower motif . Work the motif in your chosen color or colors. Once complete, work a border round of small shell stitches (3 dc in each ch-sp around) or any edging of your choice. Fasten off and weave in the ends.(3)
Round 2This is a motif worked in joined rounds from a central ring outward. Follow your African Flower diagram, joining each round with a sl st and beginning each new round with the appropriate starting ch.

Assembly

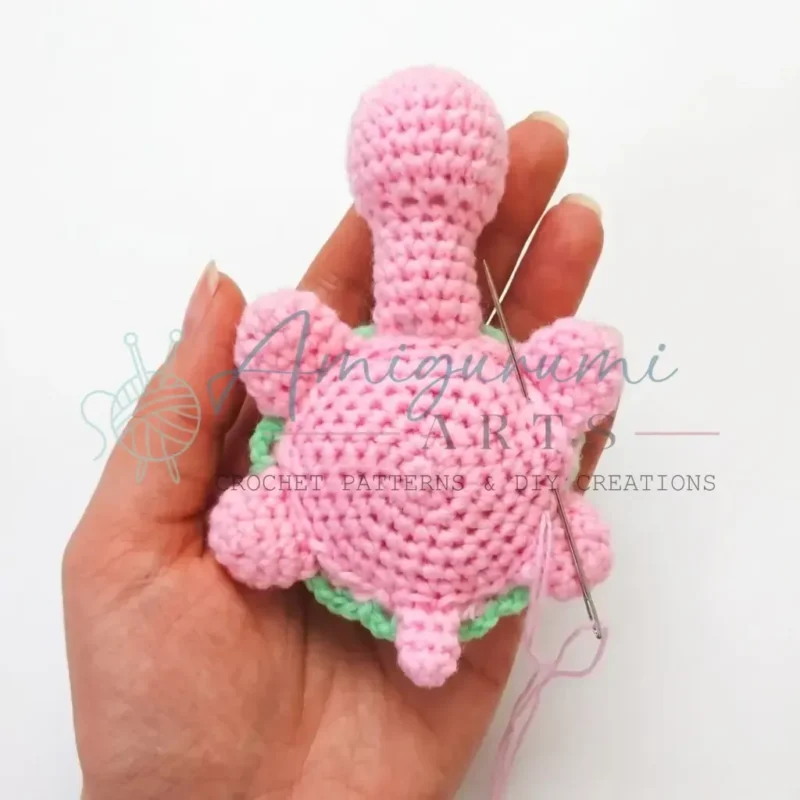
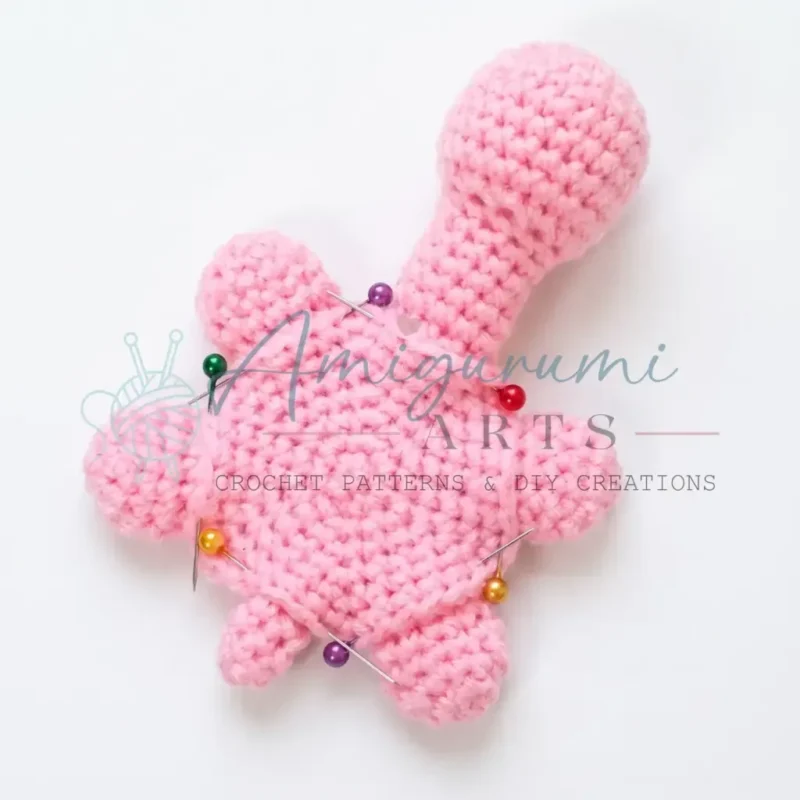
Step 1Use pins to position all pieces on the Belly before sewing anything permanently. Place the four Legs evenly around the outer edge, the Head at the front, and the Tail at the back.
Step 2Sew each Leg securely to the Belly using your yarn needle and the long tail left at fastening off. Use a whipstitch and pull snugly so there is no gap between the leg and the belly.
Step 3Sew the Tail to the back of the Belly in the same manner.
Step 4Sew the Head to the front of the Belly, leaving it slightly raised rather than flat — this gives Tata her characteristic upward gaze.
Step 5Place the Shell (African Flower motif) on top of the assembled body, aligning it centrally over the Belly. Pin it in place, paying close attention to the decorative edge details.
Step 6Before sewing the Shell down completely, stuff the body cavity firmly with fiberfill through the gap between the Shell and the Belly.
Step 7Sew the Shell to the Belly all the way around, closing the opening as you go.
Step 8Once the Shell is secured, tilt the Head upward slightly so it rests against the underside of the Shell edge and stitch it in that lifted position for Tata’s classic pose.
Step 9Use your sewing needle and black thread to sculpt a small dimple for the mouth by taking a stitch through the head and pulling gently. Embroider the eyebrows and nose with short straight stitches.
Step 10If you haven’t already, attach the safety eyes by pressing the posts through the fabric at your chosen position and securing the washers on the inside.
Step 11Tie a small ribbon into a bow and stitch or tie it onto Tata’s head or neck as a finishing touch.
Step 12Weave in all remaining yarn ends.

Tester's notes

6 mm eyes (2 pieces) need their placement decided before any permanent sewing; buttons or half-beads of the same 6 mm size substitute without resizing the Head.

1-2 stitch markers track the first stitch of every round; since every component works in a continuous spiral, losing the marker loses the round count fast.

7 rounds make up the Belly, and round 2's increase to 12 stitches is the only shaping check before the piece runs even for the rest.

4 Legs get pinned to the Belly's outer edge before a single stitch of sewing happens, so spacing stays even around the circle.

0 extra rounds are written for the Shell beyond the diagram; it is worked separately as a joined African Flower motif, not in spiral, finished with a border round of 3 dc shell stitches per ch-sp before it gets attached.

Work in progress

How to crochet Tata the turtle amigurumi, piece by piece — photo 2
How to crochet Tata the turtle amigurumi, piece by piece — photo 3

At a glance

Rounds9
Parts2
LevelBeginner
Time4-6 hours
Hook6 mm
YarnAny Weight

Gauge check

Gauge is not critical here, but check that round 2 of the Belly reads as a tight 12-stitch circle with no visible gaps before moving on, since finished size depends on yarn weight, not a target measurement.

If the stitches gap or the fabric feels loose between your fingers, drop to a hook one size smaller than the yarn label recommends, which is what the pattern itself specifies for tight amigurumi fabric.

Stitch-count checkpoints

  • Belly (Make 1) · Round 2: 12 sts
  • Belly (Make 1) · Round 4: 24 sts
  • Belly (Make 1) · Round 6: 36 sts
  • Belly (Make 1) · Round 7: 42 sts
  • Shell (Make 1) · Round 1: 3 sts

If something looks wrong

The Belly pulls into a cone instead of lying flat.
Round 2 did not land on 12 stitches, or the increases are not spaced evenly. Rip back to round 1 and recount 6 increases evenly around before continuing.
The African Flower Shell cups instead of lying flat.
The slip-stitch join at the end of a round was pulled too tight, or the motif was not blocked. Loosen the join, press or steam the finished motif flat, then attach it to the Belly.
A visible gap shows between a Leg and the Belly after whipstitching.
The whipstitch was worked too loosely or missed one of the two layers. Redo the seam, pulling the yarn snug every few stitches and catching both layers as instructed.
The 6 mm eyes sit crooked once everything is sewn.
Permanent stitching started before all pieces were pinned and checked. Pin all 4 Legs, the Head, and the Tail first, confirm symmetry from above, then sew eyes last.

Yarn substitutions

Cotton, worsted weightProduces a firmer, less stretchy fabric that holds its shape with less stuffing showing through gaps; use the same one-size-down hook rule given in the materials list.
Acrylic, DK weightShrinks the finished Tata smaller than a worsted-weight version and gives a softer drape; needs less fiberfill per piece and a correspondingly smaller hook sized one down from the DK label.
Wool-acrylic blend, bulky weightScales the Belly, Legs, Head, and Tail up in size and works the 7 Belly rounds faster; takes noticeably more fiberfill to fill the larger cavity and a hook sized one down from the bulky label for tight fabric.
FAQs

Questions

Can the Shell be made in a single color instead of contrasting colors?

Yes. The materials list calls the contrasting shell colors optional, and the African Flower motif works fine in one main color throughout.

How many rounds does the Belly actually take?

Seven rounds total, starting at 6 sc in a magic ring and increasing to 12 in round 2. It is left unstuffed, then pinched flat and closed by crocheting across the flattened edge through both layers.

Can buttons replace the 6 mm safety eyes?

Yes, the materials list lists beads, half-beads, or buttons as direct substitutes for the 2 pieces of 6 mm safety eyes. Match the 6 mm size to keep the Head's proportions consistent.

One at a time —

Get the next pattern

Tested round by round before it is sent. No spam.