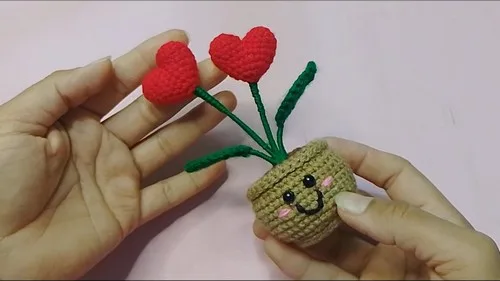
Made and counted by Wren —

Heart-shaped flower pot topper crochet pattern

Worsted-weight yarn, small hook: two crocheted heart halves joined into a flower pot topper.

Heart-shaped flower pot topper crochet pattern
BeginnerLevel
3-5 hoursTime
WorstedYarn
Jump to the pattern

About this pattern

This is a small amigurumi heart made from two crocheted halves joined into one flower pot topper. Each half starts at an 8-stitch magic ring and increases to 32 stitches over several rounds, then both halves join along 22 stitches and decrease to close. A separate spiral piece (6 to 12 stitches) forms the base, and a face is embroidered on afterward. No hook size or stuffing amount is specified in the source rounds.

This heart flower pot topper builds from two identical heart halves, each starting at a magic ring of 8 single crochets and increasing round by round to 32 stitches before the halves join along 22 combined stitches and decrease back down to close the top. A separate Part 2 piece starts at a 6-stitch magic ring and grows to 12 in a continuous spiral, forming the base that sits in the pot. The number that matters most is 32 — the widest round of each heart half, since an off count there throws off the whole shape.
The pattern

Written out round by round

Materials

  • Worsted weight yarn
  • Crochet hook (size to suit your yarn)

Abbreviations

  • ch = chain
  • st = stitch
  • sts = stitches
  • sl st = slip stitch
  • sc = single crochet
  • hdc = half double crochet
  • dc = double crochet
  • dec = decrease

Part 2

Round 1Magic ring, ch 1, make 6 sc into the ring. Tighten ring, do not sl st—continue in spiral.
Round 22 sc in each stitch around (12 total). For Rounds 3–4: 1 sc in each stitch.

Main Pattern

Round 2Ch 1, 2 sc in each stitch around (total 16). Join with sl st.
Round 3Ch 1, 1 sc, increase (2 sc in next stitch) repeat around (24 total). Join with sl st.For Round 4: Ch 1, 2 sc, increase repeat around (32 total).Join with sl st.
Round 5Front Loop Only Ch 1, sc in front loop of each stitch around. Join with sl st.
Round 6Top Part Ch 1, 3 sc in back loop, increase in next repeat around. Join with sl st.For Rounds 7–12: Ch 1, sc in each stitch around.Join with sl st after each round.
Round 13Decrease Ch 1, 3 sc, invisible decrease (dec) repeat around. Join with sl st.
Round 14Ch 1, sc around. Join with sl st. For Round 15 (Top Edge): Ch 2, double crochet (dc) in front loop of each stitch.Join with sl st, fasten off.Fold the dc round outward for decorative edge.Soil Part Repeat the pattern from the base (Rounds 1–4).Fasten off, set aside for assembly.

Heart-Shaped Flowers

Make Two Halves

Create another identical heart half.

Join both halves with sl sts.

Sc around both sides (22 total).

Round 6Sc in each stitch.
Round 7Decrease 3 sc, invisible dec repeat. Then: 6 sc, dec twice, 3 sc. For Round 8: 2 sc, dec, 1 sc, dec , then 4 sc, dec, 1 sc, dec , 2 sc.
Round 9Dec, sc, dec , 2 sc, dec, sc, dec, sc.Round 10 (Final Round): Stuff the heart with polyester. Make 5 decreases to close. Leave an opening at the base to attach the stem.

Leaves

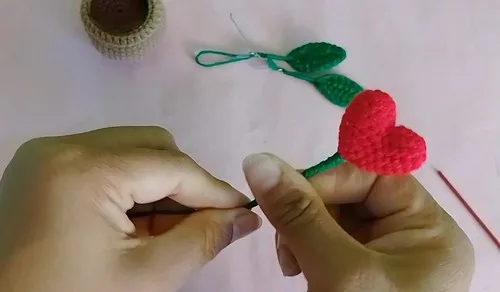
Ch 10 and insert wire through the chain.

Work along the chain: 1 sc, 1 hdc, 4 dc, 1 hdc, 1 sc.

At end: sc, ch 2, sc in same stitch.

Mirror the same pattern on the other side of the chain.

Fasten off, wrap remaining wire in green yarn.

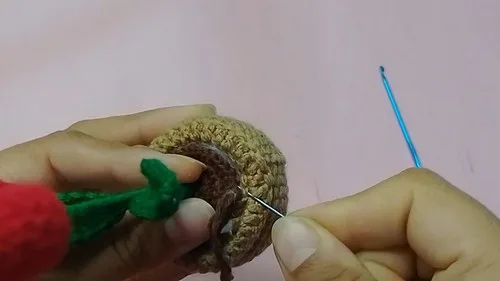
Assembly Attach wire to heart base and secure.

Cover wire with green yarn for stem.

Connect multiple hearts if desired.

Attach leaves to the stem.

Insert hearts into the soil piece.

Fill pot with polyester stuffing.

Attach the soil part to the pot securely.

Finishing Touches Embroider a smiley face using black thread.

Stitch on pink cheeks for added charm.

Assembly

Step 1Finishing Touches: Embroider a smiley face using black thread.
Step 2Stitch on pink cheeks for added charm.

Tester's notes

No hook size is stated in the pattern rounds; pick a hook that keeps the Round 1 magic ring (8 sc or 6 sc for Part 2) snug with no visible gaps, then stay with that hook for the whole piece.

Place a stitch marker at the start of each round in Part 2, since it is worked in a continuous spiral with no slip stitch join, unlike the Main Pattern rounds which do join.

Watch the stitch counts closely: 8, 16, 24, and 32 are checkpoints in the Main Pattern increase rounds, and a miscount at any one compounds by the next round.

If working the two heart halves in different colors, finish off and weave in ends at the last round of each half before joining them with slip stitches, so the color break sits cleanly at the seam.

The pattern does not state a stuffing amount; add fiberfill in small amounts as the decrease rounds (6, 7, 8) close the top, checking firmness after each round rather than stuffing all at once.

Work in progress

Heart-shaped flower pot topper crochet pattern — photo 2
Heart-shaped flower pot topper crochet pattern — photo 3

At a glance

Rounds11
Parts4
LevelBeginner
Time3-5 hours
YarnWorsted

Gauge check

After Round 3 of the Main Pattern, the piece should have 24 single crochets lying flat with no ruffling at the edge and no cupping inward.

If something looks wrong

The heart half cups instead of lying flat through the increase rounds.
The increase count fell behind — recheck that Round 3 has 24 stitches and Round 4 has 32 before moving on, since a missed increase in a round stacks forward.
The two halves do not line up evenly when joining with slip stitches.
One half likely has a different stitch count than the other at its last round; lay both halves flat side by side and recount before joining rather than after.
The joined piece has a gap or pucker at the seam where the two halves meet.
This comes from skipping stitches while working the 22-stitch sc-around-both-sides round; sc into every stitch of both halves evenly rather than stretching to close distance.
The top of the heart does not close smoothly during the decrease rounds.
Uneven spacing between invisible decreases in Round 7 or the paired decreases in Round 8 leaves flat spots; space decreases evenly around the round as instructed rather than clustering them.

Yarn substitutions

Cotton, worsted weightProduces a firmer, more defined stitch definition for the heart shape but less give when stuffing; use the same hook size planned for the pattern and expect a slightly smaller finished piece.
Acrylic, worsted weightKeeps stitch count and overall size close to the original with easier color changes between the two heart halves; drape stays stiffer, which helps the heart hold its shape without extra stuffing.
Cotton-acrylic blend, DK weightFinished heart comes out smaller than worsted weight at the same stitch counts (8 to 32), so size up the hook slightly to match the intended finished size, and use a bit less stuffing to avoid over-filling the smaller cavity.
FAQs

Questions

Why are there two heart halves instead of working the heart in one piece?

Working two identical halves (each from an 8-stitch magic ring up to 32 stitches) and joining them along 22 combined stitches is what creates the heart's center dip and rounded lobes. A single continuous piece cannot produce that inward curve without separate shaping on each side.

What is Part 2 for if it is not part of the heart?

Part 2 is a separate piece worked in a continuous spiral from a 6-stitch magic ring up to 12 stitches, forming the small base that fits into the pot. It is worked and finished independently of the Main Pattern heart halves before assembly.

Where does the embroidered face go?

The smiley face and pink cheeks are added as finishing touches after the heart halves are joined and the top is closed through the decrease rounds. Work the embroidery with black thread for the face before attaching the piece to the pot base.

One at a time —

Get the next pattern

Tested round by round before it is sent. No spam.