Made and counted by Wren —

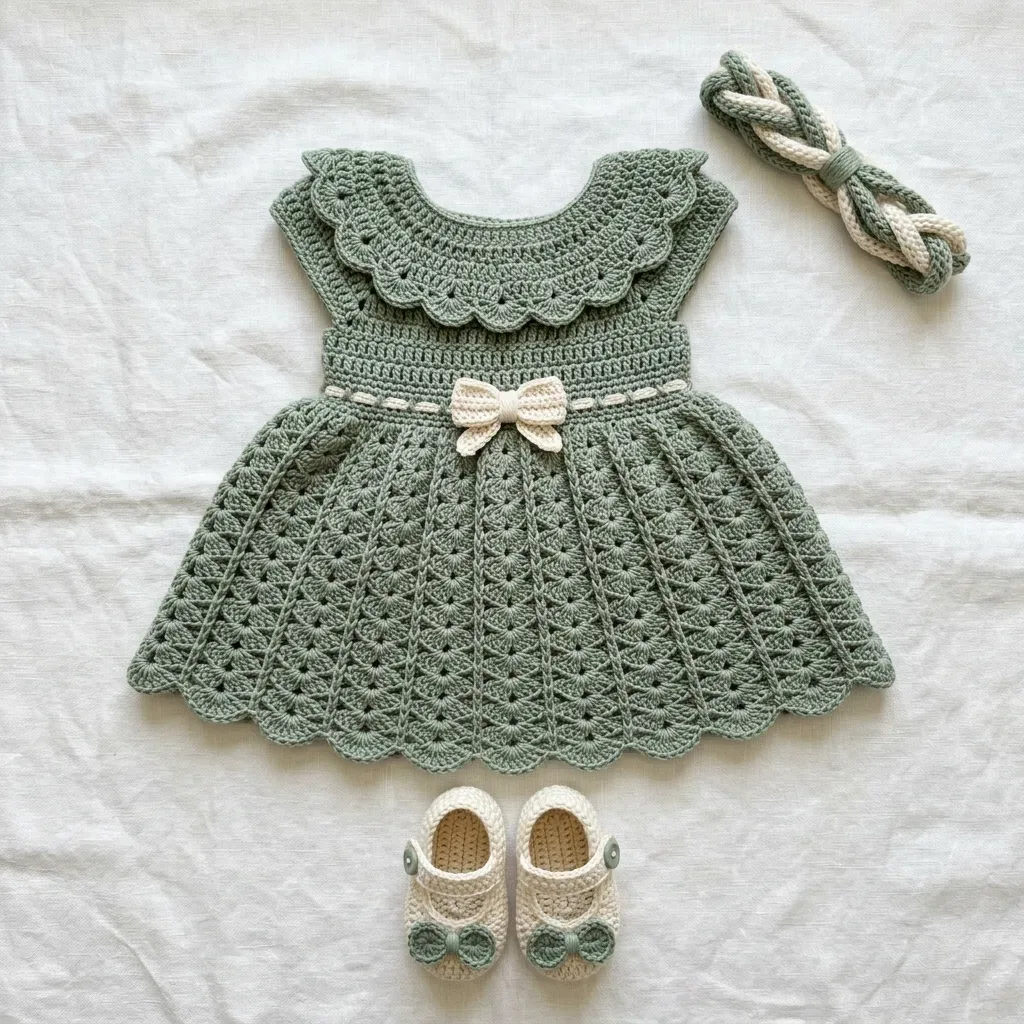
Sage green baby dress set with fan-stitch skirt and collar

E-4 / 3.5mm hook, DK yarn: crochet a sage green baby dress, collar, booties, and headband set.

Sage green baby dress set with fan-stitch skirt and collar
IntermediateLevel
12-18 hoursTime
3.5 mmHook
DKYarn
Jump to the pattern

About this pattern

This pattern makes a four-piece baby set: dress, collar, booties, and headband, in sage green DK yarn with cream contrast. Pieces are worked separately, then seamed. Dress chest circumference runs approximately 17 inches / 43 cm, length 13 inches / 33 cm. Rated advanced beginner to intermediate, requiring joined rounds, fan-stitch repeats, and edge pickup. Total time runs 12 to 18 hours, or 10 to 12 hours for experienced crocheters.

This set covers a dress, collar, booties, and headband, each piece worked separately in sage green DK-weight yarn with cream contrast accents, then seamed together at the end. Designed to fit babies 3 to 6 months old (chest 16 to 18 inches / 40 to 46 cm). The yoke starts flat from a 63-chain foundation and shapes four raglan increases before joining into rounds for the fan-stitch skirt. Chest circumference finishes at approximately 17 inches / 43 cm, with total body length from shoulder to hem at 13 inches / 33 cm. The headband finishes at approximately 14 inches / 36 cm circumference (stretchy), and the booties finish at approximately 3.5 inches / 9 cm sole length. Cream yarn repeats in the waist ribbon, center-front bow, headband braid, and bootie bows, tying the four pieces together without any color-change rounds.

The pattern

Written out round by round

Materials

Yarn

  • Yarn A (main color): DK weight (CYCA 3), sage green, approximately 350 yards / 320 meters
  • Yarn B (contrast color): DK weight (CYCA 3), cream or off-white, approximately 75 yards / 69 meters

Hooks

  • US size E-4 / 3.5 mm (for body of dress and booties)
  • US size D-3 / 3.25 mm (for collar and tighter edgings)

Notions

  • Stitch markers, at least 6
  • Yarn needle for finishing
  • Three small buttons, approximately 3/8 inch / 10 mm diameter
  • One length of cream ribbon or cream yarn, approximately 24 inches / 61 cm, for threading through waist eyelets
  • Scissors

Abbreviations

  • beg = beginning
  • BLO = back loop only (insert hook under just the back loop of the stitch)
  • cc = contrast color (Yarn B)
  • ch = chain (yarn over, pull through loop on hook)
  • ch-sp = chain space (the gap created by a chain stitch)
  • dc = double crochet (yarn over, insert hook, pull up loop, yarn over, pull through 2 loops, yarn over, pull through remaining 2 loops)
  • hdc = half double crochet (yarn over, insert hook, pull up loop, yarn over, pull through all 3 loops)
  • inc = increase (work 2 stitches into the same stitch)
  • mc = main color (Yarn A)
  • pm = place marker
  • rem = remaining
  • rep = repeat
  • rnd = round
  • RS = right side (the side that faces out when worn)
  • sc = single crochet (insert hook, pull up loop, yarn over, pull through both loops)
  • sk = skip
  • sl st = slip stitch (insert hook, yarn over, pull through stitch and loop on hook in one motion)
  • sp = space
  • st(s) = stitch(es)
  • t-ch = turning chain
  • tog = together
  • WS = wrong side
  • yo = yarn over

How to Make the Bow

The bow is worked separately in Yarn B, then sewn onto the dress.

Chain 13.

Round 1Sc in 2nd ch from hook and in each ch across. (12 sc)
Rounds 2–6Ch 1, turn. Sc in each st across. (12 sc)Fasten off, leaving a long tail. Pinch the center of the rectangle and wrap yarn tail tightly around the center 4 to 5 times. Secure with a knot. This forms the bow shape. Weave in ends, leaving one tail long enough to sew onto dress.

DRESS: NECKLINE AND YOKE

The yoke is worked flat from the neckline down. You will work increases at four raglan points to shape the armholes.

Set up: With Yarn A and E-4 / 3.5 mm hook, ch 63.

Foundation Row (RS): Sc in 2nd ch from hook and in each ch across. (62 sc)

Place markers BETWEEN stitches at these positions: Between sts 10 and 11 (right front / right sleeve divide)

Between sts 22 and 23 (right sleeve / back divide)

Between sts 40 and 41 (back / left sleeve divide)

Between sts 52 and 53 (left sleeve / left front divide)

Section breakdown: Right front: sts 1-10 (10 sts)

Right sleeve: sts 11-22 (12 sts)

Back: sts 23-40 (18 sts)

Left sleeve: sts 41-52 (12 sts)

Left front: sts 53-62 (10 sts)

Total: 10+12+18+12+10 = 62 sts

Round 1(WS): Ch 1, turn. [Sc in each st to st before marker, 2 sc in st before marker, 2 sc in st after marker, move marker to sit between the two new sts] 4 times, sc to end. (70 sc)
Round 2(RS): Ch 1, turn. Repeat Row 1 increase structure. (78 sc)Rows 3 through 10: Continue in this manner, working 8 increases per row (2 at each of the 4 raglan points).
Round 386 sc
Round 494 sc
Round 5102 sc
Round 6110 sc
Round 7118 sc
Round 8126 sc
Round 9134 sc
Round 10142 scAfter Row 10, section counts: Right front: 10 + 10 = 20 sts Right sleeve: 12 + 20 = 32 sts Back: 18 + 20 = 38 sts Left sleeve: 12 + 20 = 32 sts Left front: 10 + 10 = 20 sts Total: 142 stsCHECKPOINT: After Row 10, the yoke from neckline to underarm should measure approximately 3.5 inches / 9 cm. Hold the piece up and check that the armhole curves look even and the back opening lies straight.

WAIST EYELET ROUND

This creates the channel for threading the cream ribbon.

Round 1Eyelet Round Ch 3 (counts as dc), dc in next 2 sts, [ch 1, sk 1 st, dc in next 2 sts] around, ending with ch 1, sk 1, sl st to top of ch-3 to join. (28 ch-1 spaces + 58 dc including the starting ch-3)
Round 2Ch 1. Sc in each dc and each ch-sp around. Sl st to join. (86 sc) CHECKPOINT: The body should now measure approximately 4.5 to 5 inches / 11.5 to 12.5 cm from neckline to this point.

COLLAR

The collar is worked separately and seamed to the neckline. This creates the Peter Pan shape.

With smaller hook (D-3 / 3.25 mm) and Yarn A, ch 63.

Foundation Row: Sc in 2nd ch from hook and each ch across. (62 sc)

Round 1Ch 1, turn. Sc in first 2 sts. [Inc in next st, sc in next 2 sts] 20 times. (82 sc)
Round 2Ch 1, turn. Sc in each st across. (82 sc)
Round 3(Scallop Row, RS): Do not turn after Row 2. Work scallop along the bottom edge of the collar piece. Turn the work so you are working along Row 2’s front edge from right to left. [Sk 2 sts, 5 dc in next st, sk 2 sts, sl st in next st] repeat across the entire edge.Fasten off, leaving a long tail for seaming.

BOOTIES

Work in Yarn B for the main bootie body with Yarn A accents.

Sole: With E-4 hook and Yarn B, ch 10.

Round 1Sc in 2nd ch from hook and next 7 ch, 3 sc in last ch. Working on opposite side of foundation ch, sc in next 7 ch, 2 sc in last ch. Sl st to join. (20 sc)
Round 2Ch 1. 2 sc in first st, sc in next 7 sts, 2 sc in each of next 3 sts, sc in next 7 sts, 2 sc in each of last 2 sts. Sl st to join. (26 sc)
Round 3Ch 1. Sc in each st around. Sl st to join. (26 sc)Rounds 4 and 5: Repeat Round 3.
Round 6Toe Shaping Ch 1. Sc in first 8 sts, [sc2tog] 5 times, sc in last 8 sts. Sl st to join. (21 sc)
Round 7Ch 1. Sc in each st around. Sl st to join. (21 sc) Strap: Ch 12, sk 6 sts, sl st to join on opposite side of bootie opening. Fasten off.Button: Sew small button to strap.Small Bow: Using Yarn A, make a tiny bow (ch 8, work 4 rows of 7 sc, pinch and wrap center). Sew to toe of each bootie.Repeat for second bootie.

SKIRT

The skirt uses an expanding fan stitch pattern. First, increase stitches to a count divisible for fan pattern.

Round 3Increase Round Ch 1. Sc in each st around, working 2 sc into every 17th or 18th stitch to add 4 extra sts evenly. Sl st to join. (90 sc)Skirt Round 1: Ch 3 (counts as dc). 2 dc in same st (half-fan start). [Ch 1, sc in next st, ch 1, (3 dc, ch 1, 3 dc) in next st] 14 times. Ch 1, sc in next st, ch 1, 3 dc in same st as beginning ch-3. Sl st to top of ch-3 to join.This creates 15 V-fans alternating with sc anchors.Skirt Round 2: Sl st across 3 dc and into ch-1 sp at center of first fan. Ch 3, 2 dc in same ch-1 sp. [Ch 1, sc in next sc, ch 1, (3 dc, ch 1, 3 dc) in ch-1 sp of next fan] 14 times. Ch 1, sc in next sc, ch 1, 3 dc in same ch-1 sp as beginning. Sl st to top of ch-3.Skirt Round 3: Same as Round 2. Work fans into fan centers, sc into sc.Skirt Round 4 (Expand Round): Sl st to first fan center ch-sp. Ch 3, 2 dc in same sp. [Ch 2, sc in next sc, ch 2, (3 dc, ch 2, 3 dc) in next fan center] 14 times. Ch 2, sc in next sc, ch 2, 3 dc in same sp as beg. Sl st to join.Skirt Round 5: Work same as Round 4 but work into fan centers and sc anchors. [3 dc, ch 2, 3 dc in fan center, ch 2, sc in sc anchor, ch 2] around.

Skirt Round 6: Same as Round 5.

Skirt Round 7 (Expand Round): Change ch-2 bridges to ch-3 bridges. [3 dc, ch 2, 3 dc in fan center, ch 3, sc in sc anchor, ch 3] around.

Skirt Rounds 8 and 9: Same as Round 7.

Skirt Round 10 (Expand Round): Change to larger fans. [4 dc, ch 2, 4 dc in fan center, ch 3, sc in sc anchor, ch 3] around. Fans now have 8 dc each.

Skirt Rounds 11 and 12: Repeat Round 10 structure.

Skirt Round 13 (Scallop Hem): Sl st to first fan center ch-2 sp. [(5 dc, ch 1, 5 dc) in fan center ch-2 sp, sk 4 dc, sc in sc anchor, sk 4 dc] around 15 times. Sl st to join.

Fasten off. Weave in ends.

CHECKPOINT: After the skirt, the dress from shoulder to hem should measure approximately 13 inches / 33 cm. Check that the scalloped hem is even all the way around.

DIVIDE FOR BODY

On the next row, you will place the sleeve stitches on hold and join the fronts and back to work as a single round for the skirt.

Round 11WS, dividing row Ch 1, turn. Sc across right front 20 sts. Place right sleeve 32 sts on a stitch holder or scrap yarn. Ch 2 (underarm bridge). Sc across back 38 sts. Place left sleeve 32 sts on holder. Ch 2 (underarm bridge). Sc across left front 20 sts. Do not turn.

Now you will join to work in the round. Bring the left front edge to meet the right front edge (this is the button-band opening).

Joining Round: Join Yarn A at center back right edge. Ch 1. Sc across 20 right front sts, sc 2 into each of the 2 right underarm ch-sts (4 sc), sc across 38 back sts, sc 2 into each of the 2 left underarm ch-sts (4 sc), sc across 20 left front sts. Sl st to first sc to join. (86 sc)

HEADBAND

Cut 6 lengths of Yarn A and 3 lengths of Yarn B, each 32 inches / 81 cm long. Group into three bundles of 3 strands each (two bundles Yarn A, one bundle Yarn B). Knot all strands together at one end. Braid all three bundles to desired length. Knot at other end. Trim ends to 0.5 inch / 1.3 cm and fray slightly or fold under for a neat finish. Tie into a loop or knot ends together to form headband.

Assembly

Step 11. Attach Collar: Pin the collar to the neckline edge with RS facing out. The foundation chain edge of the collar aligns with the foundation chain edge of the dress neckline. Whip stitch in place using yarn needle and matching yarn.
Step 22. Thread Ribbon: Using the cream ribbon or a length of Yarn B, weave in and out through the eyelet holes at the waist. Tie in a small bow at center front or simply knot at the back opening.
Step 33. Attach Bow: Sew the crocheted bow to center front waist, covering the ribbon tie if desired.
Step 44. Button Loops: Along the left back edge, work 3 evenly spaced button loops: join yarn, ch 5, sl st to edge about 1/2 inch away. Repeat at 3 points down the back opening.
Step 55. Sew Buttons: Sew 3 buttons to the right back edge, corresponding to the button loops.

Tester's notes

Place stitch markers at the four raglan increase points, plus at center front and center back throughout the yoke — this uses all 6 markers called for in the materials list.

75 yards / 69 meters of Yarn B covers the waist ribbon channel, center-front bow, headband braid, and bootie bows combined — check that total before swapping to a thicker contrast.

No mid-round color changes occur anywhere in this pattern; dress, collar, booties, and headband are each worked in a single color, then joined by seaming at the end.

63 starting chain for the yoke foundation row should yield 62 sc after the first row; recount before placing the four raglan markers, since an off count there compounds through the 10 yoke rows.

Each fan stitch unit equals 7 stitches of width in counting reference (sc + ch-1 + fan) — keep this in mind if you adjust the size of the skirt.

All rounds begin and end with a slip stitch to join, then ch 1 (for sc rounds) or ch 3 (for dc rounds) at the beginning. The beginning chain does not count as a stitch unless otherwise noted.

Gauge with the E-4 / 3.5 mm hook and Yarn A: 18 sc = 4 inches / 10 cm, and 10 rows of sc = 4 inches / 10 cm. Fan stitch pattern gauge in the skirt: one 6-stitch fan repeat measures approximately 1.25 inches / 3.2 cm wide, and 5 rounds of fan pattern measure approximately 2 inches / 5 cm tall. Take time to check gauge, since chest circumference and skirt flare depend on it.

At a glance

Rounds24
Parts8
LevelIntermediate
Time12-18 hours
Hook3.5 mm
YarnDK

Gauge check

After the waist eyelet round, lay the body flat and measure from the neckline edge down: it should read 4.5 to 5 inches / 11.5 to 12.5 cm.

If the measurement is off by more than a half inch, check sc gauge against 18 sc = 4 inches / 10 cm before continuing into the skirt, and swap hook size up or down accordingly.

Stitch-count checkpoints

  • How to Make the Bow · Round 1: 12 sts
  • How to Make the Bow · Rounds 2–6: 12 sts
  • DRESS: NECKLINE AND YOKE · Round 1: 70 sts
  • DRESS: NECKLINE AND YOKE · Round 2: 78 sts
  • COLLAR · Round 1: 82 sts
  • COLLAR · Round 2: 82 sts

If something looks wrong

The skirt doesn't flare outward into
A fan-stitch repeat was likely lost in the DIVIDE FOR BODY or SKIRT round; recount against the 6-stitch fan repeat (1.25 inches / 3.2 cm wide) before continuing, since a dropped repeat flattens the flare.
The cream ribbon won't pull through the
The WAIST EYELET ROUND's 28 ch-1 spaces were likely worked too tight or too loose; rework that round at a different tension before moving into Round 2's 86 sc, since the sc round locks the spaces in place.
The collar sits crooked or puckers
The whip stitch in Assembly Step 1 was likely uneven, or the collar's foundation chain edge wasn't matched point-for-point to the dress neckline's foundation chain; unpick and re-pin the two edges together before re-stitching.
The bow looks lumpy or the center pinch keeps loosening.
The 12-sc rectangle from rows 2 through 6 wasn't wrapped tightly enough at the center; wrap the tail around the pinched center 4 to 5 times and knot it before fastening off, rather than wrapping once.

Yarn substitutions

Cotton, DK (CYCA 3)Stitch definition sharpens on the fan-stitch skirt, but drape stiffens; drop the hook a half step from E-4 / 3.5 mm to hold the 18 sc = 4 inch / 10 cm gauge.
Acrylic, DK (CYCA 3)Matches the original fiber category and gauge most closely, with no stuffing involved anywhere in this pattern, so loft is the only variable to watch.
Wool-blend, sport weight (CYCA 2)Produces a smaller chest circumference than the stated 17 inches / 43 cm unless the hook sizes up from D-3 / 3.25 mm for the collar; swatch the 6-stitch fan repeat first, since lighter yarn shortens the 1.25 inch / 3.2 cm repeat width.
FAQs

Questions

Can the dress, collar, booties, and headband be made in a different order?

Yes — each of the four pieces is worked separately with no shared rounds, so order does not affect the outcome. Assembly (whip-stitching the collar, threading the ribbon, sewing the bow) happens only after all pieces are finished.

How much contrast yarn is actually needed for the cream details?

Approximately 75 yards / 69 meters of Yarn B covers the waist ribbon, center-front bow, headband braid, and bootie bows combined. That total already accounts for every cream element in the set.

What does a correctly worked waist eyelet round look like?

Round 1 produces 28 ch-1 spaces plus 58 dc including the starting ch-3, and Round 2 closes that into 86 sc. The finished band should measure 4.5 to 5 inches / 11.5 to 12.5 cm from the neckline, matching the pattern's checkpoint.

One at a time —

Get the next pattern

Tested round by round before it is sent. No spam.