Made and counted by Wren —

Four-piece blush pink ruffle baby dress set pattern

E-4 hook, DK cotton: crochet a four-piece blush baby set — ruffle dress, skirt, booties, headband.

Four-piece blush pink ruffle baby dress set pattern
IntermediateLevel
13-19 hoursTime
3.5 mmHook
DKYarn
Jump to the pattern

About this pattern

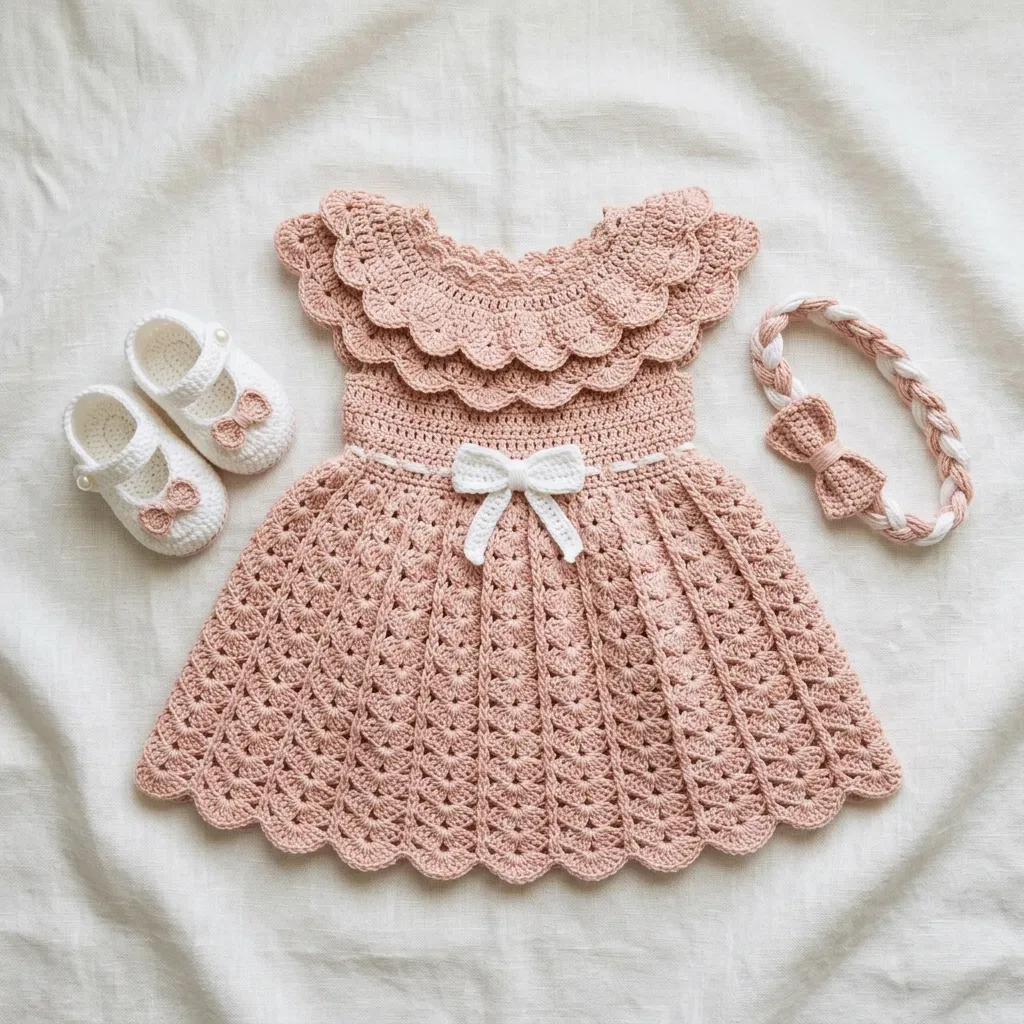
A four-piece crochet set — fitted dress, fan-stitch A-line skirt, Mary Jane booties, and braided headband — sized for newborn to 3 months with a 14 to 15 inch chest and 13-inch total length. Worked in DK weight cotton with a US E-4 hook (F-5 optional for drape), the project runs 13 to 19 hours total, with the dress body requiring 8 to 12 of those hours.

This four-piece set covers dress, skirt, booties, and headband, built from a 60-chain neckline ring worked in the round through yoke shaping, armhole separation, a waistband, and a fan-stitch A-line skirt with scallop hem. The dress fits chest sizes of 14 to 15 inches, newborn to 3 months, with a 5.5-inch bodice and 7.5-inch skirt for a 13-inch total length. Budget 13 to 19 hours across all four pieces, with the dress body alone taking 8 to 12 hours.

The pattern

Written out round by round

Materials

  • Paintbox Yarns Cotton DK works beautifully for this project. It’s 100 percent cotton with 273 yards per 100g skein. Look for Ballet Pink (shade 450) for the main color and Pure White (shade 403) for accents. Cotton gives the dress that slight structure you see in the photos without excessive stretch.
  • Drops Safran DK is another excellent choice. Also 100 percent combed cotton with 175 yards per 50g skein. Old Rose for main and Off White for accents. This yarn has exceptional stitch definition that really shows off the fan pattern.
  • Lion Brand 24/7 Cotton DK offers wide availability and machine washability. It’s 100 percent mercerized cotton with 186 yards per 100g skein. Blush for main, White for accents.
  • When substituting yarn, choose something smooth and non-splitty with good stitch definition. Cotton or cotton blends work best for infant garments since they breathe well and launder easily. Avoid highly elastic yarns because they’ll distort the fan stitch and throw off your gauge.

Yarn

  • Approximately 350 yards of DK weight yarn (also called light weight or CYCA 3) in blush rose for the main color
  • Approximately 30 yards in white for the waistband ribbon, bow, and booty accents

Hook

  • US size E-4 (3.5 mm) for the bodice and accessories
  • US size F-5 (3.75 mm) optional for the skirt and collar if you prefer a looser drape

Additional supplies

  • One stitch marker
  • Yarn needle for weaving ends
  • Scissors

Abbreviations

  • Fan Stitch (also called shell stitch) = Work 5 dc all into the same stitch or space. This creates a fan shape with 5 double crochets sharing one base point. When used in the skirt, these fans are flanked by single crochets and chain spaces to create that radiating scallop effect you see in the photos.
  • Fan Stitch Repeat = The complete unit is: sc in sc, ch 1, skip 1 st, 5 dc in next st (fan), ch 1, skip 1 st, sc in next st. This 7-stitch-consuming unit appears throughout the skirt.
  • Scallop Edging = Sl st into first st, (ch 2, 4 dc in same st, sl st into next st) repeat around. Each scallop uses 2 stitches.
  • Shell Collar Unit = (3 dc, ch 1, 3 dc) all in same stitch or space. Creates a V-shaped shell for the collar.
  • ch = chain. Yarn over and pull through the loop on your hook.
  • sl st = slip stitch. Insert hook, yarn over, pull through both the stitch and the loop on your hook in one motion.
  • sc = single crochet. Insert hook into stitch, yarn over and pull up a loop (2 loops on hook), yarn over and pull through both loops.
  • dc = double crochet. Yarn over, insert hook into stitch, yarn over and pull up a loop (3 loops), yarn over and pull through 2 loops (2 loops remain), yarn over and pull through remaining 2 loops.
  • hdc = half double crochet. Yarn over, insert hook, yarn over and pull up a loop (3 loops), yarn over and pull through all 3 loops at once.
  • inc = increase. Work 2 stitches into the same stitch.
  • inv-dec = invisible decrease. Insert hook through the front loop only of the next stitch, then through the front loop only of the following stitch, yarn over and pull up a loop, yarn over and pull through both loops. This creates a neater decrease than a standard sc2tog.
  • sk = skip. Pass over the indicated stitch without working into it.
  • ch-sp = chain space. The gap created by a chain in the previous row or round.
  • MC = main color (blush rose)
  • CC = contrast color (white)

Section 1: Neckline Foundation

With MC and E-4 hook, ch 60. Being careful not to twist, sl st to first ch to form a ring.

Round 1Ch 1, sc in each ch around, sl st to first sc to join. (60 sc)
Round 2Ch 1, sc in each st around, sl st to join. (60 sc)
Round 3Ch 1, (sc in next 9 sts, inc in next st) 6 times, sl st to join. (66 sc)
Round 4Ch 1, sc in each st around, sl st to join. (66 sc)
Round 5Ch 1, (sc in next 10 sts, inc in next st) 6 times, sl st to join. (72 sc)
Round 6Ch 1, sc in each st around, sl st to join. (72 sc) Checkpoint: Your neckline tube should measure approximately 1.25 inches in height and about 16 inches in circumference when gently stretched.

Sole

With MC, ch 12.

Round 1Sc in second ch from hook and in each ch to end, turn. (11 sc)
Round 2to 6: Ch 1, sc in each sc to end, turn. (11 sc) Without fastening off, work around the perimeter: sc evenly around all four sides (11 along top, 5 along short side, 11 along bottom, 5 along other short side), sl st to join. (32 sc around perimeter)

Sides

Round 1to 3: Ch 1, sc in each sc around, sl st to join. (32 sc each round)(32)

Headband Bow

With MC, ch 16.

Round 1Sc in second ch from hook and in each ch across, turn. (15 sc)
Round 2to 6: Ch 1, sc in each sc to end, turn. (15 sc) Fasten off. Pinch at center. Wrap an 8-inch strand of MC tightly around the center 6 times. Knot and trim. Sew or tie the bow to the front center of the headband.

Toe Shaping

Round 4Ch 1, sc in next 10 sc, (inv-dec) 6 times, sc in next 10 sc, sl st to join. (26 sc)
Round 5Ch 1, sc in next 8 sc, (inv-dec) 5 times, sc in next 8 sc, sl st to join. (21 sc)

Cuff

Round 6Ch 1, sc in each sc around, sl st to join. (21 sc)
Round 7Ch 3 (counts as dc), dc in same st, (sk 1 st, 2 dc in next st) 10 times, sl st to top of ch-3. (21 dc)
Round 8Ch 1, sc in each dc around, sl st to join. (21 sc) Strap: Join CC at center back of cuff. Ch 20. Fasten off leaving a tail. Sew the other end to the opposite side of the center back cuff for an ankle strap.Booty Bow: With CC, ch 12. Row 1: Sc in second ch from hook and in each ch across, turn. (11 sc) Rows 2 to 4: Ch 1, sc in each sc to end, turn. Fasten off. Pinch at center, wrap CC yarn around 4 times, knot securely. Sew to front center of strap.Make 2 booties.

Section 2: Yoke Shaping

Round 7Ch 1, (sc in next 11 sts, inc in next st) 6 times, sl st to join. (78 sc)
Round 8Ch 1, sc in each st around, sl st to join. (78 sc)
Round 9Ch 1, (sc in next 12 sts, inc in next st) 6 times, sl st to join. (84 sc)
Round 10Ch 1, sc in each st around, sl st to join. (84 sc)
Round 11Ch 1, (sc in next 13 sts, inc in next st) 6 times, sl st to join. (90 sc)
Round 12Ch 1, sc in each st around, sl st to join. (90 sc)
Round 13Ch 1, (sc in next 14 sts, inc in next st) 6 times, sl st to join. (96 sc)
Round 14Ch 1, sc in each st around, sl st to join. (96 sc)

Section 3: Armhole Separation

This is where we divide for the armholes. Mark your stitches as follows: Stitches 1 to 24: front panel Stitches 25 to 36: right sleeve cap (12 sts)

Stitches 37 to 60: back panel (24 sts)

Stitches 61 to 72: left sleeve cap (12 sts)

Round 15Armhole round Ch 1, sc in next 24 sts (front), ch 4, skip next 12 sts (right armhole), sc in next 24 sts (back), ch 4, skip next 12 sts (left armhole), sl st to first sc to join.Those chain-4 bridges replace the skipped stitches at each underarm.
Round 16Ch 1, sc in next 24 sc (front), sc in each of 4 ch (right underarm), sc in next 24 sc (back), sc in each of 4 ch (left underarm), sl st to join. (56 sc)
Round 17Ch 1, sc in each st around, sl st to join. (56 sc)
Round 18Ch 1, (sc in next 13 sts, inc in next st) 4 times, sl st to join. (60 sc)
Round 19Ch 1, sc in each st around, sl st to join. (60 sc)
Round 20Ch 1, (sc in next 11 sts, inc in next st) 5 times, sl st to join. (65 sc)
Round 21Ch 1, (sc in next 12 sts, inc in next st) 5 times, sl st to join. (70 sc) Checkpoint: The body below the armhole should measure approximately 2 inches. Total bodice from neckline: about 3.25 inches. Circumference at Rnd 21: approximately 15.5 inches.

Section 4: Waistband

Round 22Join CC, ch 1, sc in each st around, sl st to join. Cut CC, leaving a 6-inch tail. (70 sc)

Optional eyelet round for ribbon threading: Instead of plain sc, work: Ch 3 (counts as first dc), skip 1 st, (dc in next st, ch 1, skip 1 st) 34 times, dc in last st, sl st to top of ch-3 to join. This creates 35 eyelet holes for threading your ribbon.

Round 23Join MC, ch 1, sc in each st around, sl st to join. (70 sc)
Round 24Ch 1, sc in each st around, sl st to join. (70 sc) Checkpoint: Total dress height from neckline should be approximately 5.5 inches. This completes your bodice.

Section 5: Skirt

Now for the fun part. With 70 stitches, you have exactly 10 fan repeat units (7 stitches each).

Round 25First fan round Ch 1, (sc in next st, ch 1, sk 1 st, 5 dc in next st, ch 1, sk 1 st) 10 times, sl st to first sc. (10 fan units)
Round 26Ch 1, sc in first sc, ch 1, skip ch-1 sp, dc in first dc of fan, dc in second dc, dc in third dc (center), dc in fourth dc, dc in fifth dc, ch 1, skip ch-1 sp, (sc in sc, ch 1, skip ch-1 sp, 5 dc in center dc of fan, ch 1, skip ch-1 sp) 9 times, sl st to first sc. (10 fan repeats)

The pattern is established now. In every following round, your sc lands in the sc of the previous round, and your fans land in the center (third) dc of the previous fan.

Work Rnds 27 through 42 in established fan pattern: (sc in sc, ch 1, 5 dc in center dc of fan, ch 1) repeat around. (10 fan repeats each round)

Checkpoint: After Rnd 42, the skirt should measure approximately 7.5 inches. Full dress from shoulder to hem: about 13 inches.

Section 6: Scallop Hem Edging

Round 43Hem setup Ch 1, sc evenly around the hem edge, placing 1 sc in each sc and 2 sc in each fan group center. Total: 70 sc. Sl st to join. (70 sc)
Round 44(scallop round): Sl st into first st, (ch 2, 4 dc in same st, sl st into next st) 35 times. (35 scallops)Fasten off. Weave in ends.

Section 7: Collar

The collar has two ruffle layers. Work the outer (larger) ruffle first, then the inner (smaller) ruffle.

Outer Ruffle: Join MC to any stitch of Rnd 1 (the foundation round).

Round 1Collar Rnd C1 Ch 3 (counts as dc), 2 dc in same st, (sk 1 st, 3 dc in next st) 29 times, sk last st, sl st to top of ch-3. (90 dc in 30 groups)(90)
Round 2Collar Rnd C2 Ch 3, 2 dc in same st, dc in next dc, 3 dc in next dc, (3 dc in first dc of next group, dc in center dc, 3 dc in last dc of group) 29 times, sl st to top of ch-3. (210 dc)
Round 3Collar Rnd C3 Ch 1, sc in each dc around, sl st to join. (210 sc)
Round 4Collar Rnd C4 (scallop edge): Sl st into first st, (ch 2, 4 dc in same st, sl st into next st) 105 times. (105 scallops)Fasten off. Weave in ends.Inner Ruffle: Join MC to Rnd 2 of the neckline, offset by 1 stitch from the outer ruffle attachment.(4)
Round 5Collar Rnd IC1 Ch 3, 2 dc in same st, (sk 1 st, 3 dc in next st) 29 times, sl st to top of ch-3. (90 dc)
Round 6Collar Rnd IC2 (scallop edge): Sl st into first st, (ch 2, 4 dc in same st, sl st into next st) 45 times. (45 scallops)Fasten off. Weave in ends.(4)

Checkpoint: The finished collar should span approximately 5 inches from neckline to the bottom edge of the outer ruffle when laid flat.

Section 8: Back Opening

Mark a 2-inch section at the center back (about 9 stitches). Reinforce the edges with whipstitch or work a row of sc along each edge. Add 3 button loops (ch 3, skip 2, sc) on the left back edge, and sew 3 buttons on the right edge. Safety note: Buttons must be at least 1 inch in diameter to prevent choking hazard, or use snaps instead.

Headband Braid

Cut 6 strands of yarn: 2 MC and 2 CC, each 36 inches long. Knot at one end. Divide into 3 groups of 2 strands each (alternate MC and CC for visual interest). Braid tightly for the entire length. Tie off and trim ends to 0.5 inches. The finished braid should measure about 15 inches unstretched. Tie ends together to form a loop sized for an infant head (about 14 inches in circumference).

Assembly

Step 1Weave in all ends securely using your yarn needle, working them into the wrong side in multiple directions.
Step 2Wet block the dress by soaking in cool water for 10 to 15 minutes. Gently press excess water out with a towel, then pin flat to a blocking mat. Pin each scallop point outward so they’re clearly defined. Let dry completely (12 to 24 hours).
Step 3The booties can be hand washed and air dried flat. The headband can be lightly steamed if desired.
Step 4Thread your ribbon through the eyelet row, bring ends to front, and tie a bow. Trim ribbon ends at a 45-degree angle and apply fray stop solution to prevent unraveling.

Tester's notes

E-4 (3.5mm) hook controls the bodice and accessories; swap to F-5 (3.75mm) only for the skirt and collar if a looser drape is wanted, not for the fitted sections.

One stitch marker tracks the start of each round through all 8 rounds of Yoke Shaping and the 7 rounds of Armhole Separation, where miscounts compound fast.

350 yards of blush rose and 30 yards of white cover the full set; keep the white separate since it appears only at the waistband, booty cuffs, and headband braid.

18 stitches and 20 rows per 4 inches, blocked, is the target gauge; check it before starting Section 1 so the 60-chain foundation lands at the stated 14 to 15 inch chest.

Fan stitch repeats measure 1.25 inches wide by 0.75 inches tall; count repeats rather than stitches when checking the skirt's width against the 7.5-inch length.

At a glance

Rounds44
Parts14
LevelIntermediate
Time13-19 hours
Hook3.5 mm
YarnDK

Gauge check

After Rnd 2 of the Neckline Foundation, lay the piece flat and measure 18 stitches across; that span should equal 4 inches once blocked.

Stitch-count checkpoints

  • Section 1: Neckline Foundation · Round 1: 60 sts
  • Section 1: Neckline Foundation · Round 2: 60 sts
  • Section 1: Neckline Foundation · Round 3: 66 sts
  • Section 1: Neckline Foundation · Round 5: 72 sts
  • Sole · Round 1: 11 sts
  • Sides · Round 1: 32 sts

If something looks wrong

The scallop collar lies flat instead of curling into defined points.
Collar scallops hold shape through blocking, not stitch tension; pin each point outward on the mat during the 12 to 24 hour dry time instead of relying on the yarn alone.
The neckline ring measures wider than the 14 to 15 inch chest target after Rnd 4 of Section 1.
The increase round (Rnd 3, 60 to 66 sc) is the usual culprit if spaced incorrectly; recount the 6 repeats of 9-sc-plus-increase before moving to Rnd 4.
The sole and sides of the bootie don't line up when joining.
The sole works flat for 6 rows then around the perimeter for 32 sc; if that perimeter count is off, the 32-sc Sides rounds won't sit square — recount the 11-5-11-5 perimeter before starting Rnds 1 to 3 of Sides.
The fan-stitch skirt flares unevenly on one side.
Uneven flare usually means a fan repeat was skipped or doubled, since each repeat is a fixed 1.25 inches wide; lay the skirt flat and count repeats across the hem rather than eyeballing the curve.

Yarn substitutions

100% mercerized cotton, DK weightClosest match to the pattern's structure; keep the E-4 hook for the bodice and accessories and expect the same 18-st/4-inch gauge with minimal drape change.
Cotton-bamboo blend, DK weightAdds softness and a bit more drape to the fan-stitch skirt; size down to a D-3 (3.25mm) hook to keep the fan repeat near 1.25 inches wide.
Acrylic-cotton blend, light worsted (CYCA 3)Machine washable and easier to source, but less stitch definition on the scallop collar; move up to F-5 (3.75mm) across all pieces to compensate for a tighter blend.
FAQs

Questions

Can the dress be made larger than newborn to 3 months?

The pattern is written for a 14 to 15 inch chest only; scaling up means adding stitch multiples to the 60-chain Neckline Foundation and recalculating the 8 rounds of Yoke Shaping, which shifts every count after it. Test a swatch at the new count before committing to the full Section 2.

Why does the pattern call for two hook sizes?

E-4 (3.5mm) keeps the bodice and accessories at the stated gauge for a snug newborn fit. F-5 (3.75mm) is optional for the skirt and collar only, loosening the fan stitch and scallop hem for more drape without affecting the fitted chest measurement.

How much of the total 13 to 19 hours goes to finishing versus stitching?

Stitching time covers the dress body (8 to 12 hours), collar (2 to 3 hours), booties (2 to 3 hours), and headband with bow (about 1 hour). Finishing — weaving ends, wet blocking, and the 12 to 24 hour dry — runs separately and is not counted in that 13 to 19 hour range.

One at a time —

Get the next pattern

Tested round by round before it is sent. No spam.