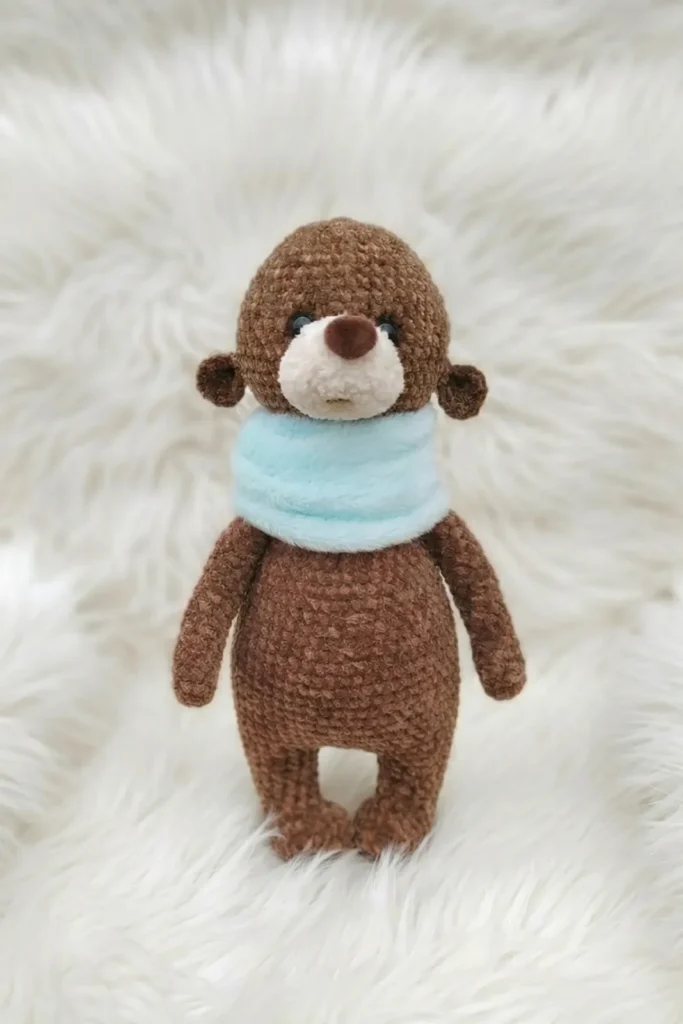
Made and counted by Wren —

Sad bear amigurumi: a round-by-round build guide

Label-size hook, velour-weight yarn: bottom-up sad bear amigurumi with a 15-round head and 5mm eyes.

Sad bear amigurumi: a round-by-round build guide
IntermediateLevel
4-6 hoursTime
5 mmHook
WorstedYarn
Jump to the pattern

About this pattern

A one-piece, bottom-up amigurumi bear worked in a continuous spiral: two legs are made separately then joined at Rnd 14 to begin the body, which flows through arm attachment at Rnd 39 and a neck taper into a 15-round head. Neither arms nor legs are sewn on — both join directly through crochet stitches. The 3-round muzzle sews onto the head between Rnds 48–53, 5mm safety eyes lock in between Rnds 52–53, and two ears sew on around Rnd 49–50. A needle-sculpted tuck technique shapes the sorrowful expression, and a 2×16-inch velour strip finishes as a sewn snood/cowl.

This sad bear amigurumi is a one-piece construction worked entirely bottom-up and in a continuous spiral: legs are made first and joined at Rnd 14, then the body climbs directly into a 15-round head with no neck seam. Arms are crocheted straight into the body at Rnd 39 — no sewing needed. The muzzle — a 3-round disc — sews on between Rnds 48–53, and 5mm safety eyes lock in between Rnds 52–53, so the head round count is the number to track before eyes go in. Two ears are sewn on around Rnd 49 or 50, and a needle-sculpted tuck plus a velour snood/cowl finish the piece. Velour or chenille yarn (~300m/100g) gives the finished bear its texture.

The pattern

Written out round by round

Materials

Yarn

  • Velour or chenille weight yarn, approximately 300m per 100g — Ice Yarn Velour or Alize Softy are ideal, but any comparable soft velour yarn works beautifully

Crochet hook

  • Select the size recommended on your yarn's label for a tight, stuffing-free fabric

Velour fabric strip

  • 2 inches × 16 inches (5 × 40 cm) for the snood/cowl

Tools

  • Chalk or acrylic paint for face shading and tinting
  • Safety eyes: 5mm
  • Polyfill stuffing
  • Yarn needle for assembly and sculpting
  • Stitch marker

Abbreviations

  • ch = chain
  • st = stitch
  • sc = single crochet
  • inc = increase
  • dec = decrease
  • rnd = round
  • rnds = rounds

Arms — Make 2

Foundation: Ch 2, work 8 sc in 2nd ch from hook. (8)

Rounds 2–19Sc in each st around. (8)Stuff lightly. Fold flat and sc across both layers — 4 sc to close. Set aside.

Legs — Make 2

Foundation: Ch 5. Starting in 2nd ch from hook: 3 sc across, 3 sc in last ch (corner), 2 sc, inc in last st. (10)

Round 2Inc, 2 sc, inc 3 times, 2 sc, inc 2 times. (16)
Round 31 sc, inc, 2 sc, [1 sc, inc] × 3, 2 sc, [1 sc, inc] × 2. (22)
Round 4Sc in each st around. (22)
Round 55 sc, dec × 6, 5 sc. (16)
Round 65 sc, dec × 3, 5 sc. (13)
Rounds 7–9Sc in each st around. (13)
Round 106 sc, inc, 6 sc. (14)
Round 11Sc in each st around. (14)
Round 12[6 sc, inc] × 2. (16)
Round 13Sc in each st around. (16)First Leg: Fasten off. Second Leg: Do not fasten off.

Joining Legs & Continuing the Body

On the Second Leg, sc 8, ch 5. Join to the First Leg with toes facing inward (pigeon-toed).

Round 1416 sc across First Leg, 5 sc across ch-5 bridge, 16 sc across Second Leg, 5 sc across opposite side of bridge. (42)
Round 15Sc 40, place marker here — this is now the new beginning of round (back center). (42)
Round 16[6 sc, inc] × 6. (48)
Round 17Sc in each st around. (48)
Round 18[7 sc, inc] × 6. (54)
Rounds 19–20Sc in each st around. (54)
Round 21Sc 54, ch 4, sc in 2nd ch from hook and next 2 ch (3 sc). (This forms the tail — do not count tail sts in main round total.) Continue in spiral. (54)
Rounds 22–26Sc in each st around. (54)
Round 27[7 sc, dec] × 6. (48)
Round 28Sc in each st around. (48)
Round 29[1 sc, dec] × 3, 30 sc, [dec, 1 sc] × 3. (42)
Rounds 30–32Sc in each st around. (42)
Round 33[5 sc, dec] × 6. (36)
Rounds 34–36Sc in each st around. (36)
Round 37[4 sc, dec] × 6. (30)
Round 38Sc in each st around. (30)Begin stuffing the body firmly as you work. Continue adding stuffing throughout.
Round 39Arm Attachment 6 sc, [sc next 4 sts of body together with 4 sts of First Arm], 10 sc, [sc next 4 sts of body together with 4 sts of Second Arm], 6 sc. (30)
Round 40Sc in each st around. (30)
Round 41[3 sc, dec] × 6. (24)
Round 42[2 sc, dec] × 6. (18)
Rounds 43–44Sc in each st around. (18)

The body narrows here — this section forms the neck.

Head — Continues Directly From Neck

Round 45[2 sc, inc] × 6. (24)
Round 46[3 sc, inc] × 6. (30)
Round 47[4 sc, inc] × 6. (36)
Round 48[5 sc, inc] × 6. (42)
Round 49[6 sc, inc] × 6. (48)
Rounds 50–55Sc in each st around. (48)
Round 56[6 sc, dec] × 6. (42)
Round 57Sc in each st around. (42)
Round 58[5 sc, dec] × 6. (36)
Round 59Sc in each st around. (36)
Round 60[4 sc, dec] × 6. (30)
Round 61Sc in each st around. (30)
Round 62[3 sc, dec] × 6. (24)
Round 63[2 sc, dec] × 6. (18)
Round 64[1 sc, dec] × 6. (12)Continue decreasing each round until fully closed. Fasten off and weave in end.

Muzzle

Foundation: Ch 2, work 6 sc in 2nd ch from hook. (6)

Round 2Inc in each st around. (12)
Round 3[1 sc, inc] × 6. (18)
Rounds 4–5Sc in each st around. (18)Fasten off, leaving a long tail for sewing. Sew muzzle onto the head, centered between Rnds 48–53.

Ears — Make 2

Foundation: Ch 2, work 6 sc in 2nd ch from hook. (6)

Round 2Inc in each st around. (12)Fold flat. Sc across both layers to close (1 sc per pair of stitches). Sew to the head at Rnd 49 or 50, one on each side.

Assembly

The Sad Bear's signature expression comes from a simple needle-sculpting technique that creates gentle indentations around his muzzle, giving him those iconic sorrowful eyes.
Step 1Inserting the Safety Eyes: Place safety eyes on either side of the muzzle, positioned between Rnds 52–53. Secure the backings firmly from the inside before fully closing the head.
Step 2Face Sculpting (Tuck Method): Using a yarn needle threaded with matching yarn, follow the numbered point diagram included in the original pattern: Insert needle at Point 1 (nose base), exit at Point 2 . Re-insert at Point 3 , exit at Point 1 . Pull gently to sculpt, then tie a secure knot. Do not cut yarn.
Step 3Insert needle at Point 1 , exit at Point 4 . Re-insert at Point 5 , exit at Point 1 . Pull to sculpt, tie a knot. Cut yarn and bury the ends inside the head. Once sculpted, use chalk or diluted acrylic paint to lightly shade the indented areas, deepening the bear's melancholy expression.

Tester's notes

Use the hook size printed on the velour or chenille yarn's label, not a fixed number — the pattern relies on that label's recommendation to keep the fabric tight enough that stuffing never shows through.

Place a stitch marker at the start of every round from the leg foundation through all 15 rounds of the head; velour hides the join line, so a marker is the only reliable way to track round starts.

Keep tension even through the 10-round leg shaping (10 → 16 → 22 sts and back down) — velour's fuzzy nap disguises loose stitches until stuffing pushes through later.

There are no color changes in this pattern; shading comes after assembly from chalk or acrylic paint applied to the finished muzzle and face, not from swapping yarn.

Stuff the arms lightly, but pack the leg and head rounds firmly enough to hold shape before folding pieces flat and closing seams.

Both the arms and legs join into the body without any sewing: legs are joined by crocheting across both foundations at Rnd 14, and arms are joined by working a single crochet through both the body stitches and the arm's flat edge at Rnd 39.

At a glance

Rounds51
Parts6
LevelIntermediate
Time4-6 hours
Hook5 mm
YarnWorsted

Gauge check

Check tension after the leg foundation (10 sc) or the first arm rounds (8 sc): stitches should sit close enough that stuffing cannot poke through, with no visible gaps between stitches.

There is no numeric gauge target given, so judge by the tight, stuffing-free fabric the materials list calls for — if fabric feels loose or floppy, drop to a smaller hook, and if stitches are hard to work into, size up.

Stitch-count checkpoints

  • Arms — Make 2 · Rounds 2–19: 8 sts
  • Legs — Make 2 · Round 4: 22 sts
  • Legs — Make 2 · Rounds 7–9: 13 sts
  • Legs — Make 2 · Round 12: 16 sts
  • Legs — Make 2 · Round 13: 16 sts
  • Joining Legs & Continuing the Body · Round 21: 54 sts

If something looks wrong

The leg base cups instead of lying flat.
The 10-st foundation round is worked too tightly, pulling the oval inward before Rnd 2 expands it to 16 sts. Rework the foundation with a slightly larger hook or looser tension so the shape sits flat before increases continue.
The muzzle looks lopsided once sewn on.
The 3-round muzzle was pinned off-center within the Rnds 48–53 sewing zone. Find the exact midpoint of Rnds 48–53 on the head and check symmetry from directly above before stitching it down.
The safety eyes sit uneven or too close together.
Eyes were pushed through Rnds 52–53 without comparing spacing against the already-attached muzzle. Pin both 5mm eyes first, view from the front, and only lock the backings once both sides mirror each other.
The arms twist or sit unevenly at the shoulder.
Rnd 39, the arm's flat closed edge wasn't held parallel and flush against the body before the joining sc was worked, or the 4 attachment stitches didn't line up with the corresponding body stitches. Hold the arm against the body first, hook through both the body stitches and the arm's flat edge together, and check both arms mirror each other before continuing to Rnd 40.

Yarn substitutions

Cotton, worsted weightStitch definition sharpens but the velour halo disappears, so every stitch on the muzzle and face shading shows. Drop to one hook size smaller than the label suggests to keep the fabric as tight as the original velour version.
Acrylic, worsted/aran weightLighter and cheaper than chenille, with good shape retention, but drape is looser, so pack stuffing more firmly to avoid a soft, sagging body. Hook size stays close to whatever the yarn label recommends.
Chenille, bulky weightA thicker single strand reaches the same finished size in fewer stitches per round, which can blur the shaping across all 15 head rounds. Size up one hook and use slightly less stuffing to avoid an overstuffed look.
FAQs

Questions

What yarn is best for crocheting the Sad Bear amigurumi?

The designer recommends velour or chenille-weight yarn such as Ice Yarn Velour or Alize Softy, both approximately 300m per 100g. Any soft velour yarn with similar weight and meterage will work well. The texture of velour gives the bear a warm, plush appearance that mimics a real stuffed toy.

Is this pattern suitable for beginners?

This pattern is best suited to confident beginners or intermediate crocheters. You'll need to be comfortable with working in continuous spirals, crocheting from a foundation chain, joining pieces while crocheting, and basic invisible decreases. If you have made a simple amigurumi before, you should find this pattern very manageable.

How do I attach the arms correctly in Rnd 39?

Hold a finished arm parallel to the body with the flat closed edge aligned against the side. As you work Rnd 39, when you reach the arm attachment point, insert your hook through both the next 4 body stitches and the corresponding 4 stitches of the arm's flat edge simultaneously, working a sc through all layers. This joins the arm directly into the body without any sewing needed.

Can I sell finished bears made from this pattern?

Yes! The designer, Tatyana Shevchenko, permits the sale of finished toys made from this pattern. However, the pattern itself may not be resold or redistributed without the author's permission.

One at a time —

Get the next pattern

Tested round by round before it is sent. No spam.