Made and counted by Wren —

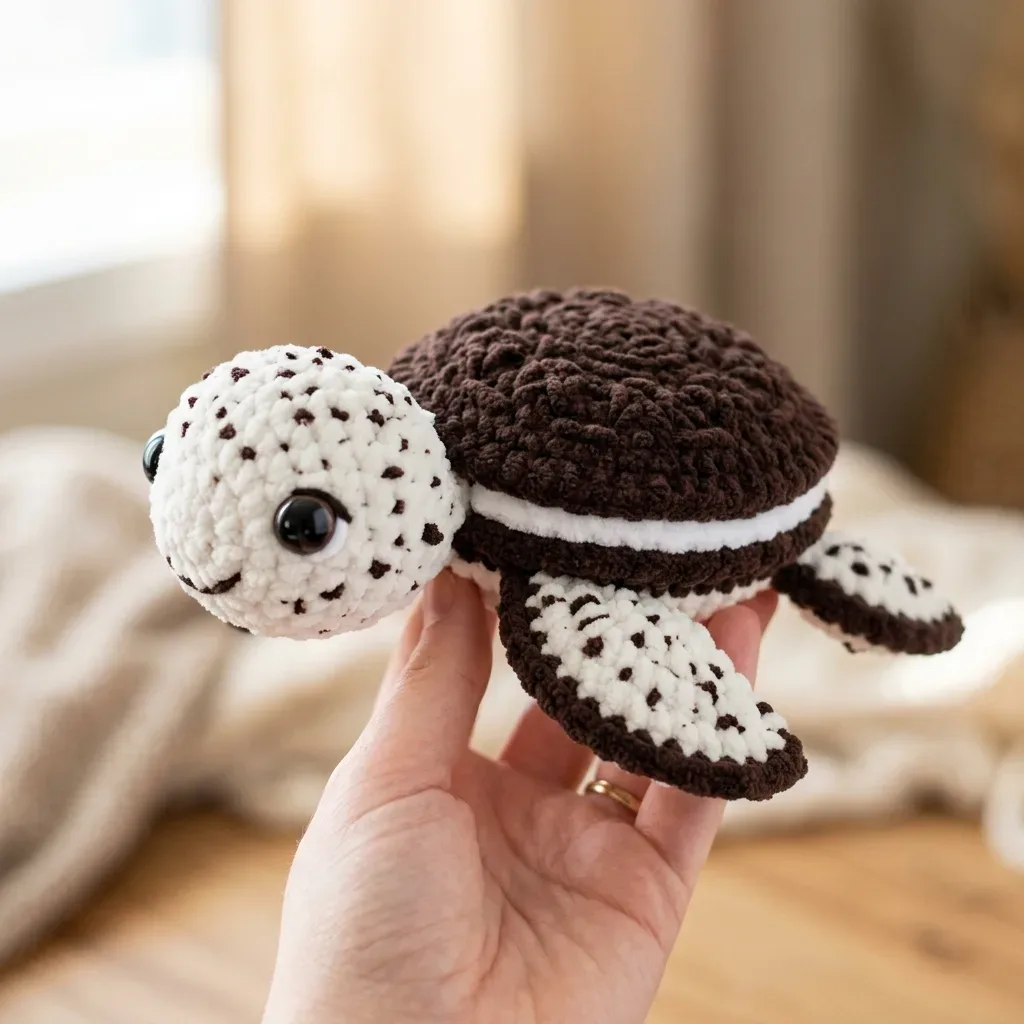
Crochet an oreo cookie turtle amigurumi with a speckled head

4.0 mm hook, worsted weight yarn: crochet an oreo cookie turtle amigurumi with a layered shell and speckled head.

Crochet an oreo cookie turtle amigurumi with a speckled head
IntermediateLevel
4-6 hoursTime
3.5 mmHook
WorstedYarn
Jump to the pattern

About this pattern

An amigurumi turtle built to look like a sandwich cookie, with two dark-brown disc shells joined by a white band seamed into a ring, a speckled head, and speckled front flippers. Materials: worsted weight yarn, a 4.0 mm hook, 12 mm safety eyes, about 2 oz of stuffing, roughly 130 yards of brown and 60 yards of white yarn, plus 10 yards for speckle accents.

This amigurumi turtle reads as a sandwich cookie: two flat dark-brown disc shells join to a separately worked white band, seamed into a ring, so the cream color shows all the way around the edge. The head and front flippers carry a speckled color effect, worked by catching small bits of dark yarn into white stitches every 4 to 5 stitches. The number that matters most: the band runs about 15.5 inches, roughly 93 rows, and must match the shell's finished circumference or the edges will not line up.

The pattern

Written out round by round

Materials

  • I recommend Lion Brand Pound of Love in Fisherman for the white and Cafe Au Lait or Espresso for the brown. This yarn is affordable, widely available, and gives excellent stitch definition for amigurumi work.
  • Paintbox Yarns Simply DK or Cotton DK also work beautifully if you prefer a slightly smaller finished size or a firmer fabric. Just use a 3.5 mm hook with DK weight yarn.
  • Avoid fuzzy or textured yarns for this project. You need smooth yarn so the speckled effect shows up clearly and your shaping looks crisp.

Yarn

  • Worsted weight yarn in two colors

Color A

  • Dark chocolate brown, approximately 130 yards

Color B

  • White or off-white, approximately 60 yards

Color C

  • Small amount for speckled effect, approximately 10 yards

Hook

  • US size G-6 / 4.0 mm crochet hook

Additional Supplies

  • 2 black safety eyes, 12 mm diameter
  • Polyester fiberfill stuffing, approximately 2 oz
  • Yarn needle for assembly
  • Stitch marker
  • Scissors

Abbreviations

  • To work a Speckle Stitch (SpSt) = Insert your hook into the next stitch as normal. Lay a short length of Color A (about 3 inches) across your working yarn. Draw up a loop with Color B through the stitch, catching that Color A strand along the back. Yarn over with Color B only and complete the stitch. The Color A creates a small visible fleck on the right side.
  • ch = chain: The foundation loops that start many projects
  • sl st = slip stitch: Insert hook, yarn over, pull through both the stitch and the loop on your hook in one motion
  • sc = single crochet: Insert hook into stitch, yarn over and pull up a loop (two loops on hook), yarn over and pull through both loops
  • inc = increase: Work two single crochet stitches into the same stitch, adding one stitch to your count
  • dec = invisible decrease: Insert hook through the front loop only of the next stitch, then the front loop only of the following stitch, yarn over and pull through both front loops, yarn over and pull through remaining two loops. This creates a tighter, less visible decrease than standard methods.
  • MR = magic ring: An adjustable loop that allows you to work the first round of stitches, then pull the center closed
  • st(s) = stitch(es)
  • BLO = back loop only
  • FLO = front loop only
  • pm = place marker
  • rnd = round
  • rep = repeat

Part 1: Top Shell Dome (Color A, Dark Brown)

Round 1MR, 6 sc into ring. (6 sc)
Round 2Inc in each st around. (12 sc)
Round 3(Sc 1, inc) rep 6 times. (18 sc)
Round 4(Sc 2, inc) rep 6 times. (24 sc)
Round 5(Sc 3, inc) rep 6 times. (30 sc)
Round 6(Sc 4, inc) rep 6 times. (36 sc)
Round 7(Sc 5, inc) rep 6 times. (42 sc)
Round 8(Sc 6, inc) rep 6 times. (48 sc)
Round 9(Sc 7, inc) rep 6 times. (54 sc)
Round 10(Sc 8, inc) rep 6 times. (60 sc)
Round 11Sc in each st around. (60 sc)
Round 12Sc in each st around. (60 sc)
Round 13Sc in each st around. (60 sc)
Round 14Sc in each st around. (60 sc) Fasten off with a long tail of at least 15 inches. Do not stuff. Set aside.

Your dome should measure approximately 4.5 to 5 inches across its widest diameter.

Part 2: Shell Base (Color A, Dark Brown)

Work exactly like the top dome through Round 10, then continue:

Round 1MR, 6 sc into ring. (6 sc)
Round 2Inc in each st around. (12 sc)
Round 3(Sc 1, inc) rep 6 times. (18 sc)
Round 4(Sc 2, inc) rep 6 times. (24 sc)
Round 5(Sc 3, inc) rep 6 times. (30 sc)
Round 6(Sc 4, inc) rep 6 times. (36 sc)
Round 7(Sc 5, inc) rep 6 times. (42 sc)
Round 8(Sc 6, inc) rep 6 times. (48 sc)
Round 9(Sc 7, inc) rep 6 times. (54 sc)
Round 10(Sc 8, inc) rep 6 times. (60 sc)
Round 11Sc in each st around. (60 sc)
Round 12Sc in each st around. (60 sc) Fasten off with a long tail of at least 15 inches. Do not stuff. Set aside.

Part 3: Cream Band (Color B, White)

This strip forms the "cream filling" visible around the shell edge.

Foundation chain: With Color B, ch 7.

Round 1Starting in 2nd ch from hook, sc 6 across. Turn. (6 sc)
Round 2Ch 1, sc 6 across. Turn. (6 sc) Repeat Row 2 until the strip measures approximately 15.5 inches in total length. This should be approximately 93 rows.Fasten off leaving a long tail. Seam the short ends together to form a ring using mattress stitch or whipstitch.

Part 4: Turtle Head (Speckled, Color B with SpSt accents)

Round 1MR, 6 sc into ring. (6 sc)
Round 2Inc in each st around. (12 sc)
Round 3(Sc 1, inc) rep 6 times. (18 sc)
Round 4(Sc 2, inc) rep 6 times. (24 sc)
Round 5(Sc 3, inc) rep 6 times. (30 sc)
Round 6(Sc 4, inc) rep 6 times. (36 sc)
Round 7Sc in each st around, working SpSt randomly every 4 to 6 sts. (36 sc)
Round 8Sc in each st around, working SpSt randomly every 4 to 6 sts. (36 sc)
Round 9Sc in each st around, working SpSt randomly every 4 to 6 sts. (36 sc)
Round 10Sc in each st around, working SpSt randomly every 4 to 6 sts. (36 sc) Insert safety eyes now between Rounds 6 and 7, approximately 6 stitches apart at the center front. Lock the washers firmly. Begin stuffing.
Round 11(Sc 4, dec) rep 6 times. (30 sc)
Round 12(Sc 3, dec) rep 6 times. (24 sc)
Round 13(Sc 2, dec) rep 6 times. (18 sc) Add more stuffing. The head should be firmly round.
Round 14(Sc 1, dec) rep 6 times. (12 sc)
Round 15Dec 6 times. (6 sc) Fasten off leaving a long tail. Close by running the tail through the front loops of the 6 remaining stitches and pulling snug.

Part 5: Front Flippers (Make 2, Speckled)

Round 1MR, 6 sc into ring. (6 sc)
Round 2Inc in each st around. (12 sc)
Round 3(Sc 1, inc) rep 6 times. (18 sc)
Round 4(Sc 2, inc) rep 6 times. (24 sc)
Round 5Sc in each st around, working SpSt randomly every 4 to 5 sts. (24 sc)
Round 6Sc in each st around, working SpSt randomly every 4 to 5 sts. (24 sc)
Round 7Sc 12, dec, sc 8, dec. (22 sc)
Round 8Sc 12, dec, sc 6, dec. (20 sc)
Round 9Sc 10, dec, sc 6, dec. (18 sc) Do not stuff. Flatten and whipstitch closed. Fasten off with a long tail.

Part 6: Back Flippers (Make 2, Speckled)

Round 1MR, 6 sc into ring. (6 sc)
Round 2Inc in each st around. (12 sc)
Round 3(Sc 1, inc) rep 6 times. (18 sc)
Round 4Sc in each st around, working SpSt randomly every 4 to 5 sts. (18 sc)
Round 5Sc in each st around, working SpSt randomly every 4 to 5 sts. (18 sc)
Round 6(Sc 1, dec) rep 6 times. (12 sc) Do not stuff. Flatten and whipstitch closed. Fasten off with a long tail.

Part 7: Tail (Color A, Dark Brown)

Round 1MR, 4 sc into ring. (4 sc)
Round 2Inc in each st around. (8 sc)
Round 3Sc in each st around. (8 sc)
Round 4Sc in each st around. (8 sc)
Round 5(Sc 1, dec, sc 1) rep 2 times. (6 sc)
Round 6Sc in each st around. (6 sc) Do not stuff. Flatten and whipstitch closed. Fasten off with a long tail.

Assembly

Step 1Your completed turtle should sit flat on its shell base with the head extending forward. All four flippers should be visible from above. If using acrylic yarn, no blocking is needed. For cotton yarn, lightly mist with water and shape by hand before air drying.

Tester's notes

130 yards of dark brown yarn covers the shell domes and the tail; measure remaining yarn before starting the tail (6 rounds) so the last piece is not short.

15 rounds shape the head and 9 rounds shape each flipper; place a stitch marker at the start of every round on these longer pieces, since a lost round is harder to spot once speckling is in progress.

4 to 5 stitches apart is where speckle color changes land; keep the carried dark strand loose on the wrong side so the white fabric does not pucker at each color change.

2 oz of stuffing fills the whole turtle; add it in small amounts as each piece closes rather than packing it all in at the final round, so shaping stays smooth instead of lumpy.

12 single crochet stitches by 12 rounds equals 2 inches by 2 inches, worked in continuous rounds with your G-6 hook. Gauge matters here because the shell pieces need to match up perfectly for assembly. If your swatch is too big, go down a hook size. Too small, go up a hook size.

approximately 7 inches wide by 5 inches long, this finished turtle is the perfect size for cuddling, displaying, or gifting.

Trim the Color A ends on the inside after stuffing, or weave them in as you go. If this feels fussy, you can also use a naturally marled or flecked yarn instead of working the Speckle Stitch.

At a glance

Rounds64
Parts7
LevelIntermediate
Time4-6 hours
Hook3.5 mm
YarnWorsted

Gauge check

After Round 3 of any disc or head piece (18 sc), lay the piece flat on a table; a flat circle confirms tension and increase rate are matched, while cupping or ruffling signals a hook mismatch for the yarn weight.

If it cups, go up a hook size; if it ruffles or stitches look loose and gappy, drop down a hook size and recheck at the same round before continuing.

Stitch-count checkpoints

  • Part 1: Top Shell Dome (Color A, Dark Brown) · Round 4: 24 sts
  • Part 1: Top Shell Dome (Color A, Dark Brown) · Round 8: 48 sts
  • Part 1: Top Shell Dome (Color A, Dark Brown) · Round 12: 60 sts
  • Part 1: Top Shell Dome (Color A, Dark Brown) · Round 13: 60 sts
  • Part 2: Shell Base (Color A, Dark Brown) · Round 3: 18 sts
  • Part 2: Shell Base (Color A, Dark Brown) · Round 6: 36 sts

If something looks wrong

The shell dome cups instead of lying flat.
Stitches worked after Round 10 are tighter than the first 10 rounds, pulling the increase rounds in. Keep tension consistent across all 14 rounds and check that the piece still lies flat before fastening off.
The cream band is too short or too long
Band length depends on individual tension over roughly 93 rows, not a fixed stitch count, so 15.5 inches is a target, not a guarantee. Pin the unfastened band around the shell edge and add or remove rows to match exactly.
The head sits loose or wobbles instead of staying forward.
An underfilled head does not hold shape once seamed to the body. Use enough of the 2 oz stuffing allotment in the head before closing it, pressing firmly to remove air pockets.

Yarn substitutions

Cotton, DK weightProduces a firmer, smaller finished turtle; pair this with a 3.5 mm hook instead of the 4.0 mm called for with worsted.
Acrylic, worsted weightMatches the gauge and finished size the pattern is written for; no hook change needed, and 2 oz of stuffing still fills the body at the stated size.
Wool-blend, worsted weightAdds more drape to the flat disc shells, which can soften the crisp seam line of the cream band; block lightly with a damp cloth rather than full wet-blocking to keep the speckled texture crisp.
FAQs

Questions

Why is the shell made from two flat discs instead of one dome?

Working two flat discs in dark brown and joining them with a separately crocheted white band creates the visible ring of cream color around the edge, the same way a sandwich cookie looks from the side. A single solid dome would not show that stripe.

How long should the cream band actually be before fastening off?

The pattern estimates approximately 15.5 inches, about 93 rows of 6 single crochet, but individual tension changes that number. Measure it against the shell's actual edge before fastening off and adjust rows rather than trusting the row count alone.

Can the speckle technique be skipped to save time?

Yes; the head and front flippers can be worked in solid white without the SpSt color changes, since the speckling is a surface effect, not a structural stitch. Stitch counts per round stay the same either way.

One at a time —

Get the next pattern

Tested round by round before it is sent. No spam.