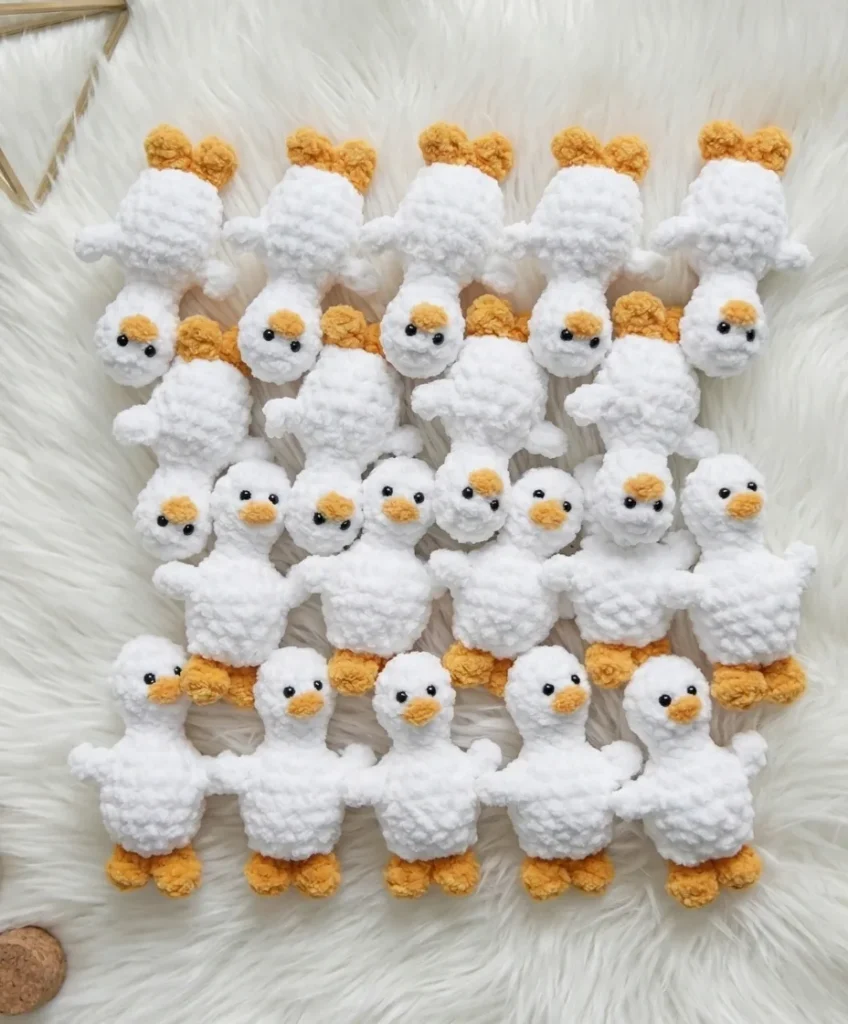
Made and counted by Wren —

One-Piece Micro Goose Amigurumi Crochet Pattern

US B-1 (2.25mm) hook and fingering yarn make this one-piece micro goose amigurumi with safety eyes.

One-Piece Micro Goose Amigurumi Crochet Pattern
IntermediateLevel
4-6 hoursTime
2.25 mmHook
FingeringYarn
Jump to the pattern

About this pattern

A one-piece micro goose amigurumi worked in continuous spiral rounds, no joining or turning, from a 6-stitch magic ring through 13 total rounds of body and head. It calls for fingering or sport weight yarn in white and orange, a 2.25mm (US B-1) hook, 4mm safety eyes, and fiberfill. Six assembly steps follow the last round, including stuffing, eye placement between Rounds 3 and 4, and beak embroidery.

This micro goose works as a single continuous piece — body and head share one spiral of 13 rounds, starting from a 6-stitch magic ring at Round 1 and building through short increase and decrease rounds to shape the neck. White fingering or sport weight yarn forms the main fabric, with orange reserved for the feet and beak accents. A 2.25mm (US B-1) hook keeps the stitches tight enough to hide the fiberfill, and 4mm safety eyes go in before the head closes.

The pattern

Written out round by round

Materials

Yarn

  • Fingering or sport weight yarn — white (main color), orange (feet and beak accent)

Hook

  • US B-1 / 2.25 mm (or size appropriate for your yarn to produce a tight, gap-free fabric)

Safety eyes

  • 4 mm black safety eyes × 2 (or embroider eyes with black thread)

Stuffing

  • Polyester fiberfill
  • Stitch marker — to track the beginning of each round
  • Yarn needle / tapestry needle
  • Scissors
  • Craft glue or fabric glue — for attaching safety eyes if not using the locking post type

Abbreviations

  • ch = Chain
  • dec = Invisible Decrease (insert hook through front loops of next 2 sts, pull up a loop, yarn over, pull through all 3 loops)
  • hdc = Half Double Crochet
  • inc = Increase (2 sc in the same stitch)
  • MR = Magic Ring
  • sc = Single Crochet
  • sl st = Slip Stitch
  • st / sts = Stitch / Stitches

Body & Head (worked as one piece)

Round 1Starting with white yarn, make a MR, work 6 sc into the ring. Pull ring closed. (6)
Round 2(1 sc, inc) × 3. (9)
Round 3Sc in each st around. (9)
Round 4Sc in each st around. (9)
Round 5(1 sc, dec) × 3. (6)
Round 6Dec, 4 sc. (5)

This narrow section forms the goose’s neck. It will feel snug — that’s correct.

Round 7Sc in each st around. (5)
Round 8Inc in each st around. (10)
Round 9(Wings): Work the wings and body sts as follows — First wing: Ch 3, sc into the 2nd ch from hook, hdc into the 3rd ch. (1 sc, inc) × 2. (4 sts worked into the main round) Second wing: Ch 3, sc into the 2nd ch from hook, hdc into the 3rd ch. 6 sc. (12)

The wings are small chain-and-stitch flaps that sit on either side of the body — they’re worked in-round, not sewn on.

Round 10Sc in each st around. (12)
Round 11(2 sc, dec) × 3. (9)
Round 12Sc in each st around. (9)
Round 13(Feet & Tail): Work as follows — First foot: Switch to orange yarn. Ch 3, work 2 hdc, sl st into the 2nd ch from hook, sc into the 3rd ch. Switch back to white yarn. 7 sc. Second foot: Switch to orange yarn. Ch 3, work 2 hdc, sl st into the 2nd ch from hook, sc into the 3rd ch. Switch back to white yarn. Tail: Sl st into the next st, ch 2, work 1 hdc into the same st as the sl st, work 1 hdc into the next st, ch 2, sl st into the last st of the round.Leave a long white yarn tail for sewing the opening closed.

Assembly

Step 1Stuff the goose firmly through the bottom opening before closing. The head and body should feel plump but not stretched. The neck will naturally stay narrow due to the decreased rounds — don’t over-stuff the neck area.
Step 2Attach the safety eyes between Rounds 3 and 4 on the head, placing them 2–3 stitches apart on each side. If you’re using craft glue, allow it to cure fully before continuing. Alternatively, embroider small black French knots.
Step 3Embroider the beak using orange yarn and a yarn needle. Work 3–4 straight stitches horizontally at the very tip of the head (below the eyes, at the end of the neck) to form a small flat beak shape.
Step 4Close the bottom opening by threading the long yarn tail onto your yarn needle and weaving through the front loops of the remaining open stitches. Pull snug to close, then knot securely.
Step 5Secure the tail — use the yarn tail near the tail section to tack it into a slightly upright position if desired, then weave in the end.
Step 6Weave in all remaining ends using your tapestry needle, working through the interior of the body so no tails are visible.

Tester's notes

2.25mm (US B-1) is the hook size the pattern is written for; go smaller rather than larger if stitches gap, since the fabric needs to stay fiberfill-tight.

6 stitches into the starting magic ring at Round 1 set the base count for every round that follows — recount after each round rather than at the end of the piece.

One stitch marker tracks the start of Round 1 and every round after it, since the whole body and head is worked in a continuous spiral with no joins or turns.

4mm safety eyes go in between Rounds 3 and 4 on the head, 2–3 stitches apart on each side, before the head is closed off and stuffed further.

White yarn covers all 13 rounds of the body and head; orange is not carried through the rounds but used afterward for the beak and feet, so no color change happens mid-round.

This pattern is written in US crochet terminology.

The wings (Round 9), feet (Round 13), and tail (Round 13) are all worked directly into the main piece — no separate pieces to sew on.

Stitch count is given at the end of each round in parentheses, for example (6) or (9).

Rounds 5 through 7 are narrow and it’s easy to lose track of where the round begins — move your stitch marker at the start of every round in this section to avoid working too many or too few stitches.

Stuff in stages if you’re new to amigurumi: add a small amount of fiberfill after Round 8 (before the wings round) so you can shape the head and neck while the opening is still wide enough to work comfortably, then add the final stuffing from the bottom before closing.

the feet and wings, don’t pull the chain loops too tight — the ch-3 chains need just a little ease so they sit neatly away from the body rather than puckering inward. Work them at normal tension and they’ll lie naturally.

At a glance

Rounds13
LevelIntermediate
Time4-6 hours
Hook2.25 mm
YarnFingering

Gauge check

Gauge is not critical for this project; what matters is a firm, tight tension so the stuffing does not show through the fabric.

Stitch-count checkpoints

  • Body & Head (worked as one piece) · Round 4: 9 sts
  • Body & Head (worked as one piece) · Round 8: 10 sts
  • Body & Head (worked as one piece) · Round 12: 9 sts

If something looks wrong

The head looks lopsided once the eyes are in.
The eyes were placed unevenly between Rounds 3 and 4; remove and reseat them so each sits 2–3 stitches apart on its own side before gluing or closing the head.
The neck bulges instead of staying narrow.
Fiberfill was packed into the decreased neck rounds; stuff the head and body first, then add only a small amount to the neck so the decrease rounds keep their shape.
Gaps show between stitches and fiberfill peeks through.
The hook is running large for the yarn; drop down from 2.25mm (US B-1) or tighten tension until the stitches sit close enough to hide the stuffing.
Stitch counts stop matching the pattern partway through.
A stitch was missed or added without noticing in the continuous spiral; recount against the given sequence (6, 9, 9, 9, 6…) at the end of each round and use the marker to confirm where the round starts.

Yarn substitutions

Fingering weight cottonStitches sit firmer with less give, so a hook slightly smaller than 2.25mm (US B-1) may be needed to keep the same gap-free fabric, and less fiberfill is needed since the denser stitches hold shape on their own.
Sport weight acrylicThe finished goose comes out a size larger than the fingering weight version; size up the hook from 2.25mm and stuff a little more generously to fill the roomier stitches.
Fingering weight wool blendFabric gains more stretch and drape, so tension needs closer watching to avoid gaps; keep the 2.25mm (US B-1) hook but check the Round 2 stitch count more often since wool shifts more easily than acrylic.
FAQs

Questions

What skill level is needed for this micro goose pattern?

Beginner-friendly, but you should be comfortable crocheting in continuous spiral rounds. If you can work a magic ring, increase, and decrease, you’re ready. Rounds 9 and 13 need a little extra attention.

How large is the finished goose?

Approximately 2–3 inches (5–7 cm) tall in fingering weight yarn with a 2.25 mm hook. A heavier yarn will scale it up proportionally.

Can I use a different yarn weight?

Yes — sport or DK weight with a larger hook works fine. Avoid fluffy or textured yarns, as they’ll hide the wing and tail details.

Can I sell finished geese made from this pattern?

Yes, for craft markets or online shops. Just note the item is handmade and not suitable for children under 3 due to small parts like safety eyes.

One at a time —

Get the next pattern

Tested round by round before it is sent. No spam.