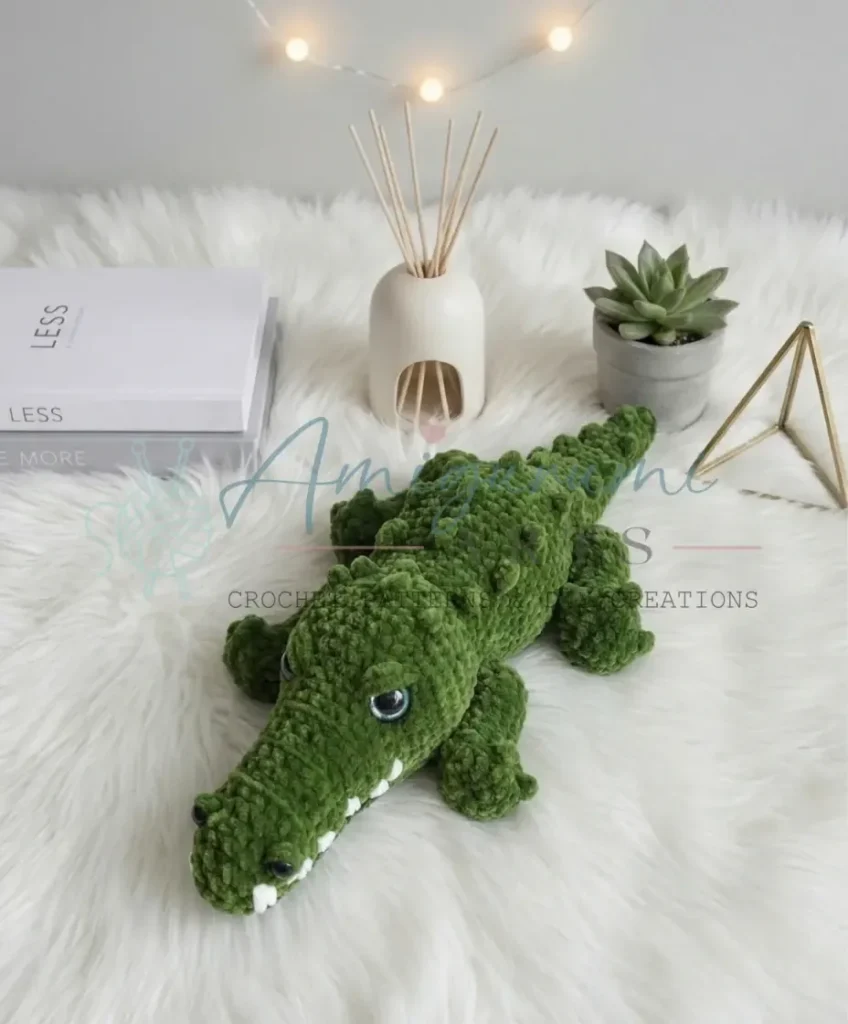
Made and counted by Wren —

One-piece crocodile amigurumi pattern with bobble claws

G-6/4.0mm hook, worsted-weight plush yarn: one-piece crocodile amigurumi with bobble claws.

One-piece crocodile amigurumi pattern with bobble claws
IntermediateLevel
4-6 hoursTime
4.0 mmHook
WorstedYarn
Jump to the pattern

About this pattern

A one-piece crocodile amigurumi: tail, body, and head crochet together in a continuous 41-round spiral, worked with worsted-to-bulky plush yarn on a G-6/4.0mm hook. Four paws, crocheted separately over 13 rounds each on a D-3/3.0mm hook, get stuffed, closed, and pinned to the body before bobble claws, dome eyes, plastic noses, and embroidered eyelids finish the face. Expect roughly 1.5 skeins of main-color yarn for the whole project.

This crocodile amigurumi is built as one continuous piece: the tail, body, and head crochet in a single 41-round spiral with no seam at the neck. Four paws — two front, two back — are worked separately over 13 rounds each, then stuffed, closed, and pinned on before bobble claws, embroidered eyelids, and nostril noses finish the face. The number that matters most is 41, since every shaping row for the main body happens inside that one spiral, with no join to lose track of. This is an intermediate-level pattern, ideal for crocheters comfortable working amigurumi in the round and confident with shaping.

The pattern

Written out round by round

Materials

  • Yarn (main color): Plush/velvet yarn, approximately 1.5 skeins — any brand or color of your choice; worsted to bulky weight recommended
  • Yarn (accent): Black acrylic yarn, 1 skein (for face details, mouth, and eyelids)
  • Yarn (accent): White acrylic yarn, 1 skein (for teeth embroidery)
  • Yarn (detail): Black cotton yarn, 1 skein (for eye tension pulls and attaching legs)
  • Hook size (body/back legs): US G-6 / 4.0 mm
  • Hook size (front paws): US D-3 / 3.0 mm

Additional hook

  • A hookless needle or spare thin hook (for burying yarn tails inside the body)

Safety eyes

  • 2 dome/half-sphere eyes with backing discs, 2 cm diameter

Noses

  • 2 black plastic noses, 1 cm diameter (applied upside down, centered on nostrils)

Stuffing

  • Fiberfill / polyester stuffing — any brand

Stitch markers

  • At least 1 (to mark beginning of round)
  • Yarn needle / tapestry needle: Standard size for weaving in ends

Plastic needle

  • For running the mouth stitch
  • Two long sewing needles: For pinning and attaching legs
  • Sewing pins / straight pins: For marking placement before embroidery
  • Scissors
  • Craft glue (clear-drying): For securing noses in place

Abbreviations

  • ch = Chain
  • dc = Double Crochet
  • dec = Invisible Decrease (insert hook through front loops of next 2 sts, pull up loop, yarn over, pull through all 3 loops)
  • inc = Increase (2 sc in the same stitch)
  • MR = Magic Ring
  • sc = Single Crochet
  • sl st = Slip Stitch
  • SM = Stitch Marker
  • st / sts = Stitch / Stitches

Tail – Body – Head (One Continuous Piece)

Begin at the tail tip. Work in a continuous spiral throughout.

Round 16 sc in MR (or in the 2nd ch from hook). (6)
Rounds 2–4Sc in each st around. (6) (3 rounds total)(6)
Round 5(1 sc, inc) × 3. (9)
Rounds 6–8Sc in each st around. (9) (3 rounds total)(9)
Round 9(2 sc, inc) × 3. (12)
Rounds 10–13Sc in each st around. (12) (4 rounds total)(12)
Round 14(3 sc, inc) × 3. (15)
Rounds 15–17Sc in each st around. (15) (3 rounds total)(15)
Round 18(4 sc, inc) × 3. (18)
Rounds 19–22Sc in each st around. (18) (4 rounds total)(18)
Round 23(5 sc, inc) × 3. (21)
Rounds 24–25Sc in each st around. (21) (2 rounds total)(21)
Round 26(3 sc, inc) × 5, 1 sc. (26)
Round 27(3 sc, inc) × 6, 2 sc. (32)
Round 28Sc in each st around. (32)
Round 29(4 sc, inc) × 6, 2 sc. (38)
Rounds 30–37Sc in each st around. (38) (8 rounds total)(38)
Round 38(5 sc, dec) × 4, 3 sc. (33)
Rounds 39–40Sc in each st around. (33) (2 rounds total)(33)
Round 41(4 sc, dec) × 5, 3 sc. (28)
Round 42Sc in each st around. (28)Stuff the piece firmly with fiberfill now. Continue stuffing as you work the neck and head.
Round 43(3 sc, dec) × 5, 3 sc. (23)
Rounds 44–45Sc in each st around. (23) (2 rounds total)(23)
Round 46(4 sc, inc) × 4, 3 sc. (27)
Rounds 47–48Sc in each st around. (27) (2 rounds total)(27)
Round 49(5 sc, inc) × 4, 3 sc. (31)
Round 50(4 sc, inc) × 6, 1 sc. (37)
Round 51(3 sc, inc) × 9, 1 sc. (46)
Rounds 52–53Sc in each st around. (46) (2 rounds total)(46)
Round 54(4 sc, dec) × 7, 4 sc. (39)
Round 55(3 sc, dec) × 7, 4 sc. (32)
Round 56(4 sc, dec) × 5, 2 sc. (27)
Round 57(3 sc, dec) × 6, 2 sc. (22)
Rounds 58–59Sc in each st around. (22) (2 rounds total)(22)
Round 60(5 sc, dec) × 3, 1 sc. (19)
Rounds 61–67Sc in each st around. (19) (7 rounds total)Add more fiberfill to the head now and insert your 2 cm safety eyes at this stage. Position them evenly on either side of the face before closing further.(19)
Round 68(4 sc, dec) × 3, 1 sc. (15)
Round 69Sc in each st around. (15)
Round 70(3 sc, dec) × 2, 2 sc. (12)
Round 71(2 sc, dec) × 3. (9)
Round 72Dec twice. Close the remaining opening, weave in the end securely, and bury the tail inside the head.

Paws — Make 4

Front paws: US D-3 / 3.0 mm hook. Back legs: US G-6 / 4.0 mm hook. Instructions are identical for all four.

Round 16 sc in MR (or in the 2nd ch from hook). (6)
Round 2Inc in each st around. (12)
Round 3(1 sc, inc) × 6. (18)
Rounds 4–6Sc in each st around. (18) (3 rounds total)(18)
Round 76 sc, dec × 3, 6 sc. (15)
Round 84 sc, dec × 3, 5 sc. (12)
Rounds 9–11Sc in each st around. (12) (3 rounds total)(12)
Round 12(3 sc, inc) × 3. (15)
Round 13(2 sc, inc) × 5. (20)
Rounds 14–15Sc in each st around. (20) (2 rounds total)(20)
Round 16(2 sc, dec) × 6. (15) (Note: pattern has 24 sts in sequence — work the dec repeat to reduce correctly to 15)
Round 17(1 sc, dec) × 5. (10)
Round 18Dec × 4. Close the opening and leave a long yarn tail for sewing.

Assembly

Step 1Stuff all four paws firmly with fiberfill before closing. Make sure the paw shape is round and defined.
Step 2Close each paw using the yarn tail and a yarn needle, weaving through the remaining stitches and pulling tight.
Step 3Add bobble claws to all four paws after stuffing and closing: insert your needle threaded with plush yarn into the center of the paw sole, holding the tail end so it doesn't pull through. Work one chain stitch, yarn over, insert back into the original point — you'll have 3 loops on the hook. Pull through all 3 loops. Repeat once more into the same point. This creates one raised bobble — your center claw. Cut yarn and knot the tail ends, then bury both ends inside the paw. Repeat this process two more times, placing the additional claws approximately 2–3 stitches to the right and left of the center claw, for three evenly spaced bobble claws on each paw.
Step 4Use long straight pins to position the front paws on the lower body and the back legs on the sides of the body. Step back and check symmetry before sewing.
Step 5Thread a long needle with black cotton yarn. Attach each paw using firm whipstitches through the edge of the paw and into the body, working all the way around the opening.
Step 6Once each paw is sewn on, use the same cotton yarn to work the toe tension pull: insert the needle through the center of the paw from the inside, loop the yarn between two claw bobbles on the outside, and pull back through to the inside. Repeat for each pair of claws (3 passes total), pulling gently to create small indentations between toes — not too deep. Tie off firmly and bury ends.
Step 7Add all face embroidery: nostrils, eye tension, eyelids, muzzle, and teeth. For the nostrils, draw up a loop of plush yarn near the center of the face just to the side of the left eye, work one chain, then yarn over and work 2 dc into the same point to form a raised bobble; cut the yarn, knot the tail ends slightly to the left, and bury the ends inside the head, then glue each 1 cm plastic nose upside down and centered on its nostril bobble. For the eye tension pull, thread a long needle with a single strand of black cotton yarn, insert it from the underside of the muzzle to come out at the lower edge of the left eye, then go in at the upper edge of the left eye and out at the upper edge of the right eye, then in at the lower edge of the right eye and out through the underside of the muzzle about 1 stitch from the start, and gently pull both ends to draw the eye sockets into their sculpted shape. Finish with the embroidered eyelids, muzzle shaping, and teeth as described in the pattern.
Step 8Add spine bobbles across the back.
Step 9Weave in all remaining yarn ends.

Tester's notes

Rnd 1 sets the spiral start — place a stitch marker there and move it up every round; the piece never joins, so there's no round-end seam to anchor your count.

2 hook sizes are required: G-6/4.0 mm for the body and back legs, D-3/3.0 mm for the front paws. Keeping one hook for both leaves the front paws looser and baggier than the body.

4 paws need stuffing firmly before closing; underfilled paws go flat once the bobble claws are added on top.

1.5 skeins of main-color yarn covers the entire tail-body-head piece plus all 4 paws — buy the extra half-skein up front so color doesn't shift mid-project.

13 rounds make up each paw, worked identically for all 4; recheck the stitch count at Rnd 3 (18 sc) before starting the straight rounds that follow.

This pattern is written in US crochet terminology — convert your terms before starting the spiral if you normally work from UK charts.

At a glance

Rounds54
Parts2
LevelIntermediate
Time4-6 hours
Hook4.0 mm
YarnWorsted

Gauge check

After Rnd 1, count: the magic ring should hold exactly 6 single crochet before moving to Rnd 2, since every later increase round builds off that base.

If the fabric gapes enough to let stuffing peek through once Rnds 2–4 are done, drop to a smaller hook rather than trust a swatch — the pattern notes gauge matters less than a tight, stuffing-proof stitch.

Stitch-count checkpoints

  • Tail – Body – Head (One Continuous Piece) · Round 26: 26 sts
  • Tail – Body – Head (One Continuous Piece) · Round 49: 31 sts
  • Tail – Body – Head (One Continuous Piece) · Round 70: 12 sts
  • Tail – Body – Head (One Continuous Piece) · Round 71: 9 sts
  • Paws — Make 4 · Round 3: 18 sts
  • Paws — Make 4 · Round 8: 12 sts

If something looks wrong

The front paws look noticeably looser
Materials call for D-3/3.0 mm on front paws versus G-6/4.0 mm on the body and back legs; re-check which hook is in hand before starting Paws — Make 4.
Fiberfill is visible through the stitches.
The fabric is too loose for the yarn weight; go down a hook size and keep working — the pattern notes gauge matters less than a stuffing-proof tension.
The round count drifts partway through the body.
No join happens at any round end in this spiral, so a lost marker means a lost count; move the stitch marker up every round starting at Rnd 1 and recount at each increase row (Rnd 5 should read 9 sc) to catch drift early.
Nose or eyes end up off-center once glued or sewn on.
Placement is set by sewing pins before the glue or thread is permanent; pin both eyes and both noses first, step back to check symmetry, then secure — nostrils and noses only go on after the eyes are already secured.

Yarn substitutions

Acrylic chenille, worsted weightKeeps the same G-6/4.0 mm hook and a similar velvet-like texture to the plush main yarn, but sheds less fuzz and shows stitch definition slightly better, so stuffing hides without sizing down.
Cotton yarn, worsted weightTrades the plush halo for crisp stitch definition and a stiffer drape; cotton has less give than velvet yarn, so sizing up to an H-8 hook keeps the fabric from becoming too dense to stuff.
Polyester or acrylic, bulky weightProduces a larger finished crocodile than the stitch counts imply, since bulky yarn grows faster each round; expect to use more than the stated 1.5 skeins and to size the main hook up from G-6/4.0 mm to compensate.
FAQs

Questions

Why is the body worked as one continuous piece instead of a separate head and body?

Tail, body, and head crochet together in one 41-round spiral with no seam at the neck, so all shaping — including the early increase from 6 sc in the magic ring to 9 sc by Rnd 5 — happens inside a single piece. This removes the need to sew a head onto a separate body.

Why do the front paws and back legs use different hook sizes?

The materials list calls for G-6/4.0 mm on the body and back legs but D-3/3.0 mm on the front paws, even though all 4 paws follow the same 13-round instructions. The smaller hook keeps the front paw fabric denser, which matters more on the thinner front limbs than on the sturdier back legs.

When should the bobble claws and nostrils be added?

Bobble claws attach to each paw only after it's stuffed and closed — adding them earlier would get crushed when the paw opening is cinched shut. Nostrils go on the face after the eyes are already secured, so eye placement is locked in before the face layout is finalized.

One at a time —

Get the next pattern

Tested round by round before it is sent. No spam.