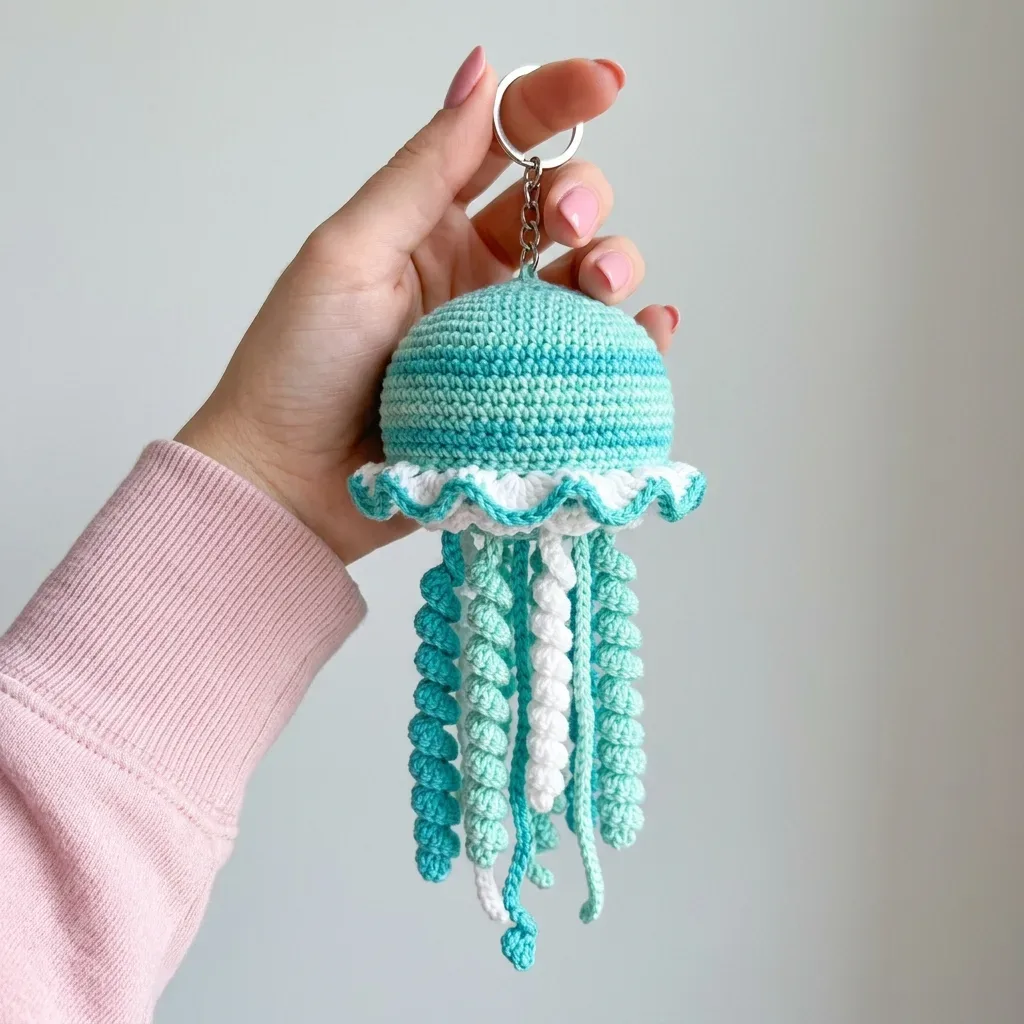
Made and counted by Wren —

Ocean Blue Jellyfish Keychain Free Crochet Pattern

Make an adorable Ocean Blue Jellyfish keychain with this free crochet pattern featuring a ruffled frill, bobble chain tentacles, and no-sew construction.

IntermediateLevel
4-6 HoursTime
2.25 mmHook
Fingering/DKYarn
Jump to the pattern

At a glance

Start the bell at the top and work continuous rounds downward, increasing to shape the rounded dome.

Add small amounts of stuffing as the rounds progress to keep the dome smooth and evenly filled.

Attach your keychain hardware securely inside the bell before the final rounds close it up.

Fan out shell stitches around the frill rounds so the border flares out into a ruffled edge.

Make eight tentacles separately using repeated bobble chain segments that curl into spiraled cords.

Attach all eight tentacles evenly around the base of the bell using the tentacle attachment steps.

Weave in every yarn end and give the tentacles a gentle shake to let their natural curl settle.

About this pattern

This Ocean Blue Jellyfish Keychain turns a handful of cotton yarn into the sweetest little sea creature you can clip to a bag or keyring. What makes it special is the dome-shaped bell worked in seamless continuous rounds, topped with a ruffled white frill and finished off with eight curly, bumpy tentacles that actually spiral on their own. It's perfect for crocheters who love ocean themes, want a quick amigurumi gift, or are looking for a project that feels fancier than it actually is to make.

The star technique here is the bobble chain stitch, a simple chain-and-bobble combo repeated to create tentacles that naturally curl without any blocking or wire. You'll also work a shell stitch fan for the frill and a slip stitch picot edge for texture. This sits at an intermediate level thanks to the continuous rounds and stuffing-as-you-go construction, and most crocheters finish the whole jellyfish, tentacles included, in about 4 to 6 hours.

The finished jellyfish is small and huggable, with a smooth rounded bell about the size of a golf ball, a frothy white frill skirting the opening, and eight dangling tentacles that sway and bounce with movement. The mercerized or cotton yarns give it a slight sheen that really does look like it belongs in the ocean. It's an ideal handmade gift for beach trip souvenirs, party favors, teacher gifts, or a fun stocking stuffer for anyone who loves quirky sea life.

Variations

I fell in love with this pattern the moment I discovered the bobble chain stitch for the tentacles. You just chain four, drop a bobble into that fourth chain, and repeat — and like magic, the cord spirals and curls all on its own without any steam blocking or wire insertion. There's something so satisfying about watching eight of these squiggly little legs pile up as you work them. The bell itself is worked in continuous rounds from the top down, so you're stuffing as you go and never fussing with slip stitch joins or visible seams. Then that Round 19 frill, worked into front loops with a shell stitch fan, adds this gorgeous ruffled skirt that instantly makes the whole thing look more finished and fancy than the effort it actually took. Attaching your keychain hardware before you close up the bell means no awkward sewing after the fact. Every part of this build feels intentional and clever, and by the time you're weaving in your last tentacle end, you'll have this tiny, wobbly, joyful creature that genuinely looks like it swam straight out of the sea.

Common mistakes

  • Losing track of rounds because the bell is worked in continuous spirals with no joining slip stitch.Place a stitch marker in the first stitch of every round and move it up as you go — this is non-negotiable for continuous round amigurumi and will save you from miscounted rows.
  • Bobble chain tentacles come out flat and don't curl the way they should.Make sure you're working the dc into the very first chain of your 4-chain (three chains back from the hook, not the last one made) — the excess chain length is what forces the spiral, so working into the wrong chain flattens the curl.
  • The Round 19 frill looks tight or puckered instead of ruffly.Double check you're working into the front loops only of Round 19, leaving the back loops free — working into both loops locks the frill flat instead of letting it flare outward.
  • Stuffing unevenly, leaving lumps or a saggy bottom on the bell.Stuff a small amount every few rounds as you work rather than cramming it all in at the end — this keeps the dome shape smooth and prevents overstuffing that distorts your stitch tension.
  • Keychain hardware pulls loose after light use.Attach your hardware securely before closing the last few rounds of the bell, weaving through several stitches and tying off with a double knot so it's anchored inside the stuffing, not just tacked to the surface.
  • Tentacles end up uneven lengths or twist oddly when attached.Count your bobble chain repeats out loud or jot down the number as you make each tentacle so all eight match, and lay them out next to each other before attaching to check length consistency.

The pattern

Written out round by round

Materials

  • You want a cotton or cotton blend yarn in fingering to light DK weight. Cotton holds the dome shape beautifully and gives you crisp stitch definition.
  • DMC Natura Just Cotton (50 g / 169 yds): Use Turquoise for Color A, Green Smoke for Color B, and Blanc for Color C.
  • Scheepjes Catona (50 g / 125 yds): This mercerized cotton has a slight sheen that enhances the oceanic look. Use Cyan for Color A, Chrystaline for Color B, and White for Color C.
  • Paintbox Yarns Cotton DK (50 g / 137 yds): An affordable choice with good stitch clarity. Use Kingfisher Blue for Color A, Misty Teal for Color B, and Paper White for Color C.
  • Avoid very stretchy fibers like wool or acrylic blends for the bell. They can cause the dome to lose its rounded shape over time.

Yarn

  • Color A (Medium teal or turquoise): approximately 25 yards or 23 meters
  • Color B (Light mint or pale aqua): approximately 15 yards or 14 meters
  • Color C (White): approximately 20 yards or 18 meters

Hook

  • US size B-1 / 2.25 mm crochet hook, or the size needed to match gauge

Notions

  • Polyfill stuffing, a small amount
  • Yarn needle for weaving in ends
  • Scissors
  • Stitch marker

Abbreviations

  • ch = chain: Wrap yarn over hook, pull through loop on hook. This creates one chain stitch.
  • sl st = slip stitch: Insert hook into stitch, yarn over, pull through both the stitch and the loop on your hook in one motion.
  • sc = single crochet: Insert hook into stitch, yarn over and pull up a loop (two loops on hook), yarn over and pull through both loops.
  • sc2tog = single crochet two together (invisible decrease): Insert hook in front loop only of first stitch, insert hook in front loop only of next stitch, yarn over and draw through both loops, yarn over and draw through remaining two loops. This decrease is nearly invisible.
  • dc = double crochet: Yarn over, insert hook into stitch, yarn over and pull up a loop (three loops on hook), yarn over and pull through two loops, yarn over and pull through remaining two loops.
  • tr = treble crochet: Yarn over twice, insert hook into stitch, yarn over and pull up a loop (four loops on hook), [yarn over and pull through two loops] three times.
  • MR = magic ring: An adjustable loop that allows you to pull the center closed tightly.
  • pm = place marker
  • sm = slip marker
  • st(s) = stitch(es)
  • sp = space
  • BLO = back loop only
  • FLO = front loop only
  • rnd = round
  • rep = repeat
  • approx = approximately
  • rem = remaining
  • RS = right side (the outside of the dome)
  • WS = wrong side (the inside of the dome)
  • yo = yarn over

The Bell (worked in continuous rounds, top down)

  1. Round 1Using Color A, make a MR, work 6 sc into ring, pull ring closed. (6 sc)
  2. Round 2Work 2 sc in each st around. (12 sc)
  3. Round 3[Sc in 1 st, 2 sc in next st] 6 times. (18 sc)
  4. Round 4Change to Color B on last yo of Rnd 3 final st. [Sc in 2 sts, 2 sc in next st] 6 times. (24 sc)
  5. Round 5[Sc in 3 sts, 2 sc in next st] 6 times. (30 sc)
  6. Round 6Change to Color A on last yo of Rnd 5 final st. [Sc in 4 sts, 2 sc in next st] 6 times. (36 sc)
  7. Round 7[Sc in 5 sts, 2 sc in next st] 6 times. (42 sc)
  8. Round 8Change to Color B on last yo of Rnd 7 final st. [Sc in 6 sts, 2 sc in next st] 6 times. (48 sc)
  9. Round 9Sc in each st around. (48 sc)
  10. Round 10Change to Color A on last yo of Rnd 9 final st. Sc in each st around. (48 sc)
  11. Round 11Sc in each st around. (48 sc)
  12. Round 12Change to Color B on last yo of Rnd 11 final st. Sc in each st around. (48 sc)
  13. Round 13Sc in each st around. (48 sc)
  14. Round 14Change to Color A on last yo of Rnd 13 final st. Sc in each st around. (48 sc)
  15. Round 15Sc in each st around. (48 sc) Before continuing, attach the keychain hardware. Thread the split ring through the center loop of the magic ring at the crown. If the ring slips, use a short length of Color A to whipstitch around the bar of the ring and through the crown loop several times, then knot securely.Now begin stuffing the bell gradually as you work the next rounds.
  16. Round 16Change to Color B on last yo of Rnd 15 final st. [Sc in 6 sts, sc2tog] 6 times. (42 sc)
  17. Round 17[Sc in 5 sts, sc2tog] 6 times. (36 sc) Add remaining stuffing now so the dome is firm before the opening closes further.
  18. Round 18Change to Color A on last yo of Rnd 17 final st. [Sc in 4 sts, sc2tog] 6 times. (30 sc)
  19. Round 19[Sc in 3 sts, sc2tog] 6 times. (24 sc) Checkpoint: After Round 19, your bell should measure approximately 3.5 inches / 9 cm across the widest point and approximately 2 inches / 5 cm tall from crown to current opening. If your piece is larger, try a smaller hook or tighter tension. If smaller, try a larger hook.Do not fasten off. Continue to the frill.

The Frill (worked into the front loops of Round 19)

Before working the frill, change to Color C (white).

Working into the FLO of each st of Round 19 only:

  1. Round 20(Frill base): Join Color C with a sl st into any FLO, ch 1, sc in same st, sc in each FLO around, sl st to first sc to join this round. (24 sc)
  2. Round 21(Ruffle round): Ch 3 (counts as first dc), work 4 more dc in same st (first ruffle shell complete), [work 5 dc in next st] 23 times, sl st to top of beginning ch-3 to join. (120 dc total, 24 shells of 5 dc)
  3. Round 22(Picot edging): Using Color A, join with a sl st into the top of any dc. Work picot edging as follows: [sl st in next dc, ch 3, sl st in first of those 3 chs, sl st in next dc] around. Continue until all 120 dc have been edged. Fasten off and weave in end.

The frill will naturally ruffle outward from the base of the bell.

The Tentacles (make 8 total)

Make 3 tentacles in Color A (teal), 3 tentacles in Color B (mint), and 2 tentacles in Color C (white). This creates the mixed color cascade visible in the finished piece.

Each tentacle uses the Bobble Chain Stitch described in Special Stitches.

Short tentacles (make 4, one of each color plus one extra Color A):

Work 18 bobble chain units. This produces a tentacle approximately 3 inches / 7.5 cm long when relaxed and curled.

Long tentacles (make 4, one of each color plus one extra Color B):

Work 28 bobble chain units. This produces a tentacle approximately 4.5 inches / 11.5 cm long when relaxed and curled.

To start each tentacle: Make a slip knot, ch 1 to secure, then begin the bobble chain sequence immediately. Leave a tail of approximately 6 inches / 15 cm at the start of each tentacle for attachment.

To end each tentacle: After the final bobble unit, cut yarn leaving a 4 inch / 10 cm tail, pull tail through the last loop to fasten off. Tuck the end tail back through several bobbles to hide it.

Tentacle Attachment

Hold the bell with the frill facing down and the crown facing up. The back loops of Round 19 (left exposed when you worked the frill into the front loops) form a ring of 24 loops at the base of the bell.

Divide the 24 back loops into 8 groups of 3 loops each.

Thread the starting tail of each tentacle onto a yarn needle. Insert the needle under the 3 back loops of one group from outside to inside, wrap around twice, then knot securely on the inside of the bell. Pull snugly so the tentacle hangs straight down.

Attach one tentacle to each group of 3 loops, working evenly around the base. Alternate colors as you go: teal, mint, white, teal, teal, mint, mint, white. This arrangement, when the tentacles curl, creates the mixed swirling look of the finished piece.

After all 8 tentacles are attached, weave in all remaining tails on the inside of the bell.

Assembly

Step 1

Cotton yarn does not require aggressive blocking. Once all ends are woven in, lightly mist the bell with water, gently coax it into a smooth hemisphere, and allow to dry on a flat surface with the dome facing up.

Step 2

Do not wet block the tentacles. The moisture may temporarily relax the curl. If tentacles lose curl after washing, allow them to air dry hanging vertically and the spiral will return.

Step 3

Trim all tails close to the fabric after weaving in. Do not leave any tails longer than 0.25 inch / 0.5 cm inside the bell.

Important notes

💡 Use a US size B-1 / 2.25mm hook and stick with a fingering to light DK weight cotton — a stretchier fiber like acrylic will cause your bell to lose its crisp dome shape over time.

💡 Keep a stitch marker in the first stitch of each round throughout the bell; continuous rounds have no visual join, so it's the only way to know where a round starts and ends.

💡 Stuff the bell gradually as you work upward, adding small pinches of polyfill every 3-4 rounds rather than all at once at the end for the smoothest, most even shape.

💡 When working the bobble chain stitch for tentacles, count your chain-4 and bobble repeats carefully and keep a tally so all 8 tentacles end up a matching length.

💡 Attach your keychain hardware before you finish closing the top of the bell — it's far easier to anchor it securely while there's still an opening to work through.

FAQs

Frequently asked questions

What yarn weight works best for this jellyfish keychain?

A fingering to light DK weight cotton or cotton blend works best, since cotton holds the dome shape crisply. DMC Natura Just Cotton, Scheepjes Catona, and Paintbox Cotton DK are all great options and are listed with matching color suggestions.

Why does the tentacle keep curling — is that supposed to happen?

Yes, the curling is intentional and comes from the bobble chain stitch technique. The excess chain length combined with the bobble naturally forces the cord to spiral, giving you that bouncy tentacle look without any extra shaping.

Can I make this without continuous rounds if I'm not comfortable with that technique?

The pattern is specifically designed for continuous rounds to avoid seams and keep the dome smooth, so it's worth practicing with a stitch marker before starting. If you're newer to amigurumi, working a quick practice swatch in the round first will help you get comfortable.

How much yarn do I actually need for one jellyfish?

You'll need approximately 25 yards of Color A, 15 yards of Color B, and 20 yards of Color C, which comfortably fits within a single 50g skein of any of the recommended yarns with plenty left over.

Is this a good beginner amigurumi project?

It's rated intermediate mainly because of the continuous rounds, bobble stitches, and shell stitch frill, so it's a great next-step project if you've already made a basic amigurumi or two. A confident beginner who's comfortable with increases could still tackle it with some patience.

One at a time —

Get the next pattern

Tested round by round before it is sent. No spam.