Made and counted by Wren —

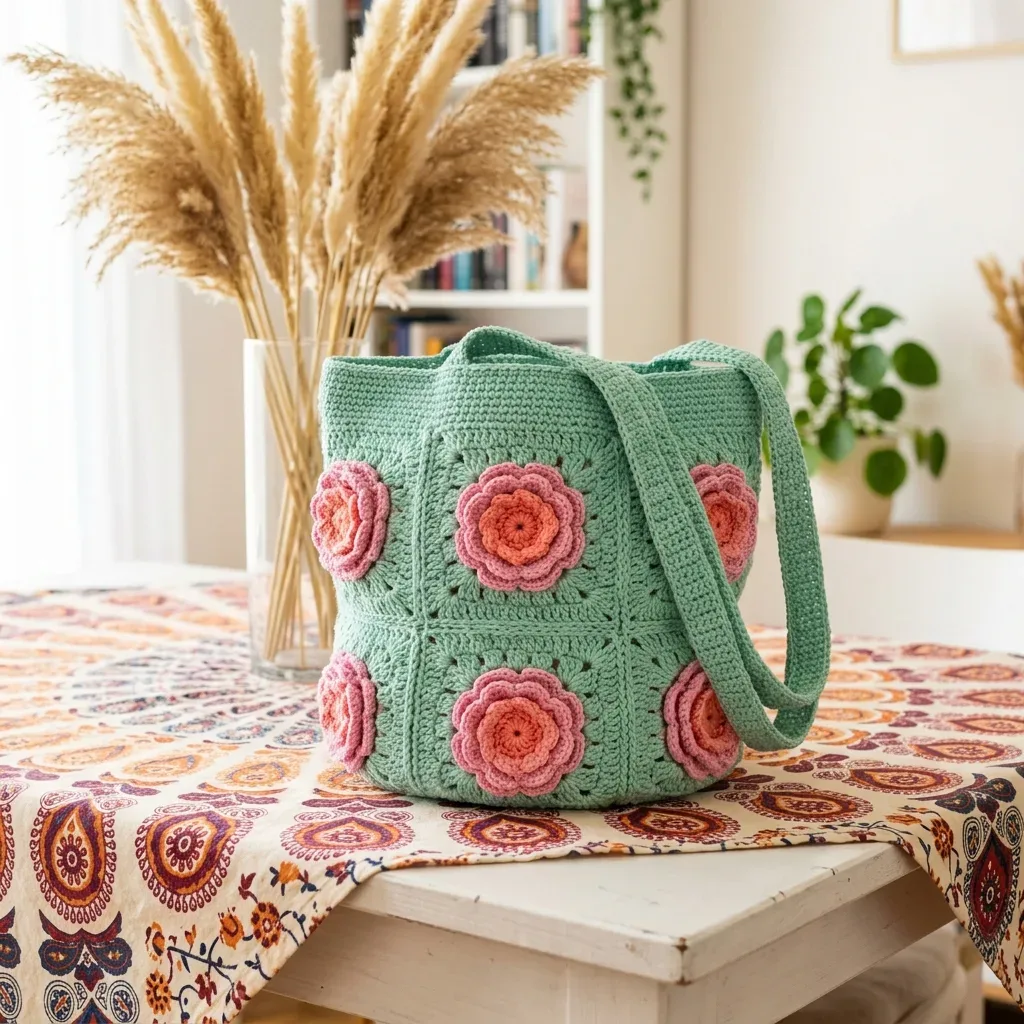
Mint granny square bag with crochet rose appliques

4.0 mm hook, worsted cotton: mint granny square bag with coral and pink crochet roses, 120-sc top edge.

Mint granny square bag with crochet rose appliques
IntermediateLevel
4-6 hoursTime
4.0 mmHook
WorstedYarn
Jump to the pattern

About this pattern

A mint granny square bag worked in worsted weight cotton on a 4.0 mm hook, built from 14 granny squares (12 walls, 2 bottom) that reach 76 dc after 5 rounds each, joined into a 120-sc top edge finished with crab stitch. Coral, light pink, and pink crochet roses (8-sc center to 8 outer petals) attach as appliques. Materials: 450 yards mint, 250 yards combined accent colors, optional lining or plastic canvas base.

This bag joins 14 mint granny squares — 12 arranged into a two-row band around the walls (6 squares per row) and 2 forming the bottom — each worked to 76 dc and 19 dc per side after 5 rounds, into a boxy body finished with a continuous 120-sc top edge and a crab stitch trim. Coral, light pink, and pink crochet roses, each built from an 8-sc center through 8 outer petals, attach to the 12 wall squares as surface appliques. The construction stays within four colors and a single 4.0 mm hook, with the 120-sc count at the top opening setting the fit of the strap and lining.

The pattern

Written out round by round

Materials

Yarn

  • Color D (mint green): 450 yards of worsted weight cotton
  • Color A (coral): 60 yards of worsted weight cotton
  • Color B (light pink): 90 yards of worsted weight cotton
  • Color C (pink): 100 yards of worsted weight cotton

Hook

  • 4.0 mm (G-6), or whatever size gives you the correct gauge

Notions

  • Yarn needle, stitch markers, pins, tape measure, scissors, and optional lining fabric

Abbreviations

  • Standing dc join = Make a slip knot on your hook, yarn over, insert hook in the indicated stitch or space, yarn over and pull up a loop, yarn over and pull through two loops twice. This counts as one double crochet and lets you start a new color without a chain.
  • Invisible seam = Hold pieces with wrong sides together or lay them flat with right sides up. Using matching yarn, sew through the inner loops only, catching one inner loop from each edge. Pull snug but not tight. This creates a nearly invisible join.
  • Crab stitch = Work single crochet from left to right if you are right-handed, or right to left if you are left-handed. Insert your hook in the next stitch behind your hook, pull up a loop, yarn over and pull through both loops. It feels backward at first, but creates a beautiful braided edge.
  • ch = chain
  • dc = double crochet (yarn over, insert hook, pull up loop, yarn over and pull through two loops twice)
  • hdc = half double crochet
  • MR = magic ring
  • rep = repeat
  • RS = right side
  • sc = single crochet (insert hook, pull up loop, yarn over and pull through both loops)
  • sl st = slip stitch
  • sp = space
  • st(s) = stitch(es)
  • WS = wrong side

Main Pattern

You will make 14 mint green squares total. Twelve become wall squares, and two form the bottom of the bag.

Pattern Notes Chain 3 (ch 3) counts as 1 double crochet in the granny square. Each round adds 16 double crochet total and 4 double crochet per side. Block every square to 4.25 inches (10.8 cm) before joining.

Round 1With mint, make a magic ring. Ch 3, 2 dc in ring, ch 2, [3 dc in ring, ch 2] 3 times. Join with sl st to top of ch-3. Tighten ring. (12 dc, 4 corner ch-2 spaces)
Round 2Sl st into next corner sp. Ch 3, dc in same sp, ch 2, 2 dc in same sp, dc in each of next 3 dc, [(2 dc, ch 2, 2 dc) in next corner sp, dc in each of next 3 dc] 3 times. Join. (28 dc, 4 corner ch-2 spaces; 7 dc per side)
Round 3Sl st into next corner sp. Ch 3, dc in same sp, ch 2, 2 dc in same sp, dc in each of next 7 dc, [(2 dc, ch 2, 2 dc) in next corner sp, dc in each of next 7 dc] 3 times. Join. (44 dc; 11 dc per side)
Round 4Repeat Round 3 logic, working corners as (2 dc, ch 2, 2 dc) and dc in each of 11 dc across each side. Join. (60 dc; 15 dc per side)
Round 5Repeat Round 3 logic, working corners as (2 dc, ch 2, 2 dc) and dc in each of 15 dc across each side. Join and fasten off. (76 dc; 19 dc per side)Checkpoint: Each square should measure 4.25 inches (10.8 cm) across after blocking. If it measures larger or smaller by more than 0.25 inches (6 mm), change your hook size before making the remaining squares.

Main Pattern

Make 12 flowers, one for each visible wall square. Leave a 16 inch (40 cm) tail for sewing when you fasten off.

Round 1Center With coral, make a magic ring. Ch 1, 8 sc in ring. Join with sl st to first sc. (8 sc)
Round 2Center growth Ch 1, 2 sc in each st around. Join. (16 sc)
Round 3Inner petals Change to light pink. Working in front loops only: [sl st in next st, 5 dc in next st] 8 times. Join to first sl st. (8 petals)(8)
Round 4Outer petal base Working behind Round 3 into unworked back loops of Round 2: [sl st in next back loop, ch 4, skip next back loop] 8 times. Join. (8 ch-4 spaces)
Round 5Outer petals Change to pink. In each ch-4 sp work (sl st, hdc, 5 dc, hdc, sl st). Join and fasten off, leaving tail. (8 outer petals)

Main Pattern

Round 1Join mint at a side seam on the top opening. Ch 1, sc evenly around: 19 sc across each of the 6 top square edges and 1 sc in each of the 6 seam or corner joins. Join. (120 sc)
Rounds 2–3Ch 1, sc in each st around. Join. (120 sc)Round 4: Crab stitch in each st around. Join and fasten off. (120 crab sts)

Main Pattern

Round 1With mint, ch 111. Sc in 2nd ch from hook and in each ch across. Turn. (110 sc)
Rounds 2–5Ch 1, sc in each st across. Turn. (110 sc) Edging: Ch 1, rotate and sc evenly around all four edges, placing 2 sc in each corner. Join and fasten off. Aim for a flat edge, not a ruffle.

Applique Placement Tips

Center one flower on each of the 12 wall squares. Pin all flowers first before sewing anything down. The outer petals should sit inside the square border without covering the seam line.

Sew around the back of the flower through the final round and a few center stitches so the applique remains secure. Take your time with this step. A well-attached flower will stay put through years of use.

Checkpoint: A finished flower should measure about 2.5 to 2.75 inches (6.5 to 7 cm) across and sit flat against the square.

Attaching the Strap

Mark the center of each side panel at the top edge. Overlap each strap end by 1.25 inches (3 cm) on the inside of the bag. Sew a box with an X through it using mint yarn or strong matching thread. Repeat several passes for strength.

The finished strap drop will be about 11 to 12 inches (28 to 30.5 cm) depending on how tightly you sew the ends.

Assembly

Step 1Arrange the 12 wall squares into one long band, two squares tall, in the order Left side, Front, Front, Right side, Back, Back, repeated for the second row. Join the remaining 2 squares into a strip for the bottom; this creates an 8.5 inch x 4.25 inch (21.5 x 11 cm) base.
Step 2With right sides facing up, join squares edge to edge using the invisible seam through inner loops only. Join vertical seams first to form the long wall band. Each joined edge uses 19 seam stitches.
Step 3Fold the band into a tube and join the final side seam. Keep front and back panels two squares wide.
Step 4Join the bottom strip to the lower edge of the tube. Ease one bottom square under the two front columns and one under the two back columns. Match corners and seams before sewing. Seam Count Checkpoint: every square edge has 19 dc along the side; when two edges are joined, make 19 sewing bites across the dc stitches, then secure at the corner. Shape Checkpoint: after joining, the bag should stand as a soft rectangular bucket.
Step 5Weave in all ends on the wrong side, splitting yarn tails in different directions so the cotton does not work loose over time.
Step 6Steam or wet block the finished bag lightly. Shape the corners and allow to dry completely before use.
Step 7For extra structure, consider sewing in a simple fabric lining or adding a removable plastic canvas base cut slightly smaller than the bottom.

Tester's notes

4.0 mm is the stated hook, but the pattern allows any size that reproduces the stitch counts per round, so check Round 1's 12 dc and 4 corner spaces before committing to a hook.

450 yards of mint covers the main square body; coral, light pink, and pink total only 250 yards combined (60 + 90 + 100), so one small skein of each accent color is enough.

Mark the 4 corner ch-2 spaces on Round 1 of each square with stitch markers to keep the corner placement consistent through all 5 rounds.

Each flower changes color only twice: coral to light pink at Round 3 and light pink to pink at Round 5, so carry rather than cut the first tail if the centers will be joined later.

Join the 120-sc top edge at a side seam, not a corner, so the crab stitch round's turning point stays off the most visible corner of the bag.

Gauge: one granny square should measure 4.25 inches x 4.25 inches (10.8 x 10.8 cm) after Round 5 and blocking. Strap gauge is 17 sc and 18 rows equals 4 inches (10 cm). Make one test square first; if it measures larger than 4.25 inches by more than a quarter inch, try a smaller hook, and if it measures smaller, go up a hook size.

Finished dimensions: width 8.5 inches (21.5 cm), height 8.5 inches (21.5 cm), depth 4.25 inches (11 cm), with a strap length of approximately 26 inches (66 cm) before attachment.

At a glance

Rounds14
Parts6
LevelIntermediate
Time4-6 hours
Hook4.0 mm
YarnWorsted

Gauge check

After Round 1 of a motif, check that the 12 dc and 4 corner ch-2 spaces sit flat once the magic ring is tightened.

If the ring won't close fully or the corners pull tight, change hook size per the pattern's own note to use whatever size gives correct gauge, rather than forcing the stated 4.0 mm.

Stitch-count checkpoints

  • Main Pattern · Round 1: 8 sts
  • Main Pattern · Round 2: 16 sts
  • Main Pattern · Round 3: 8 sts
  • Main Pattern · Round 1: 120 sts
  • Main Pattern · Rounds 2–3: 120 sts
  • Main Pattern · Round 1: 110 sts

If something looks wrong

The square cups instead of lying flat.
Corner tension is too tight at the ch-2 spaces; loosen it or block the piece more firmly to flatten the corners.
Square edges ruffle instead of sitting straight.
Stitches are too loose for the hook; drop to a smaller hook or reduce steam blocking, which can stretch loose fabric further.
Rose petals curl instead of lying flat against the square.
The petals were attached before blocking; block flowers face down first, then sew more anchor points through the petal base to hold them flat.
The top edge waves after the 120-sc round.
Too many stitches were picked up at the seam joins; work fewer pick-up stitches at each of the 6 seams to settle the edge back to 120 sc.

Yarn substitutions

Acrylic, worsted weightFinished bag is lighter with less body than cotton; add a lining strip or plastic canvas base to replace the structure cotton normally provides.
Cotton-acrylic blend, worsted weightCloser match to the original 4.0 mm hook and softer drape than 100% cotton, while still holding the granny square shape with light blocking.
DK weight cottonSquares finish smaller at the stated round counts (12 dc after Round 1, 76 dc after Round 5); size the hook down from 4.0 mm to keep the corner ch-2 spaces from gaping.
FAQs

Questions

How much yarn does the bag actually use?

The mint base takes 450 yards of worsted cotton. The coral, light pink, and pink accents add 60, 90, and 100 yards respectively, for a combined 250 yards across the three rose colors.

Why does the pattern call for '4.0 mm (G-6), or whatever size gives correct gauge'?

Cotton tension varies by brand and by how tightly a person works, so hook size matters less than matching the stated stitch counts per round. Check the Round 1 count of 12 dc and 4 corner spaces before continuing with any hook.

Does the bag need a lining?

Lining is optional. The assembly notes list a fabric lining or a removable plastic canvas base as ways to add structure, not as required steps.

One at a time —

Get the next pattern

Tested round by round before it is sent. No spam.