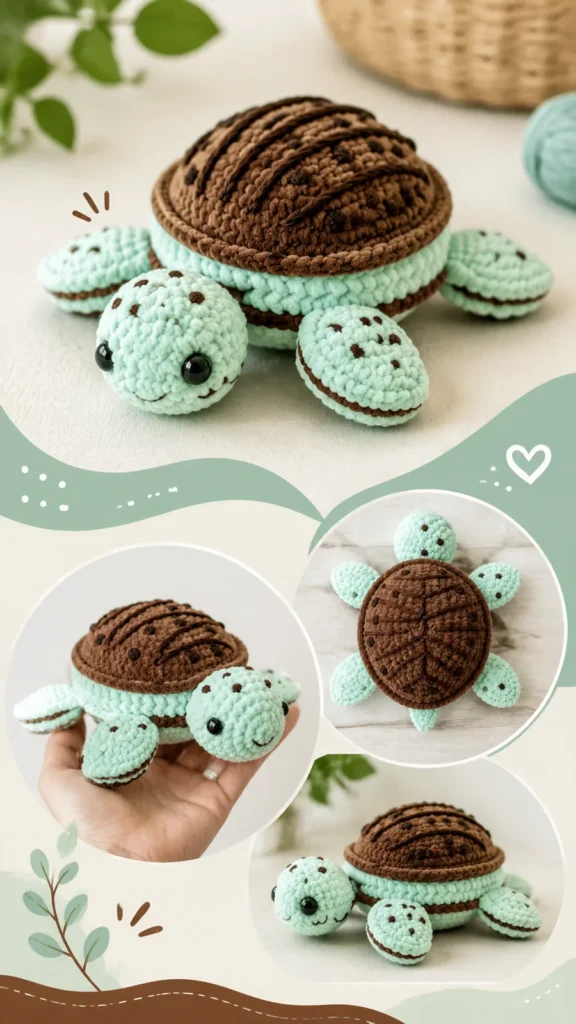
Made and counted by Wren —

Make a mint chocolate chip turtle amigurumi

Bulky yarn, hook sized to tension: mint chocolate chip turtle amigurumi, 10-round body, sewn-on shell.

Make a mint chocolate chip turtle amigurumi
IntermediateLevel
4-6 hoursTime
BulkyYarn
Jump to the pattern

About this pattern

A mint chocolate chip turtle is a spiral-crocheted amigurumi animal with a mint-green Body and Head worked in 10 rounds, four flippers worked in 5 rounds each, and a Tail worked in 3 rounds, plus a separate chocolate-brown shell marked with dark-brown embroidered chips. Single crochet worked tightly throughout keeps stuffing contained. Pieces are stuffed lightly, sewn together, then shaped by hand rather than steamed under pressure.

This amigurumi turtle pairs a chocolate-brown shell with a mint-green body, built on the ice-cream-dessert theme that gives it its name. Head and body are crocheted as one continuous spiral from a 6-stitch magic ring, growing through 10 rounds before flippers and a tail join by sewing rather than being worked in. Dense single crochet keeps the polyester stuffing from showing through, while the shell's curved sections and dark-brown embroidery stand in for chocolate chip detail. The count that matters most: 10 rounds for Body and Head, the longest single piece in the pattern.

The pattern

Written out round by round

Materials

  • Mint green bulky yarn for the body
  • Chocolate brown bulky yarn for the shell
  • Dark brown embroidery thread for chocolate chip details
  • Black embroidery thread or safety eyes
  • Polyester fiber stuffing
  • Yarn needle
  • Stitch marker
  • Scissors

Abbreviations

  • MR = Magic ring
  • ch = Chain
  • sc = Single crochet
  • inc = Increase, 2 sc in one stitch
  • dec = Decrease, single crochet two stitches together
  • sl st = Slip stitch
  • st = Stitch
  • FO = Fasten off
  • Construction note = This turtle is worked in continuous rounds unless stated otherwise. Use a stitch marker at the beginning of each round and move it upward as you crochet.

Body and Head

Round 1Make a magic ring. Crochet 6 sc into the ring. (6)
Round 2Inc in each stitch around. (12)
Round 3(Sc in 1 st, inc) repeat 6 times. (18)
Round 4(Sc in 2 sts, inc) repeat 6 times. (24)
Round 5(Sc in 3 sts, inc) repeat 6 times. (30)
Rounds 6–10Sc in each stitch around. (30)
Round 11(Sc in 3 sts, dec) repeat 6 times. (24)
Round 12(Sc in 2 sts, dec) repeat 6 times. (18)Begin stuffing firmly.
Round 13(Sc in 1 st, dec) repeat 6 times. (12)
Round 14Dec around. (6)

FO and close the opening.

Shell

Round 1With brown yarn, create a magic ring and make 6 sc. (6)
Round 2Inc around. (12)
Round 3(Sc in 1 st, inc) repeat 6 times. (18)
Round 4(Sc in 2 sts, inc) repeat 6 times. (24)
Round 5(Sc in 3 sts, inc) repeat 6 times. (30)
Rounds 6–8Sc around. (30)
Round 9(Sc in 3 sts, dec) repeat 6 times. (24)
Round 10Sc around. (24)

FO, leaving a long sewing tail.

Lightly stuff the shell so it keeps a rounded shape. Sew the shell securely onto the upper body section.

Flippers

Make four flippers using mint yarn.

Round 1MR with 6 sc. (6)
Round 2Inc around. (12)
Round 3Sc around. (12)
Round 4(Sc in 2 sts, dec) repeat 3 times. (9)
Round 5Sc around. (9)

FO and leave a sewing tail.

Tail

Round 1MR with 5 sc. (5)
Round 2Sc around. (5)
Round 3Inc in first stitch, sc in remaining stitches. (6)

FO and leave a sewing tail.

Project Details

Project Name Mint Chocolate Chip Turtle Amigurumi Skill Level Confident beginner Finished Size Approximately 8 inches (20 cm) long and 5 inches (13 cm) wide

Yarn Suggested bulky chenille yarn, approximately 180 yards (165 meters) total Hook Recommended 4.0 mm crochet hook (US G-6)

Gauge Approximate: 16 single crochet stitches x 18 rounds = 4 inches (10 cm)

Terminology US crochet terms

Assembly

Step 1Sew the head onto the front edge of the body.
Step 2Attach two front flippers near the lower sides of the body.
Step 3Attach two back flippers slightly behind the front pair.
Step 4Sew the tail onto the back center area.
Step 5Secure the shell over the top of the body.
Step 6Add facial features using embroidery thread or attach safety eyes if appropriate.
Step 7Embroider small chocolate chip spots onto the shell and flippers.
ImportantPlastic safety eyes may not be suitable for babies or children under three. For baby-safe crochet toys, use securely embroidered eyes and avoid any loose decorative pieces.
Step 8After assembly, gently shape the turtle with your hands to create a balanced rounded form. Avoid aggressive stretching because plush yarn can lose its soft structure. If needed, lightly steam around the outside without pressing directly on the stitches.
Step 9For care, spot cleaning is usually recommended for stuffed crochet animals. If washable yarn is used, follow the yarn manufacturer’s cleaning instructions and allow the turtle to dry completely before storing.

Tester's notes

4 flippers come from the same 5-round shape worked twice in pairs; mark the first stitch of each round, since the spiral gives no visible seam to orient by.

10 rounds take the Body and Head from a 6-stitch magic ring to its final width; losing the round marker partway through makes it easy to misplace an increase.

6-stitch magic ring starts the Body and Head and the Flippers; the Tail starts at 5. Pull the ring tail snug before Round 1 so no gap shows at center.

Stuff the Flippers and Tail lightly — at 5 and 3 rounds they are the smallest pieces, and overstuffing stiffens the edge used later for sewing to the body.

Keep chocolate brown confined to the shell and mint to the Body and Head; chip details are embroidered onto the finished shell afterward and are not part of the stitch count.

Mint green can be swapped for strawberry pink, vanilla cream, or ocean blue to create different turtle color themes without changing the stitch pattern.

Amigurumi looks best when stitches are firm and even. If stuffing pushes between stitches, try a smaller hook size rather than reducing the amount of stuffing.

At a glance

Rounds26
Parts5
LevelIntermediate
Time4-6 hours
YarnBulky

Gauge check

After Round 5 of the Body and Head, count stitches: the round should total 30 single crochet, matching the 6-12-18-24-30 increase pattern.

If the count is off at that point, undo back to the last round that matched its target rather than continuing, since every later round builds its increase count from the one before it.

Stitch-count checkpoints

  • Body and Head · Round 3: 18 sts
  • Body and Head · Rounds 6–10: 30 sts
  • Body and Head · Round 13: 12 sts
  • Body and Head · Round 14: 6 sts
  • Shell · Round 2: 12 sts
  • Shell · Round 4: 24 sts

If something looks wrong

The shell cups or won't sit flat against the mint body
Uneven tension across its rounds pulls one side tighter than the other; block the shell lightly with steam held off the stitches before sewing it on, rather than forcing it flat during assembly.
The four flippers come out noticeably different sizes
Each flipper is worked separately through its own 5 rounds, so tension drifts between pieces; count stitches at Round 4's 9-stitch mark on each one before stuffing to catch the mismatch early.
The embroidered chocolate chip details
Bulky or chenille yarn has loose loops that embroidery thread can slip between; anchor each chip stitch with a small backstitch on the inside rather than a single pass through the fabric.
The tail curls to one side instead of sitting straight
The single increase in Round 3 shifts the tail off-center if it lands on the wrong stitch; place that increase directly opposite the sewing tail left after Round 1 so the shaping stays symmetrical.

Yarn substitutions

Worsted-weight acrylicProduces a smaller turtle than the bulky original; move down a hook size to keep stitches dense enough to hide stuffing, and expect flippers and tail to look proportionally thinner.
Chenille, bulky weightMatches the plush, rounded look the pattern calls for; drape is softer than standard bulky, so stuff the Body and Head slightly firmer to hold its shape through all 10 rounds.
Cotton, bulky weightGives a sturdier, less plush surface that holds up to handling; stitches show more definition, which helps the shell's curved sections read clearly but stuffing may peek through unless tension is tightened.
FAQs

Questions

Can safety eyes replace embroidered eyes?

Yes, the materials list offers both options directly. Insert safety eyes before the Body and Head is fully stuffed and closed, since they cannot be placed afterward.

How does the shell attach to the body?

The shell is crocheted as its own piece, lightly stuffed, and sewn onto the mint-green Body and Head after both are finished. This separate-piece construction is what keeps the shell's curved shaping distinct from the body's rounds.

One at a time —

Get the next pattern

Tested round by round before it is sent. No spam.