Made and counted by Wren —

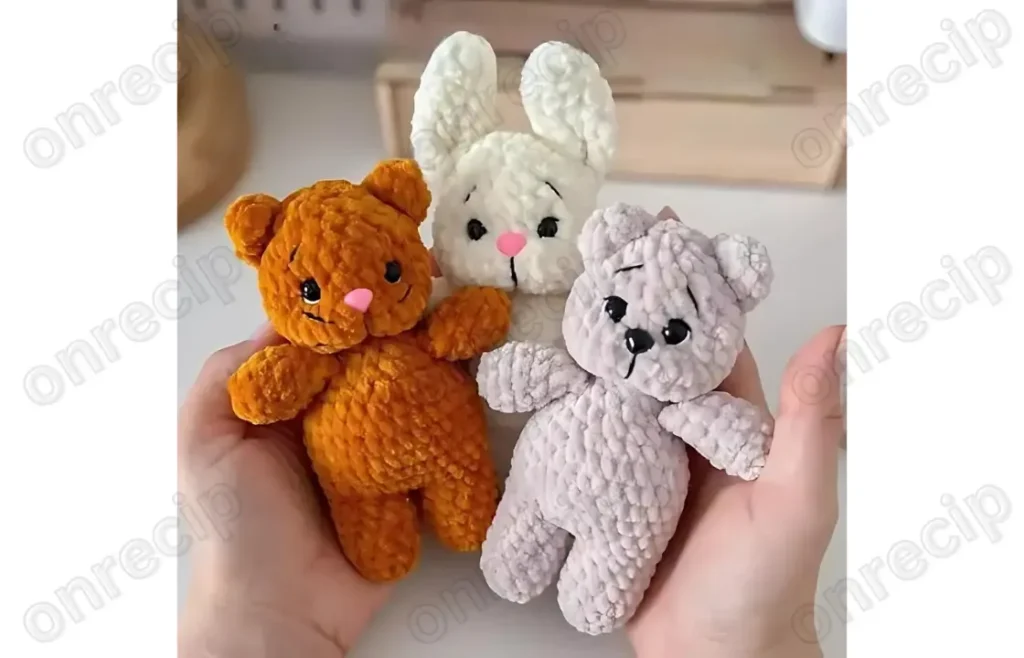
Mini plush amigurumi animals with interchangeable ears and tails

3.5 mm hook, plush yarn amigurumi pattern for a mini bunny, bear, and kitten with swappable ears and tails.

Mini plush amigurumi animals with interchangeable ears and tails
EasyLevel
3-5 hoursTime
3.5 mmHook
BulkyYarn
Jump to the pattern

About this pattern

Mini plush amigurumi pattern for a bunny, bear, and kitten sharing one base body: legs worked separately, joined into a 12-round Body, topped with a 12-round Head. Ears and tails differ by animal, each ear taking 3 rounds. Requires a 3.5 mm hook, plush yarn, 8 mm safety eyes, 7×9 mm safety noses, and cotton-blend yarn for embroidered face details.

This pattern builds one shared body — legs, body, and head — then swaps only the ears and tail to produce a bunny, a bear, or a kitten. Legs start in a magic ring, work up through 3 rounds each for Upper and Lower Legs, then join directly into a 12-round Body in Round 1 with no separate seam. The Head takes 12 rounds and holds 8 mm safety eyes with a 7×9 mm safety nose, sculpted afterward with a needle to shape the eye corners and mouth.

The pattern

Written out round by round

Materials

  • Plush yarn (e.g., Wolans Bunny Baby, Himalaya Dolphin Baby, etc.)
  • Cotton-blend yarn YarnArt Jeans: 01-white (for eye details), 53-black (for outlining eyes, eyebrows, and face)
  • Hook: 3.5 mm
  • Safety eyes: 8 mm
  • Safety noses: 7×9 mm (pink for bunny and kitten, black for the bear)
  • Toy stuffing
  • Stitch markers
  • Pins
  • Needle for sewing pieces together
  • Scissors

Abbreviations

  • MR = magic ring
  • ch = chain
  • sl st = slip stitch
  • sc = single crochet
  • inc = increase
  • dec = decrease
  • (…) x n = repeat the instructions inside the brackets n times

Upper Legs

Make 2
Round 15 sc in MR or 2 ch, 5 sc in 2nd ch from hook. (5)
Round 2(inc) x 5. (10)
Rounds 3–610 sc. (10)Stuff just the bottom part of the leg.Fold in half, sc dec x 2, sl st.Leave a long tail for sewing.

Lower Legs

Make 2
Round 16 sc in MR or 2 ch, 6 sc in 2nd ch from hook. (6)
Round 2(inc) x 6. (12)
Rounds 3–712 sc. (12)On the first leg (right leg), finish with a sl st. On the second leg, continue to the body.

Body

Round 1Ch 2, join with the left leg and work 12 sc around it, 2 sc in the chains, 12 sc around the right leg, 2 sc in the chains.
Round 25 sc, inc (for the side), 13 sc, inc (for the side), 5 sc, (1 sc, inc) x 2 to form the belly.
Rounds 3–632 sc. (32)
Round 7(6 sc, dec) x 4. (28)
Round 8(5 sc, dec) x 4. (24)Start stuffing the legs and body.
Round 9(4 sc, dec) x 4. (20)
Round 10(3 sc, dec) x 4. (16)
Round 11(2 sc, dec) x 4. (12)
Round 12(1 sc, dec) x 4. (8)Continue crocheting the head.

Head

Round 1(inc) x 8. (16)
Round 2(1 sc, inc) x 8. (24)
Round 3(2 sc, inc) x 8. (32)
Rounds 4–632 sc. (32)
Round 7(6 sc, dec) x 4. (28)
Round 8(5 sc, dec) x 4. (24)
Round 9(4 sc, dec) x 4. (20)Insert the safety eyes between rows 7 and 8, leaving a gap of 3-4 stitches between them. Stuff the head, especially around the neck to make it stable.
Round 10(3 sc, dec) x 4. (16)
Round 11(2 sc, dec) x 4. (12)
Round 12(1 sc, dec) x 4. (8)dec x 2, pull the hole closed with a hook or needle.

Bunny Ears

Make 2
Round 15 sc in MR or 2 ch, 5 sc in 2nd ch from hook. (5)
Round 2(inc) x 5. (10)
Rounds 3–710 sc. (10)Fold in half, work 5 sc, fold in half again and work 2 sc, sl st.Leave a long tail for sewing.

Bunny Tail

Round 16 sc in MR or 2 ch, 6 sc in 2nd ch from hook. (6)
Round 26 sc. (6)Leave a long tail for sewing.

Bear Ears

Make 2
Round 16 sc in MR or 2 ch, 6 sc in 2nd ch from hook. (6)
Round 2(1 sc, inc) x 3. (9)
Round 39 sc. (9)Fold in half, work 3 sc together, finish with a sl st.Leave a long tail for sewing.

Bear Tail

Round 16 sc in MR or 2 ch, 6 sc in 2nd ch from hook. (6)
Round 26 sc. (6)Leave a long tail for sewing.

Kitten Ears

Make 2
Round 13 sc in MR or 2 ch, 3 sc in 2nd ch from hook. (3)
Round 2(inc) x 3. (6)
Round 3(1 sc, inc) x 3. (9)Fold in half, work 4 sc together.Leave a long tail for sewing.

Kitten Tail

Round 1Ch 11; sc in the 2nd ch from hook and work 10 sc. (10)Leave a long tail for sewing.

Assembly

Step 1Cut a piece of thread for face sculpting.
Step 2Start sculpting the eyes. Insert the needle in the first row of the head, near the inside corner of the eye to be sculpted. Pull the needle out near the outer corner of the eye, thread the yarn around the inner corner, and pull the needle back through the head.
Step 3Do the same for the other eye, then tie a knot between the eyes. Use the remaining yarn to sculpt the mouth and nose.
Step 4Sew the arms between rows 10 and 11 of the body. Position them directly above the legs.
Step 5Attach the ears to the head, adjusting the placement to your preference. Use sewing pins to position them before sewing.
Step 6Sew the tail on the lower back.

Tester's notes

3.5 mm hook: keep tension tight enough that stuffing does not peek through the plush yarn fabric, especially on single-round pieces like the Kitten Tail.

8 mm safety eyes and 7×9 mm safety noses go in before the Head closes — the last open round is the only access point for seating the washers.

Stitch markers: place one at the start of each round on the 12-round Body and 12-round Head, since only the first Lower Leg finishes with a sl st and the rest continue in a spiral.

Black and white cotton-blend yarn is for face embroidery only — outlining eyes, eyebrows, and the sculpted mouth — with no color change inside the plush yarn rounds themselves.

Stuffing: the Upper Legs get stuffed at the bottom section only, per the pattern, so the top stays flat and foldable before working the sc dec x2 closure.

Difficulty level: easy.

This pattern makes plush animals such as a bunny, a kitten, and a bear using the same base pattern; the only differences are the ears and tails.

You will need safety eyes and noses for the faces, as well as black and white smooth yarn for embroidering details.

Sculpt the faces to give them more expression.

At a glance

Rounds39
Parts10
LevelEasy
Time3-5 hours
Hook3.5 mm
YarnBulky

Gauge check

After Round 2 of the Upper Legs, count stitches — 10 sc should sit close enough that the magic ring center and stuffing do not show through the fabric.

If gaps appear between stitches, drop to a smaller hook; if the round won't lie flat or cups, size up by half a millimeter from the stated 3.5 mm.

Stitch-count checkpoints

  • Upper Legs · Round 1: 5 sts
  • Upper Legs · Round 2: 10 sts
  • Upper Legs · Rounds 3–6: 10 sts
  • Lower Legs · Round 1: 6 sts
  • Lower Legs · Round 2: 12 sts
  • Lower Legs · Rounds 3–7: 12 sts

If something looks wrong

The leg round won't close into a tight
The MR tail wasn't pulled fully snug before starting Round 1's 5 or 6 sc. Cinch the ring closed completely and check the center hole is gone before increasing.
The Body cups instead of sitting round
The 2 sc worked into the chain sts on each side went in loose or uneven. Work those chain stitches at the same tension as the 12 sc around each leg.
The 8 mm safety eyes sit crooked once the Head is stuffed.
The eye posts went in before checking row placement on both sides. Count rows from the crown on each side to match position, then insert both posts and lock the washers before adding stuffing.
The face looks flat even with eyes and nose in place.
The needle-sculpting step was skipped. Pull thread from the inner corner of one eye to the inner corner of the other and tie a knot between them before trimming, per the assembly steps.

Yarn substitutions

Acrylic plush (velvet-style), worsted-weight equivalentFinished sizes stay close to the stated stitch counts and the 3.5 mm hook holds; loft varies by brand, so pack stuffing slightly firmer to keep shape.
Cotton, DK-weightProduces a smaller, denser toy with stiffer drape; the hook may need to drop half a size, and stuffing shows through more easily so pack tighter than with plush yarn.
Chenille or velvet, super bulky weightGrows the finished animal larger per round; size the hook up half to a full millimeter, and less stuffing is needed since the yarn itself adds bulk.
FAQs

Questions

Can the bunny ears be attached to the bear body?

Yes. Ears and tails are the only parts that differ across the three animals, and each ear set works up over 3 rounds to fit the same 12-round Head. Any ear or tail combination attaches to any body without changes.

Why does the first Lower Leg end in a slip stitch but the second one doesn't?

The first leg is finished off so it can be set aside and sewn on later, while the second leg continues directly into the Body's Round 1 join. That round works 12 sc around each leg plus 2 sc in the chains on each side, merging both legs into the body without a crotch seam.

Do the safety eyes and nose go in before or after stuffing the Head?

Insert both before stuffing, while the last open round still gives full access to seat the washers. The face-sculpting steps that shape the eye corners and mouth also happen before the Head closes completely, so leave stuffing light until sculpting is finished.

One at a time —

Get the next pattern

Tested round by round before it is sent. No spam.