Made and counted by Wren —

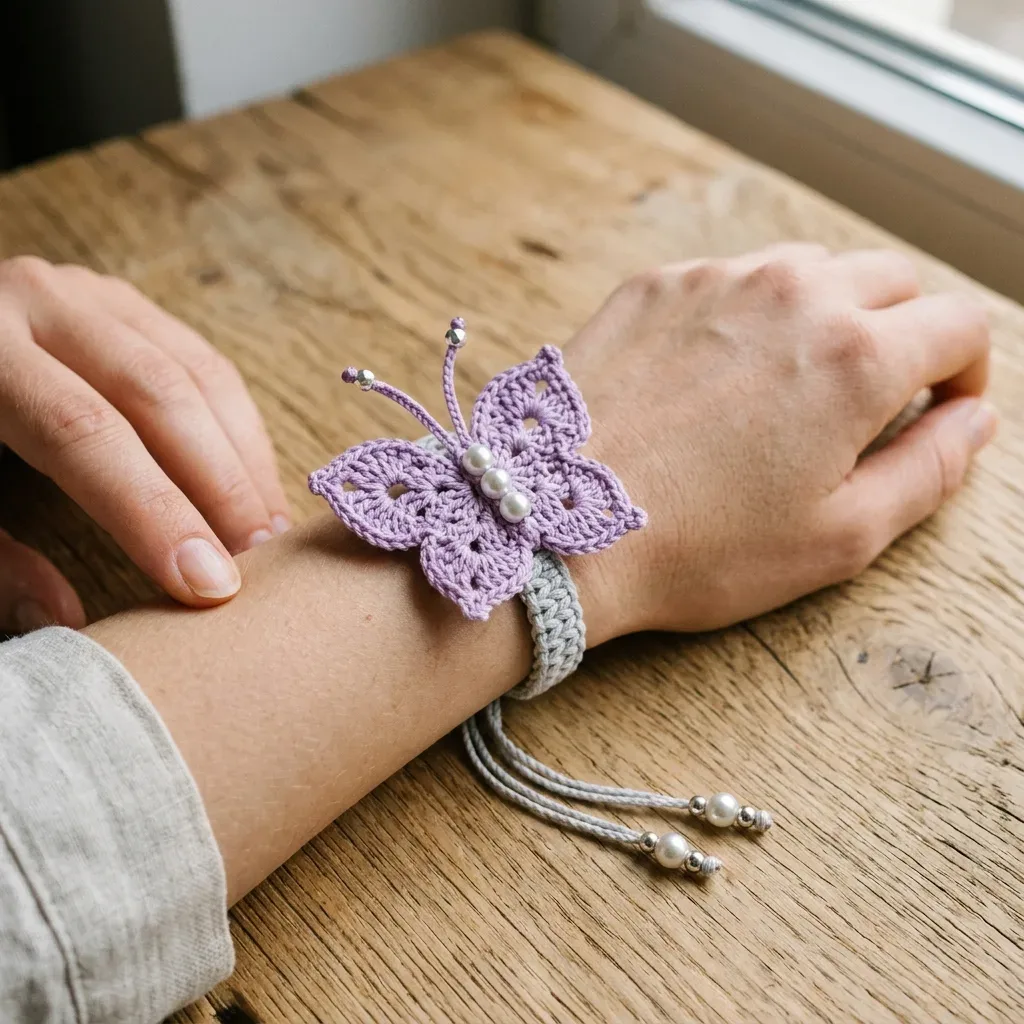
Lavender butterfly bracelet with a sliding bead closure

Steel hook size 7 (1.65mm) and size 10 crochet thread make a lavender butterfly bracelet with a sliding bead closure.

Lavender butterfly bracelet with a sliding bead closure
IntermediateLevel
4-6 hoursTime
1.65 mmHook
FingeringYarn
Jump to the pattern

About this pattern

A lavender butterfly motif sews onto a gray slip stitch cord band to make an adjustable bracelet. The band works flat over 120 rows to 7.5 inches; the butterfly builds from separate upper wings, lower wings, a stuffed body, and beaded antennae across 8 body rounds. A sliding bead closure lets the finished band fit wrists from 5.5 to 7 inches. Intermediate difficulty.

This bracelet splits into two separately worked pieces: a slip stitch cord band in gray crochet thread and a lavender butterfly motif with lace wings, a stuffed body, and beaded antennae, joined afterward by sewing. The band runs 120 rows to reach 7.5 inches before the sliding bead closure adjusts it to fit wrists from 5.5 to 7 inches. The butterfly itself spans 2 inches wide by 1.75 inches tall across its 8 body rounds and two sets of 3-round wings. Five 4mm pearl beads and four 3mm silver beads finish the closure and antennae.

This is an intermediate level project. The band itself is beginner friendly, but the butterfly requires comfort working into specific stitches, creating picots, and assembling multiple pieces. If you have made amigurumi or lace motifs before, you will feel right at home.

The pattern

Written out round by round

Materials

  • Lizbeth Size 10 Crochet Thread by Handy Hands works beautifully here. Try "Silver Gray" for the band and "Lilac Medium" or "Lavender" for the butterfly. This 100% Egyptian cotton gives clean, firm stitch definition.
  • DMC Petra Size 5 Crochet Cotton in colors 5415 (gray) and 5554 (lavender) produces a slightly thicker version with excellent stitch visibility. This is a good choice if you are newer to working with fine thread.
  • Avoid fuzzy or loosely spun fibers. Stitch definition matters for the butterfly wing lace effect.

Yarn A (for the band)

  • Light gray, size 10 crochet thread or fingering weight cotton yarn, approximately 15 yards

Yarn B (for the butterfly)

  • Light purple or lavender, size 10 crochet thread or fingering weight cotton yarn, approximately 20 yards

Hook

  • US steel crochet hook size 7 (1.65 mm) for crochet thread, OR US B/1 (2.25 mm) for fingering weight yarn. Use whichever size achieves gauge.

Notions

  • 5 white pearl beads, approximately 4 mm diameter
  • 4 small silver metal beads, approximately 3 mm diameter
  • 2 small purple or silver seed beads, approximately 2 mm (optional for antenna tips)
  • Beading needle or fine tapestry needle
  • Sewing thread in white and gray
  • Scissors
  • 2 stitch markers
  • Tapestry needle for weaving ends

Abbreviations

  • Picot = Chain 3, slip stitch into the first chain made. This creates a small decorative loop. It does not add to your working stitch count.
  • 3-dc cluster (3-dc cl) = Work three incomplete double crochets into the same stitch or space (yarn over, insert hook, pull up loop, yarn over, pull through 2 loops). Then yarn over and pull through all 4 loops on hook. Counts as 1 stitch.
  • Slip stitch cord = All rows are slip stitches through both loops. Turn after each row without making a turning chain. This creates a dense, rounded cord texture.
  • Antenna loop = Chain 8, slip stitch into the 8th chain from hook to form a small loop. Thread a bead onto the loop before closing if desired.
  • ch = chain: yarn over, pull through loop on hook
  • sl st = slip stitch: insert hook, yarn over, pull through stitch and loop on hook in one motion
  • sc = single crochet: insert hook, yarn over, pull up loop, yarn over, pull through both loops
  • hdc = half double crochet: yarn over, insert hook, pull up loop, yarn over, pull through all 3 loops
  • dc = double crochet: yarn over, insert hook, pull up loop, yarn over, pull through 2 loops, yarn over, pull through remaining 2 loops
  • tr = treble crochet: yarn over twice, insert hook, pull up loop, (yarn over, pull through 2 loops) three times
  • sk = skip
  • st/sts = stitch/stitches
  • ch-sp = chain space
  • MR = magic ring (also called magic circle or adjustable ring)
  • pm = place marker
  • RS/WS = right side/wrong side

Part 1: The Band

The band is worked flat in a slip stitch cord pattern. This creates that dense, rounded look you see in the photos.

Foundation: Using Yarn A (gray), ch 7.

Row 1(RS): Sl st into the 2nd ch from hook and into each ch across. Turn. (6 sl sts)
Row 2Sl st into each sl st across. Turn. (6 sl sts)Repeat Row 2 until band measures 7.5 inches from foundation chain. This takes approximately 120 rows at gauge.Final row: Sl st across. Do not fasten off yet.

Checkpoint: Your band should measure approximately 7.5 inches long and 0.375 inches wide. It should feel dense and cord-like, lying flat without curling.

Optional Edging:

With RS facing, join Yarn A at one short end. Work 1 row of sc evenly along each long edge and 3 sc in each corner. Sl st to join. Fasten off.

Fasten off Yarn A. Weave in all ends. Set band aside.

Part 2: The Butterfly Upper Wings

The upper wings are worked around a foundation chain, creating two mirrored wing shapes.

Using Yarn B (lavender), ch 10. Do not join.

Round 1Side A (Right Upper Wing): Sc in 2nd ch from hook. (1 sc) Sc in next ch. (2 sc) Hdc in next ch. (3 sts)Dc in next ch. (4 sts)Tr in next ch. (5 sts)Tr in next ch. (6 sts)Dc in next ch. (7 sts)Hdc in next ch. (8 sts)Sc in next ch. (9 sts)Work 5 sc into the last ch to pivot around the tip. (14 sts total on this side, including pivot)Side B (Left Upper Wing): Working back along the opposite side of the foundation chain: Sc into the next available ch. (1 st)Hdc in next ch. (2 sts)Dc in next ch. (3 sts)Tr in next ch. (4 sts)Tr in next ch. (5 sts)Dc in next ch. (6 sts)Hdc in next ch. (7 sts)Sc in next ch. (8 sts)Sc in the last ch. (9 sts)Sl st to the first sc of Side A to close. (Total stitches around upper wing unit: 23 sts plus pivot)Do not fasten off.
Round 2Wing shaping and lace detail Sl st into first st. Ch 1.

Right upper wing:

Sc in same st. Sc in next st. Ch 2, sk 1 st, sc in next st. Ch 2, sk 1 st, sc in next st. Sc in next 2 sts. Work (sc, ch 3, sc) into the center pivot st. Sc in next 2 sts.

Left upper wing (mirror):

Sc in next 2 sts. Ch 2, sk 1 st, sc in next st. Ch 2, sk 1 st, sc in next st. Sc in next 2 sts. Sc in last 2 sts.

Sl st to first sc to close.

Round 3Picot edging Sl st into first sc. Work sc into each sc and (sc, hdc, sc) into each ch-2 sp around. Work (sc, picot, sc) into the ch-3 tip sp. Continue in pattern around the left wing in mirror. Sl st to close.Fasten off, leaving a 6-inch tail for sewing. Set aside.

Part 3: The Butterfly Lower Wings

The lower wings are slightly smaller and more rounded.

Using Yarn B, ch 8. Do not join.

Round 1Side A (Right Lower Wing): Sc in 2nd ch from hook. (1 sc) Hdc in next ch. (2 sts)Dc in next ch. (3 sts)Tr in next ch. (4 sts)Dc in next ch. (5 sts)Hdc in next ch. (6 sts)Work 5 sc into the last ch to pivot. (11 sts total including pivot)Side B (Left Lower Wing): Hdc into next ch on underside. (1 st)Dc in next ch. (2 sts)Tr in next ch. (3 sts)Dc in next ch. (4 sts)Hdc in next ch. (5 sts)Sc in last ch. (6 sts)Sl st to first sc of Side A to close. (Total sts around lower wing unit: 17 sts plus pivot)
Round 2Wing shaping Sl st into first st. Ch 1.

Right lower wing:

Sc in same st. Sc in next st. Ch 2, sk 1 st, sc in next st. Sc in next 2 sts. Work (sc, ch 3, sc) into center pivot st.

Left lower wing (mirror): Sc in next 2 sts. Ch 2, sk 1 st, sc in next st. Sc in next 2 sts.

Sl st to close.

Round 3Picot edging Sc into each sc and (sc, hdc, sc) into each ch-2 sp. Work (sc, picot, sc) into ch-3 tip sp. Continue in mirror around left wing. Sl st to close.Fasten off, leaving a 6-inch tail for sewing.

Part 4: The Butterfly Body

Using Yarn B, make a MR (magic ring).

Round 1Ch 1, work 6 sc into the MR. Pull ring tight. Do not join. Work in a continuous spiral. Pm in last st. (6 sc)
Round 2Work 2 sc in each st around. (12 sc)
Round 3Work (sc in next st, 2 sc in next st) around. (18 sc)
Round 4Work (sc in next 2 sts, 2 sc in next st) around. (24 sc)
Round 5Sc in each st around. (24 sc)
Round 6Work (sc in next 2 sts, sc2tog) around. (18 sc)
Round 7Work (sc in next st, sc2tog) around. (12 sc) Lightly stuff the body with scrap yarn, or leave flat for a flatter butterfly.
Round 8Work (sc2tog) around. (6 sc) Sl st to next st, fasten off leaving a long tail. Pull tail through remaining 6 sts, draw tight, and secure. The body is a small oval approximately 0.75 inches long.

Part 5: The Antennae

Cut two lengths of Yarn B, each measuring 4 inches.

For each antenna:

Fold one length in half. Pull the fold through the top center of the butterfly body using your hook to create a lark’s head knot attachment.

Chain 8 along one tail by making slip stitch chains with your hook. At the tip, thread a small seed bead onto both tail ends, tie a tight overhand knot behind the bead, and trim excess.

Repeat for the second antenna, positioning it approximately 0.25 inches from the first and angling outward.

Part 7: Attaching Butterfly to Band

Position the completed butterfly onto the center front of the band, approximately 3.75 inches from each end. The butterfly sits on the RS of the band.

Using Yarn B and a tapestry needle, sew the bottom edge of the lower wing unit to the band with small overcast stitches. Sew through the top layer of the band only. Sew the body base down as well for extra security.

The butterfly should lie flat and centered. If the wings pucker, loosen your stitches slightly.

Fasten off and weave in all ends.

Part 8: Adjustable Sliding Closure

You will need two 6-inch lengths of gray crochet thread and 4 small silver metal beads.

Step 1: Thread one cord through the left short end of the band, centering it so 3 inches extend from each side.

Step 2: Thread one cord through the right short end the same way.

Step 3: Take both ends from the LEFT cord and cross them to the RIGHT side. Thread both ends through one silver bead from left to right, tie a tight overhand knot behind the bead, and trim to 0.25 inches. Thread a second silver bead over the knotted end to cap it.

Step 4: Take both ends from the RIGHT cord and cross them to the LEFT side. Repeat Step 3 in mirror.

Step 5: The two cords now cross between the two sets of beads. Pulling the bead caps away from each other tightens the bracelet. Pushing them toward each other loosens it. Test before trimming excess cord.

Step 6: Trim all cord ends to approximately 0.125 inches beyond their final knots. Apply a drop of clear fabric glue to each knot to prevent unraveling. Allow to dry completely.

Assembly

Step 1Wet blocking is recommended for the butterfly only. Spray lightly with water, pin each wing to a blocking board, and allow to dry completely before removing pins. This step is critical for the wings to lie flat and symmetrically.
Step 2The band does not require blocking but may be lightly steamed with an iron held 0.5 inch above the surface to even out the texture.
Step 3Do not block the adjustable closure or beaded sections.
Step 4Weave in all ends by running the tail forward and backward at least twice through dense stitches. Trim close.

Tester's notes

120 rows gets the band to 7.5 inches at gauge; count rows rather than measuring length mid-work, since slip stitch cord stretches under tension and springs back after release.

2 stitch markers mark the start of Round 1 on the upper and lower wing foundation chains, since both wing sides work from the same starting chain without a join.

5 pearl beads and 4 silver beads need threading onto sewing thread before assembly begins; running short mid-closure means unpicking stitches to add more.

8 rounds shape the stuffed body; add stuffing gradually round by round rather than all at once, since fine thread fabric shows lumps from uneven fill.

At a glance

Rounds16
Parts7
LevelIntermediate
Time4-6 hours
Hook1.65 mm
YarnFingering

Gauge check

After row 10 of the band, measure height across the sl sts: it should read 0.375 inches, matching 16 slip stitches per inch across the width.

If the swatch runs long or short, adjust hook size up or down before working the full 120 rows, since the sliding closure only functions within the 5.5 to 7 inch range the stated gauge produces.

the butterfly: 1 complete small wing section (Rounds 1 through 3) measures approximately 0.875 inches wide at this gauge. Swatch the wing before starting if your gauge runs differently.
Stitch-count checkpoints

  • Part 2: The Butterfly Upper Wings · Round 1: 3 sts
  • Part 3: The Butterfly Lower Wings · Round 1: 2 sts
  • Part 4: The Butterfly Body · Round 2: 12 sts
  • Part 4: The Butterfly Body · Round 4: 24 sts
  • Part 4: The Butterfly Body · Round 6: 18 sts

If something looks wrong

The band curls along its length instead of lying flat.
Uneven slip stitch depth pulls the cord off-center; keep every sl st the same height and steam lightly with the iron held 0.5 inch above the surface.
The butterfly wings cup or pucker instead of lying flat.
Unblocked lace motifs cup at the picots; wet block each wing pinned to a board and let it dry completely before removing the pins.
The sliding closure will not slide, or slides too freely.
Band gauge outside 16 sl st per inch changes cord thickness; swatch first and adjust hook size until gauge matches before working the full 120 rows.
The two wing halves on the same motif
Each wing starts from its own foundation chain (ch 10 for the upper wing, ch 8 for the lower wing) worked around both sides; keep stitch heights (sc, hdc, dc, tr) identical on Side A and Side B so the mirrored half matches.

Yarn substitutions

Mercerized cotton, size 10 (fingering/lace weight)Closest match to the stated gauge; no hook change needed, and stitch definition stays clean enough for the wing lace and picots.
Cotton crochet thread, size 5 (slightlyProduces visibly larger stitches and a band thicker than 0.375 inches; keep the steel hook size 7 or go up slightly, and expect to use less than the stated 15-20 yards per color.
FAQs

Questions

Can the band be made longer for a larger wrist?

Yes. Add rows to the band before working the sliding closure, keeping gauge at 16 slip stitches per inch so the closure still functions. The base pattern as written covers wrists from 5.5 to 7 inches.

Does the butterfly need blocking before attaching it to the band?

Yes. Wet block each wing pinned flat and let it dry completely first. The band itself only needs a light steam, and the beaded antennae and closure should not be blocked at all.

One at a time —

Get the next pattern

Tested round by round before it is sent. No spam.