Made and counted by Wren —

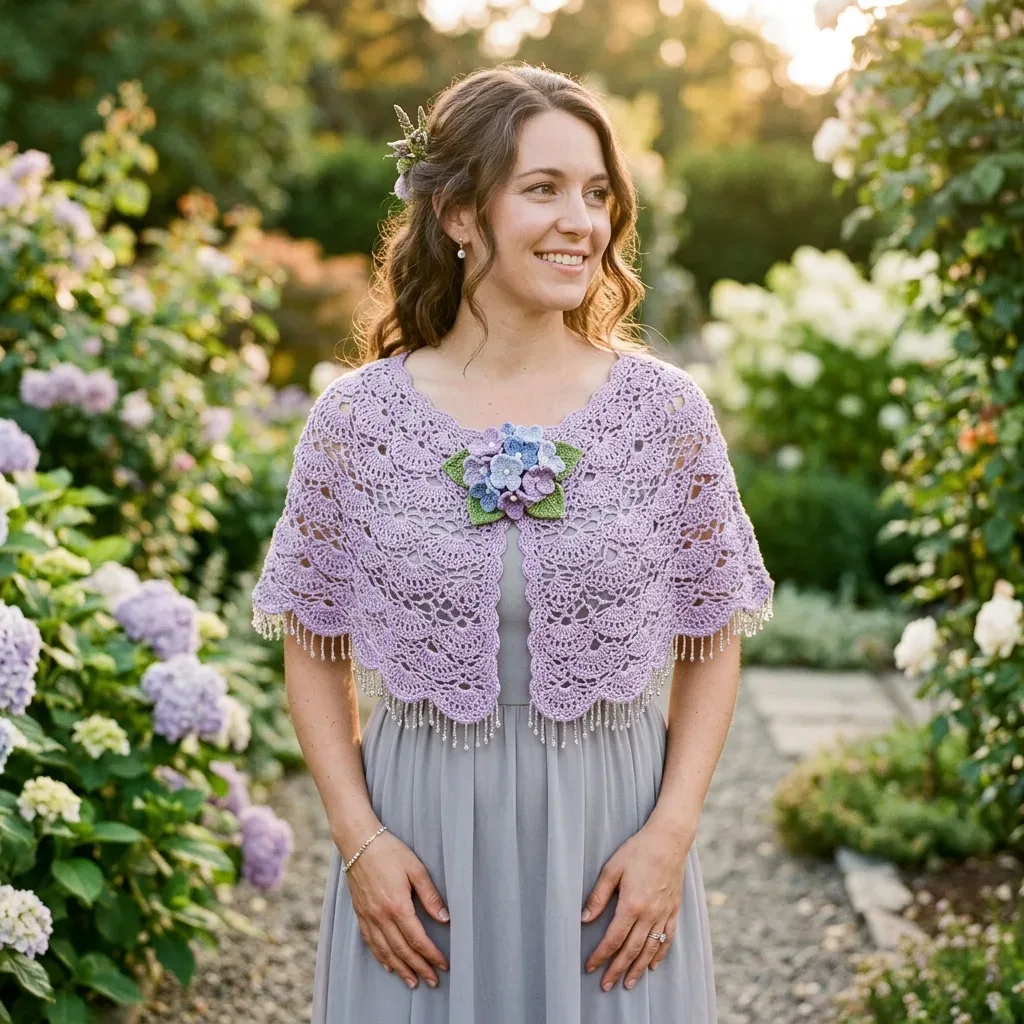
Lace capelet with pineapple fan motif and hydrangea corsage

US B-1 hook, fingering weight cotton: a circular lace capelet with pineapple fan motif and hydrangea corsage closure.

Lace capelet with pineapple fan motif and hydrangea corsage
Advanced IntermediateLevel
10-15 hoursTime
2.25 mmHook
FingeringYarn
Jump to the pattern

About this pattern

A circular-yoke lace capelet worked outward from a 137-chain neckline band, using a pineapple fan lace motif over 11 repeats of 12 stitches. Finished measurements run approximately 22 inches at the neckline and 72 inches at the hem, roughly 12 to 13 inches long. The front closure uses a button loop and a separately crocheted three-dimensional hydrangea corsage.

This lace capelet is worked in continuous rounds outward from a flat neckline band, so the yoke grows without seams. The Main Body Setup Round establishes 132 double crochet stitches around the neckband's lower edge, distributed as 11 repeats of 12 stitches — the count every subsequent pineapple fan round depends on. The main body opens into a repeating pineapple fan lace motif framed by shells and chain mesh, reaching a hem circumference of roughly 72 inches. A scalloped picot edging with bead fringe finishes the lower edge, and a separately worked three-dimensional hydrangea corsage covers the front closure.

This is an advanced intermediate crochet pattern. It requires comfort reading lace charts and multi-step pattern repeats, plus experience with pineapple stitch sequences that combine fans, shells, and chain mesh together, and with circular construction where shaping increases are distributed across repeats. If you have completed two or three lace projects before, you can tackle this pattern — it walks you through every step, so take your time with the setup rounds and count carefully.

One size as written: neckline circumference approximately 22 inches (56 cm), adjustable; total circumference at hem approximately 72 inches (183 cm); length center back from neckline to hem approximately 13 inches (33 cm); length at front sides from neckline to hem approximately 11 inches (28 cm); width across back from sleeve edge to sleeve edge approximately 30 inches (76 cm).

Plan for approximately 20 to 28 hours total, including blocking and corsage assembly. If you are an experienced lace crocheter, you may finish in closer to 18 hours. Add 2 to 4 hours for beading the fringe.

The pattern

Written out round by round

Materials

Yarn Suggestions

  • Option 1: Paintbox Yarns Simply 4ply Cotton in shade Wisteria or Dusty Lilac. 100 percent cotton, 340 yards per 100g skein. Affordable, widely available, and takes blocking exceptionally well.
  • Option 2: Scheepjes Catona in shade 520 Lavender or 528 Silverblue. 100 percent mercerized cotton, 62 yards per 25g ball. Excellent stitch definition for lace. You will need approximately 12 balls for the main body.
  • Option 3: Cascade Yarns Ultra Pima Fine in shade Wisteria. 100 percent pima cotton, 437 yards per 100g skein. Lightweight with a silky finish that drapes beautifully and gives the beaded fringe excellent weight.

Substitution Note

  • Choose any fingering weight or light sport weight yarn with good stitch definition. Avoid fuzzy or textured yarns as they will obscure the lace motif. Cotton or cotton blend yarns are strongly recommended. Wool will produce a denser, less drapey fabric and may shrink with humidity.

Yarn for Main Body

  • 3 skeins (approximately 750 yards or 686 meters total) of fingering weight yarn , 100 percent mercerized cotton or a cotton linen blend, in soft lavender

Yarn for Corsage

  • Small amounts (less than 15 yards each) of fingering weight yarn in light blue, medium periwinkle, soft purple, and medium green

Hook

  • US B-1 (2.25 mm) for main body
  • US B-1 (2.25 mm) or US C-2 (2.75 mm) for corsage (use the smaller size for tighter flower centers)

Notions

  • Tapestry needle for weaving ends
  • Approximately 200 to 250 glass seed beads or small pearl beads in white or clear, size 6/0, for hem fringe
  • Beading needle or thin wire folded as beading needle
  • 1 small shank button, approximately half inch (12 mm), in pearl or white, for neckline closure
  • 4 to 6 stitch markers
  • Blocking pins and blocking mats
  • Spray bottle and cool water for blocking

Abbreviations

  • beg = beginning
  • ch = chain (wrap yarn over hook and pull through loop)
  • ch-sp = chain space (the gap created by chain stitches)
  • dc = double crochet (yarn over, insert hook, pull up loop, yarn over and pull through two loops twice)
  • dc2tog = double crochet two together, a decrease that joins two stitches into one
  • hdc = half double crochet (yarn over, insert hook, pull up loop, yarn over and pull through all three loops)
  • lp(s) = loop(s)
  • MC = main color (lavender)
  • pc = picot (see Special Stitches below)
  • pm = place marker
  • rem = remaining
  • rep = repeat
  • rnd = round
  • rs = right side
  • sc = single crochet (insert hook, pull up loop, yarn over and pull through both loops)
  • sk = skip
  • sl st = slip stitch (insert hook, yarn over, pull through stitch and loop on hook)
  • sp(s) = space(s)
  • st(s) = stitch(es)
  • t-ch = turning chain
  • tr = treble crochet (yarn over twice, insert hook, pull up loop, yarn over and pull through two loops three times)
  • yo = yarn over
  • Shell = Work 5 double crochet (dc) in the same stitch or space. This forms the fan base of the pineapple motifs.
  • Large Shell = Work 7 dc in the same stitch or space. Used in mid section expansion rounds.
  • PCL = Pineapple Cluster: yarn over, insert hook in next stitch, yarn over, pull up loop, yarn over, draw through 2 loops. Repeat this 5 times total in consecutive stitches or as directed. Then yarn over and draw through all 6 loops on hook. This forms the top tip of each pineapple unit.
  • V-st = V-Stitch: work (dc, ch 2, dc) in the same stitch or space.
  • Picot = Chain 3, slip stitch in first chain made. This forms a small decorative loop at hem scallop points.
  • Bead Fringe Loop = Before working each hem picot, slide 6 to 8 beads onto a 6 inch length of yarn. Fold yarn and slip stitch both ends into the picot base to create a hanging bead loop.

Section 1: Foundation and Neckline Band

Using MC and US B-1 hook, ch 137 .

Row 1RS, neckline band, worked flat Sc in 6th ch from hook (skipped chs count as ch-3 corner sp and 2 skipped chs), sc in each ch across to last 2 ch, ch 2, dc in last ch. Turn. (132 sc in center, plus ch-3 sp at each end)
Row 2Ch 1, sc in first dc (the ch-2 turning sp), sc in each sc across, sc in top of turning ch-5 sp. Turn. (134 sc)
Row 3Buttonhole row Ch 1, sc in first 2 sts, ch 3, sk 2 sts (buttonhole made), sc in each st across to last 4 sts, ch 3, sk 2 sts, sc in last 2 sts. Turn. (130 sc plus 2 ch-3 buttonhole loops)
Row 4Ch 1, sc in first 2 sc, 2 sc in ch-3 sp, sc in each sc across to second ch-3 sp, 2 sc in ch-3 sp, sc in last 2 sc. Turn. (134 sc)
Row 5Ch 1, sl st in each sc across. Fasten off. (134 sl sts, edge complete) Checkpoint: Your neckband should measure approximately 22 to 22.5 inches (56 to 57 cm) wide and 1 inch (2.5 cm) tall.

Section 2: Main Body Setup Round

Rejoin MC with a standing dc to the right front lower corner of the neckband (the long bottom edge, not the scalloped top).

Round 1Setup, picking up from neckband lower edge Working along the bottom of the neckband into the foundation chain row, ch 3 (counts as first dc here and throughout), work evenly across to produce 132 dc total along this bottom edge, distributing stitches so the math works for 11 repeats of 12. Do not join. At the end of the round, sl st to top of beginning ch-3. (132 dc)

Section 3: Lace Body Rounds

Now the beautiful lacework begins. The pineapple fan lace motif is worked over 12 stitch repeats.

Round 2Fan base setup Ch 3, sk first dc, (dc in next dc, ch 2, sk 2, shell in next dc, ch 2, sk 2, dc in next dc, ch 2, sk 2) across, ending dc in last dc, sl st to beg ch-3. (11 shells of 5 dc each, 22 ch-2 sps, 22 dc posts)
Round 3Ch 5 (counts as dc, ch 2), dc in first dc post after shell, ch 2, (5 dc in center dc of shell, ch 2, dc in next dc post, ch 2, dc in next dc post, ch 2) across, ending 5 dc in last shell center, ch 2, sl st to 3rd ch of beg ch-5. (11 shells, 33 ch-2 sps)
Round 4(begin pineapple expansion): Ch 3, (2 dc in first ch-2 sp, dc in next dc, 2 dc in ch-2 sp, dc in first dc of shell, ch 1, sk 1, dc in next dc, ch 1, sk 1, dc in next dc, 2 dc in ch-2 sp, dc in next dc, 2 dc in ch-2 sp) across, sl st to beg ch-3. (11 fan groups, total working dc count = 132)
Round 5Ch 4 (counts as dc, ch 1), (sk 1, dc in next dc, ch 1) twice, sk 1, dc in next dc, ch 2, (PCL over next 5 dc, ch 2, dc in next dc, (ch 1, sk 1, dc in next dc) twice, ch 1, sk 1, dc in next dc, ch 2) across, ending last rep with PCL over 5 dc, ch 2, sl st to 3rd ch of beg ch-4. (11 PCL tips, 11 ch-2 sps below each tip, 44 ch-1 sps in lattice, 44 dc posts)
Round 6(begin second fan tier): Ch 3, (3 dc in next ch-2 sp, dc in next PCL, 3 dc in next ch-2 sp, ch 2, dc in next dc, (ch 1, dc in next dc) 3 times, ch 2) across, sl st to beg ch-3. (11 groups of 7-dc fans below, 11 ch-1 ladder sections above)
Round 7Ch 3, (dc in next dc) across all dc in fans, working (ch 2, V-st in center dc of fan, ch 2) over each 7-dc fan and continuing ch-1 mesh over the dc lattice from Rnd 6, sl st to beg ch-3. (11 V-sts, 22 ch-2 sps)
Round 8Outer fan expansion with increase Ch 3, (large shell of 7 dc in ch-2 sp of V-st, ch 2, dc in next dc, ch 2, dc in next dc, ch 2, dc in next dc, ch 2) across, sl st to beg ch-3. (11 large shells x 7 dc = 77 dc in shells, plus 44 dc posts and chain sps; working position total = 144)
Round 9Ch 5, (dc in first dc of large shell, (ch 1, sk 1, dc in next dc) 5 times across large shell, ch 1, dc in next dc, ch 2, dc in next dc, ch 2) across, sl st to 3rd ch of beg ch-5. (11 pineapple bodies begun, 22 ch-2 inter-repeat sps, 55 ch-1 intra-pineapple sps; total = 144)
Round 10Ch 3, (dc in each dc of pineapple body working dc2tog over each adjacent pair to taper, working (dc, ch 1, dc) at pineapple peak to maintain point, V-st in each inter-repeat ch-2 sp, ch 2) across, sl st to beg ch-3. (11 pineapple peaks with center point, 11 V-sts; total = 144)
Round 11Ch 3, (PCL over 5 dc of tapered pineapple tip, ch 3, shell in ch-2 sp of inter-repeat V-st, ch 3) across, sl st to beg ch-3. (11 PCL tips completing second pineapple tier, 11 shells of 5 dc; total = 132)Checkpoint: After Round 11, your piece should measure approximately 5 to 5.5 inches (12.5 to 14 cm) from the neckband. You should count 11 distinct pineapple tip clusters and 11 shells clearly across the width.

Section 4: Lower Body Expansion

Round 12Ch 3, (dc in first dc of shell, ch 2, sk 2, dc in center dc of shell, ch 2, sk 2, dc in last dc of shell, ch 2, sk 2) across all 11 shells plus continuation of chain mesh, sl st to beg ch-3. (33 dc posts, 33 ch-2 sps; structural positions = 132)
Round 13Ch 3, (2 dc in first ch-2 sp, dc in next dc, 2 dc in next ch-2 sp, dc in next dc, ch 1, sk ch-2 sp, dc in next dc, 2 dc in last ch-2 sp) across, sl st to beg ch-3. (154 dc total; 11 repeats x 14 dc = 154)
Round 14Ch 4, (sk 1, dc in next dc, ch 1) across, adjusting to maintain chain-1 mesh over all dc, sl st to 3rd ch of beg ch-4. (77 dc, 77 ch-1 sps; total = 154)
Round 15Establish third pineapple tier Ch 3, (large shell of 7 dc in every 14th structural position center, ch 2, (V-st, ch 2) twice in inter-repeat positions) across. (77 dc in fans; total = 154)
Round 16Ch 5, (dc in each dc of large shell with ch 1 between each pair of dc forming pineapple body of 7 dc with 6 ch-1 sps, ch 2, dc in ch-2 sp, ch 2, dc in next ch-2 sp, ch 2) across, sl st to 3rd ch of beg ch-5. (11 large pineapple bodies, 33 inter-repeat ch-2 sps; total = 154)
Round 17Ch 3, (dc2tog over dc pairs tapering pineapple body, (dc, ch 2, dc) at apex of each pineapple, 5-dc shell in inter-repeat ch-2 sp, ch 2, 5-dc shell in next ch-2 sp, ch 2) across, sl st to beg ch-3. (11 pineapple apex points, 22 shells; total = 154)
Round 18Ch 3, (PCL over 5 tapered dc at pineapple apex, ch 3, dc in ch-2 sp between shells, ch 3) across all pineapple tips, then (5 dc in center of each inter-repeat shell) across, sl st to beg ch-3. (11 PCL, 11 dc inter-pineapple posts, 22 shells of 5 dc; total = 176)Checkpoint: After Round 18, your piece should measure approximately 9 to 10 inches (23 to 25.5 cm) from the neckband. The third pineapple tier should be visible and the hem should flare distinctly outward.

Section 5: Hem Scallop Edging

Round 19(scallop fan base): Ch 3, (7 dc in center dc of each 5-dc shell, ch 3, sc in dc inter-sp, ch 3) across all 22 shells, sl st to beg ch-3. (22 large 7-dc fans, 22 sc pivots, 44 ch-3 arches; total = 176)
Round 20Ch 1, (sc in first dc of 7-dc fan, (ch 3, sk 1, sc in next dc) 3 times across fan, sc in last dc of fan, ch 3, sc in sc pivot, ch 3) across, sl st to beg ch-1. (22 fans each producing 3 ch-3 loops = 66 loops, 44 pivot ch-3 arches, 44 anchor sc)
Round 21Ch 1, (sc in first sc, (3 dc in ch-3 sp, sc in sc between loops) twice, 3 dc in last ch-3 sp, sc in last sc, ch 2, sc in next sc pivot, ch 2) across, sl st to beg ch-1. (66 petals of 3 dc each = 198 dc, 44 sc pivots, 44 total ch-2 sps)
Round 22Final picot edging row Ch 1, (sc in first sc, picot, sk 1, sc in center dc of first petal, picot, sk 1, sc in sc between petals, picot, sk 1, sc in center dc of second petal, picot, sk 1, sc in sc between petals, picot, sk 1, sc in center dc of third petal, picot, sc in last sc, ch 1, sc in pivot sc, ch 1) across, sl st to beg ch-1. (22 scallops each with 7 picots = 154 picot points total along hem)Fasten off and weave in end at front edge.

Assembly

Step 1Blocking is essential for this lace pattern and will open the motifs dramatically, adding 1 to 2 inches to the final measurements.
Step 21. Weave in all ends securely on the wrong side. Bury tails through at least 1 inch of stitches in two directions.
Step 32. Fill a basin with cool water. Submerge the capelet and gently press to saturate. Allow to soak for 10 minutes.
Step 43. Lift the capelet supporting its full weight. Gently press between two clean towels to remove excess water. Do not twist.
Step 54. Lay flat on blocking mats. Pin the neckline edge at intervals of approximately 1 inch to hold the curve. Spread the lower hem to its full width and pin each scallop point firmly outward.
Step 65. Allow to dry completely (12 to 24 hours) before removing pins.
Step 76. Once dry, add beaded fringe.

Tester's notes

132 dc from the Main Body Setup Round must divide evenly into 11 repeats of 12 stitches before starting Section 3 — recount before working Round 2 of the lace body.

4 to 6 stitch markers keep the 11 repeat points visible through Sections 3 and 4, where shaping increases are distributed across repeats rather than at a single seam.

15 yards or less of each of the four corsage colors (light blue, medium periwinkle, soft purple, medium green) is enough — no need to buy full skeins for the hydrangea.

The capelet is worked in the round from the neckline outward with the right side always facing you; the piece stays open at the center front, and you do not turn between rounds unless specifically instructed.

Add the beaded fringe only after blocking — beading before blocking lets the bead weight distort the damp fabric.

The hydrangea corsage is pinned or tacked to the right front neckline rather than sewn on permanently, so it can be removed for washing.

At a glance

Rounds27
Parts5
LevelAdvanced Intermediate
Time10-15 hours
Hook2.25 mm
YarnFingering

Gauge check

After the Main Body Setup Round and the first full pineapple fan repeat through Round 5, lay the work flat and measure one 12-stitch fan repeat across — it should read 2.25 inches wide, matching the stated gauge of 32 stitches and 12 rows per 4 inches in basic double crochet.

If the repeat measures narrower, move up to a US C-2 (2.75 mm) hook; if wider, drop to a smaller hook before continuing into Section 4.

Swatch at least a 6 inch square using the US B-1 (2.25 mm) hook, block it, then measure before proceeding — gauge is critical to achieving the correct neckline circumference and overall drape.

Stitch-count checkpoints

  • Section 1: Foundation and Neckline Band · Row 2: 134 sts
  • Section 1: Foundation and Neckline Band · Row 4: 134 sts
  • Section 2: Main Body Setup Round · Round 1: 132 sts

If something looks wrong

The pineapple fans stay closed and
Fabric opens fully only after wet blocking, which adds 1 to 2 inches to motif size; hold off judging fan shape until the piece has been soaked and pinned to measurements.
The neckline band ripples or the
Row 3 needs exactly 2 stitches skipped on each side for the ch-3 loops; recount to 130 sc plus the 2 loops before starting Row 4.
The main body cups or ruffles instead of lying flat.
132 dc did not divide into 11 clean repeats of 12 at the setup round; stitch markers placed at each repeat point in Section 3 catch a miscount before it compounds through Section 4.

Yarn substitutions

Fingering weight linen-cotton blendHolds the pineapple fan shape with less stretch than 100 percent cotton; block at the same 32-stitch, 12-row gauge with the same US B-1 hook and expect a crisper, less soft hand.
Lace weight (light fingering) mercerized cottonProduces a smaller capelet at the same stitch and row counts unless hook size increases; move up to a US C-2 (2.75 mm) hook to hold the 72-inch hem circumference.
Sport weight cottonYields a heavier, less open version of the same 11-repeat pineapple pattern; sizing past US C-2 (2.75 mm) pushes the finished piece past the stated 22-inch neckline and 72-inch hem unless the repeat count is reduced.
FAQs

Questions

Can the neckline circumference be adjusted?

Yes; the pattern lists the 22-inch neckline as adjustable, and Row 1 of Section 1 starts from a 137-chain foundation that can be shortened or lengthened in multiples that keep the buttonhole and repeat math intact. Any change to the starting chain count carries through to the 132-dc setup round and the 11-repeat pineapple pattern, so recalculate before casting on.

Is the hydrangea corsage required to finish the capelet?

The corsage covers the front closure and pairs with the button loop made in Section 1's buttonhole row, so skipping it leaves that loop unused. Corsage yarn amounts are small, under 15 yards per color, so it adds little to overall yardage even if left off.

How much yarn is needed for the main body alone?

The materials list gives 3 skeins, approximately 750 yards (686 meters) total, of fingering weight cotton for the main lavender body, separate from the small corsage amounts. That yardage assumes cotton or a cotton-linen blend at fingering to light sport weight; wool is not recommended since it produces a denser, less drapey fabric.

One at a time —

Get the next pattern

Tested round by round before it is sent. No spam.