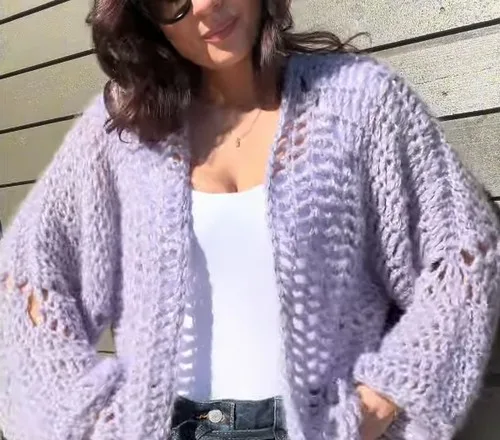
Made and counted by Wren —

Hexagon cardigan crochet pattern with a sparkle finish

8mm hook, light yarn plus sparkle yarn: two hexagons seam into an oversized cardigan with sleeves.

Hexagon cardigan crochet pattern with a sparkle finish
IntermediateLevel
6-9 hoursTime
8 mmHook
Light (DK)Yarn
Jump to the pattern

About this pattern

A hexagon cardigan built from two mitered hexagons, each worked in treble crochet with 6 corner-increase points per round on an 8mm hook, held with one strand of light yarn and one strand of sparkle yarn. Each hexagon folds into an L-shape; two are seamed along the back and shoulders to form the body. Sleeves pick up stitches at the armhole and work outward for a designer-suggested 6 rounds.

This cardigan starts as two flat hexagons, each worked in treble crochet with 6 corner increase points per round using an 8mm hook and one strand each of light yarn and sparkle yarn held together. Every hexagon folds into an 'L' shape, and two of them form the entire body once seamed along the back and shoulders. The designer suggests 11-13 rounds per hexagon for an oversized fit, fewer for a closer one. Sleeves pick up directly from the armhole opening and build outward in plain treble rounds.
The pattern

Written out round by round

Materials

Yarn

  • Light yarn (acrylic, mohair, poly mix) combined with a sparkly yarn (one strand of each yarn).

Hook

  • Size 8 mm.

Other

  • Scissors, stitch markers, tapestry needle for seaming.

Abbreviations

  • ch = chain
  • tr = treble crochet
  • sl st = slip stitch
  • fpdc = front post double crochet

Hexagon

Make 2

The side stitches will increase with each round.

The designer suggests 11-13 rows for an oversized look, or fewer for a smaller fit.

The completed hexagon should fold into an 'L' shape.

Foundation: Ch 4, sl st to the first ch to form a ring.

Round 1Ch 4 (counts as 1st tr); Work (tr, ch 3, tr) 5 times into the ring; Sl st to the 4th ch to join. (6 corner spaces and 6 treble crochet posts)
Round 2Ch 4 (counts as 1st tr); Work 1 tr in each tr from the previous round until you reach the corner; Corner: Work (2 tr, ch 3, 2 tr) in the ch-3 space; Repeat the side stitches and corner all around; Sl st to the 4th ch to join.Subsequent Rounds: Repeat Round 2, working 1 tr in every tr stitch along the sides, and (2 tr, ch 3, 2 tr) in every corner space. Continue until the hexagon is the desired size.

Sleeves

Make 2

The sleeves are worked in the round directly from the armhole opening.

Round 1Foundation Join the yarn in the middle of the underarm seam; Work 1 tr in every stitch around the armhole opening; In the seam area, work 2 tr (one on each side of the seam); Sl st to the 4th ch to join.
Rounds 2–6Ch 4, and work 1 tr in every stitch all the way around; Sl st to join. Repeat this round until you have your desired sleeve length (the designer suggests 6 rounds for her length, but you can adjust).

Bottom Edging

This step adds length to the bottom edges, since the back is shorter than the front.

Round: Join yarn at the bottom edge and work in the same manner as the hexagon rounds; Sides: Work 1 tr in every stitch; Corners: Work a corner increase of (2 tr, ch 3, 2 tr) in the corner spaces; Repeat all the way around the bottom edge of the cardigan.

Sleeve Cuff

Make 2
Round 1This section uses the Front Post Double Crochet (fpdc) to create a ribbed, tightened cuff.
Round 2Cuff Round 1 (Decrease): Ch 3; Work (fpdc, fpdc together, 1 fpdc alone); Repeat the sequence all the way around; Sl st to join.
Round 3Cuff Round 2 (No Decrease): Ch 3; Work 1 fpdc in every stitch (including the decreased stitches); Sl st to join.
Round 4Cuff Round 3 (Decrease): Ch 3; Repeat the sequence from Round 1: (fpdc, fpdc together, 1 fpdc alone); Repeat the sequence all the way around; Sl st to join.

Assembly

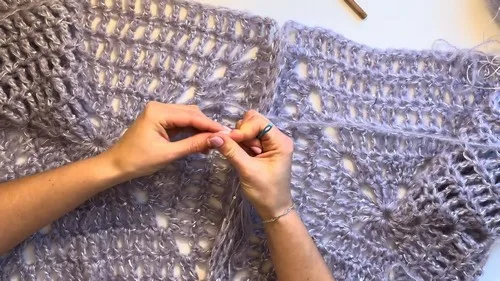
Step 1Once both hexagons are completed, you will join them using a needle and yarn (use the non-glitter yarn for seaming).
Step 2Back Seam: Place the two hexagons with the right sides facing together.
Step 3Sew the two center back edges together from the middle of the neck opening down to the bottom.
Step 4Shoulder Seams: Sew the top edge of each hexagon together to form the shoulders, leaving the last two corner spaces open for the neck/collar area (adjust for size).

Tester's notes

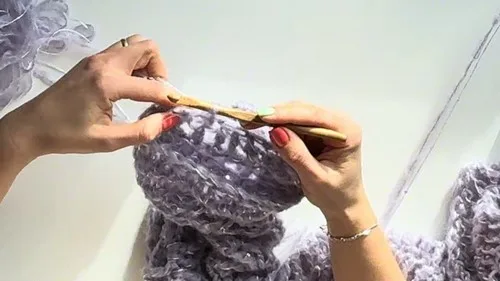
8mm hook needs to move through two strands held together (light yarn plus sparkle yarn); work loosely or the treble stitches will tighten gradually across the 4 hexagon rounds.

6 corner spaces per hexagon round must line up before starting the next round; a stitch marker in each ch-3 corner space prevents miscounting as the round grows wider.

2 hexagons need to match round for round, not just size by eye - stop both pieces at the same round number (11-13 per the designer's suggestion) before assembly.

1 strand of sparkle yarn can shed fiber at the hook; keep scissors nearby to trim strays rather than pulling, which can snag the mohair strand in the light yarn blend.

Sleeve rounds 2-6 repeat a plain treble round with no corner increases; mark the seam point set in round 1 so later rounds don't drift off the underarm line.

Work in progress

Hexagon cardigan crochet pattern with a sparkle finish — photo 2
Hexagon cardigan crochet pattern with a sparkle finish — photo 3

At a glance

Rounds8
Parts4
LevelIntermediate
Time6-9 hours
Hook8 mm
YarnLight (DK)

Gauge check

After round 2 of the first hexagon, lay it flat and check that it still reads as a hexagon with 6 distinct corner spaces, not a cone or a ruffled disc.

If the corners pull tight or the sides ripple, swap the 8mm hook for one a half size up or down until the fabric lies flat without stretching the two held strands apart.

If something looks wrong

The hexagon cups or domes instead of lying flat.
Too many stitches are landing at the corners or the treble posts are worked too tight. Work exactly one (2 tr, ch 3, 2 tr) per corner per round and loosen tension at the ch-3 spaces specifically.
The two hexagons don't match in size once it's time to seam them.
One hexagon was likely stopped on a different round number than the other, even if the widths look close. Count rounds, not just width, and rework the shorter piece up to the same round before joining.
The sleeve puckers or flares right at the underarm.
Extra stitches were added across the seam beyond the 2 tr the foundation round calls for. Recheck round 1 for exactly one tr on each side of the seam, then recount the full stitch total before starting round 2.
The sparkle strand disappears into the fabric instead of showing on the surface.
The sparkle strand went slack while the light yarn carried the tension, letting the light yarn dominate each stitch. Hold both strands with even tension before every treble crochet and check every few stitches that both sit on the hook together.

Yarn substitutions

Fingering-weight mohair blend doubled with a lace-weight metallic threadHexagons come out smaller and the fabric drapes softer. Drop to a 5mm hook and add rounds beyond the suggested 11-13 to reach the same finished width.
DK-weight acrylic worked alone, no second strandNo sparkle effect and a flatter fabric overall. Size stays close to the 8mm-hook gauge, but swatch first since a single DK strand is thinner than the light-plus-sparkle combo.
Bulky-weight chenille held with a fine metallic strandFabric gets heavier and warmer, and hexagons reach the oversized 11-13 round range faster, so fewer rounds are needed. A hook closer to 9mm keeps the corner spaces from closing up.
FAQs

Questions

How many rounds should each hexagon have before assembly?

The designer worked 11-13 rounds for an oversized fit; fewer rounds give a smaller, closer fit. Both hexagons need the same round count so the shoulder and back seams line up correctly.

Why does the pattern use two strands of yarn held together?

One strand is a light yarn (acrylic, mohair, poly mix) and the other is a sparkle yarn, worked together through every round of the hexagons, edging, and sleeves. Holding them together lets the 8mm hook build a fabric thick enough for the hexagon shapes without the sparkle yarn carrying the structure alone.

How is the sleeve length adjusted?

Sleeves start at round 1 from the armhole opening, then repeat the plain tr round (rounds 2-6) until the sleeve reaches the desired length. The designer's own sample used 6 rounds total, but working fewer or more changes the length without changing the stitch count per round.

One at a time —

Get the next pattern

Tested round by round before it is sent. No spam.