Made and counted by Wren —

Free Crochet Numbers 0-9 Pattern: A Complete Guide To Crocheting Beautiful Numbers

Learn to crochet numbers 0-9 in flat or stuffed styles with this free pattern guide, perfect for blankets, banners, toys, and handmade birthday decor.

IntermediateLevel
4-6 HoursTime
2.5 mmHook
WorstedYarn
Jump to the pattern

About this pattern

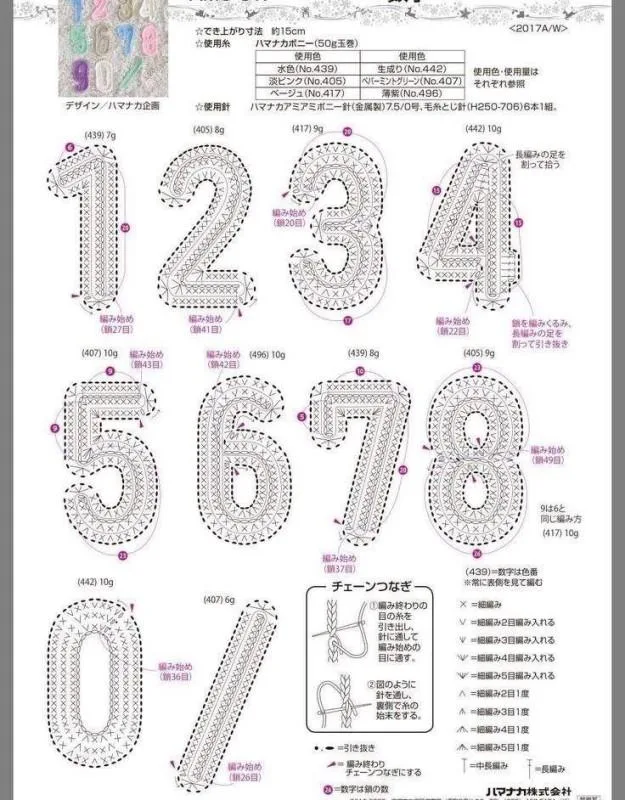
This Free Crochet Numbers 0-9 Pattern gives you two complete ways to make every digit: flat versions perfect for embellishing blankets, bags, clothing, and wall decorations, plus stuffed 3D versions that become huggable toys, learning tools, or photo-worthy birthday props. Whether you're personalizing a baby blanket with a birth year or building a giant milestone number for a first birthday party, this pattern flexes to fit your project. It's the kind of versatile design that earns a permanent spot in your hook bag.

You'll work with half double crochet for rounded numbers like 0, single crochet for straighter shapes like 4, and clever chain-stitch bars to form horizontal elements. Numbers like 4 and 5 involve joining separate pieces together — a vertical line, a horizontal bar, curved sections — so basic seaming and shape-joining skills come in handy. This sits comfortably at an intermediate level; if you've made granny squares or simple amigurumi before, you're ready. Expect roughly 4-6 hours per complete number, depending on size and whether you're stuffing it.

The finished numbers have wonderfully crisp, defined edges thanks to cotton yarn's excellent stitch definition, so every curve and corner reads clearly even from across a room. Flat numbers lie beautifully smooth for appliqué work, while stuffed versions have a plush, dimensional pop that begs to be touched and played with. Either way, these make heartfelt handmade gifts — a stuffed birthday number for a first birthday photo shoot, or a felt-backed appliqué number stitched onto a keepsake blanket that will be treasured for years.

Variations

I adore this pattern because it turns something as simple as a digit into a genuinely satisfying make. Building Number 0 with chained semi-circles worked in half double crochet, then joining the two curved halves and reinforcing the seam with a slip stitch border, feels like solving a tiny puzzle — and the payoff is a perfectly rounded zero every time. Number 4 is a different kind of fun: chaining 12, crocheting a clean vertical line in single crochet, then adding that jaunty horizontal bar with chain stitches before joining everything together. There's something deeply satisfying about watching flat pieces become a recognizable shape stitch by stitch. I love that this pattern doesn't lock you into one finish, either — go flat for appliqués or stuff it up for a toy, using the exact same foundation rounds. It's practical, it's customizable, and it scratches that itch for both technical practice (shaping, joining, reinforcing) and pure creative payoff. Numbers rarely get this much crochet love, and once you make one, you'll want the whole set.

Common mistakes

  • Losing count on the initial foundationUse a stitch marker on every 5th chain as you work, and always recount your chain before starting round 1 — a few extra seconds here saves you from unpicking an entire section later.
  • Working the semi-circles for Number 3Keep consistent tension throughout both semi-circles by using the same hook grip and yarn feed each time, and lay the two pieces side by side before joining to confirm they match in size and curve before you start the slip stitch border.
  • Skipping or rushing the slip stitchWork the slip stitch border slowly and evenly around the entire joined edge, inserting your hook through both loops of each stitch to create a smooth, sturdy finish that holds its rounded shape.
  • Misaligning the horizontal barBefore joining, lay the vertical single crochet line flat and measure roughly one-third down from the top to mark bar placement with a stitch marker, ensuring your chain-stitch bar attaches at a consistent, balanced point every time.
  • Forgetting to swap crochet techniquesDouble-check which stitch each round calls for before starting; half double crochet gives the taller, rounder profile needed for curved numbers, while single crochet keeps straight-edged numbers like 4 crisp and structured.
  • Overstuffing or understuffing the 3DStuff in small pinches, working from the center outward and checking the shape against a flat printed reference as you go; stop stuffing just before the seam becomes hard to close so the number keeps a soft, huggable feel.

The pattern

Written out round by round

Materials

Basic Crochet Supplies

  • Cotton yarn or acrylic yarn
  • Crochet hook (2.5mm – 4mm recommended)
  • Yarn needle
  • Scissors
  • Stitch markers

Optional Materials

  • Fiberfill stuffing (for 3D numbers)
  • Felt backing (for appliqués)
  • Fabric glue
  • Buttons or embellishments

Abbreviations

  • CH = Chain
  • SC = Single crochet
  • HDC = Half double crochet
  • SL ST = Slip stitch
  • INC = Increase
  • DEC = Decrease

Crochet Number 0 Pattern

About The number zero resembles an oval ring.

Step by step Step by step: Chain 16; join with slip stitch to form a ring.

  1. Round 1Single crochet around the chain
  2. Round 2Increase slightly on the curves
  3. Round 3Single crochet evenlyFinishing Fasten off and weave in ends. The result is a clean oval shape representing number 0.

Crochet Number 1 Pattern

About The number one is the easiest to crochet.

Step by step Step by step: Chain 18.

  1. Row 1Single crochet across
  2. Row 2Slip stitch across
  3. Row 3Add a small base using 5 chains

Finishing This creates a recognizable crochet number 1.

Crochet Number 2 Pattern

About The number two involves curves and angles.

Step by step Step by step: Chain 20.

  1. Row 1Single crochet across
  2. Row 2Decrease gradually on one side
  3. Row 3Create bottom base with chains

Finishing Shape the number carefully as you crochet.

Crochet Number 3 Pattern

About Number three consists of two curves.

Step by step Step by step: Chain 18.

  1. InstructionsCrochet semi-circles using half double crochet; Join two curved sections; Reinforce with slip stitch border

Crochet Number 4 Pattern

About Number four uses straight lines.

Step by step Step by step: Chain 12.

  1. InstructionsCrochet vertical line using single crochet; Create horizontal bar with chain stitches; Join pieces together

Crochet Number 5 Pattern

About Number five blends straight lines with a bottom curve.

Step by step Step by step: Chain 15.

  1. Row 1Single crochet across
  2. Row 2Form curve using increases
  3. Row 3Slip stitch border

Crochet Number 6 Pattern

About This number forms a spiral.

  1. InstructionsMagic ring with 6 stitches; Increase gradually; Crochet outer curve; Attach inner circle

Crochet Number 7 Pattern

About The number seven is simple and geometric.

Step by step Step by step: Chain 18.

  1. InstructionsCrochet top bar; Work diagonal row downward; Reinforce edges

Crochet Number 8 Pattern

About The number eight resembles two stacked circles.

  1. InstructionsCrochet two small circles using magic ring; Join circles with slip stitches; Add border for stability

Crochet Number 9 Pattern

About Number nine is the reverse of six.

  1. InstructionsCrochet circle with magic ring; Extend tail using chains; Reinforce shape with slip stitch border

Important notes

💡 Choose a 2.5mm-3mm hook for crisp, defined flat numbers meant for appliqué work, and size up to 3.5mm-4mm if you're making stuffed 3D versions that need a bit more give for stuffing.

💡 Cotton yarn is usually preferred over acrylic for this pattern because it provides excellent stitch definition, making the number shapes clearer, especially for curved edges like Number 0's semi-circles.

💡 Place a stitch marker at the start of each round and at any joining points (like where the 4's horizontal bar meets the vertical line) so you never lose track of your pattern placement mid-project.

💡 When making flat appliqué numbers, press each piece lightly with a cool iron and damp cloth before gluing to felt backing — this flattens curled edges and helps fabric glue adhere more evenly.

💡 For stuffed numbers, stuff firmly around curves and corners first (like the top of the 0) before filling the center, since edges are more visible and need to hold their shape crisply.

💡 When joining pieces like the two halves of Number 0 or the bar-and-line pieces of Number 4, use a yarn needle and whip stitch through matching stitches on both edges for the neatest, most invisible seam.

💡 To make numbers bigger, use thicker yarn, larger crochet hooks, increase your chain lengths, and add extra rows — these adjustments let the same basic pattern produce large decorative numbers for statement pieces.

💡 Popular color palettes include pastel tones for nursery decor, rainbow colors for educational toys, neutral cotton for minimalist designs, and bright colors for birthday themes — mixing colors can also improve visual contrast.

💡 For the best results overall: use tight stitches for clean shapes, block pieces if necessary, add contrasting borders for definition, and use stitch markers when shaping curves — small adjustments in stitch tension can dramatically improve the final result.

FAQs

Frequently asked questions

Can I make a full set of numbers 0-9 in matching colors for a garland?

Absolutely — just work each number in the same yarn and hook size, keeping tension consistent across all ten digits. String them together with ribbon or twine through the top of each piece for a cohesive birthday or countdown banner.

What size will my finished numbers be?

the chain counts given (16 for the 0, 12 for the 4) and a worsted weight cotton yarn on a 3mm-3.5mm hook, numbers typically finish around 4-5 inches tall. Sizing up your chains and hook will produce larger statement numbers.

Do I need to know how to join pieces to make this pattern?

Yes, several numbers like 0, 3, 4, and 8 require joining separate crocheted sections, so basic seaming skills (whip stitch or slip stitch) are helpful. If you're new to joining, practice on scrap pieces first to get comfortable with even, matched stitches.

Can I use acrylic yarn instead of cotton for these numbers?

You can, but cotton yarn is recommended because its stitch definition keeps the number shapes sharp and recognizable. Acrylic works fine for stuffed toy versions where softness matters more than crisp edges.

How do I turn a flat number into a 3D stuffed version?

Crochet two identical numbers, join the edges using single crochet, stuff lightly with fiberfill, and close the edges. This produces soft plush numbers perfect for children.

One at a time —

Get the next pattern

Tested round by round before it is sent. No spam.