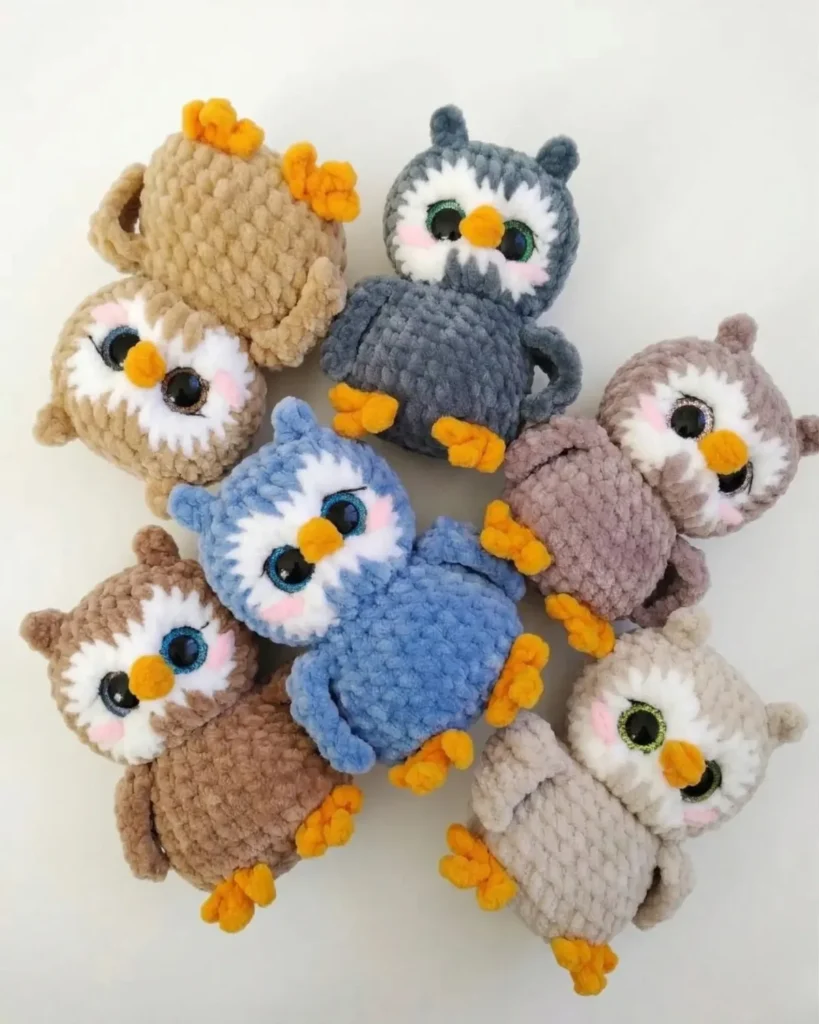
Made and counted by Wren —

Fluffy Bird Amigurumi Crochet Pattern

Make an adorable Fluffy Bird amigurumi with this detailed crochet pattern featuring spiral rounds, a sweet beak, and embroidered face for a cuddly handmade

Fluffy Bird Amigurumi Crochet Pattern
IntermediateLevel
4-6 HoursTime
2.75 mmHook
WorstedYarn
Jump to the pattern

At a glance

Chain 6 and work into both sides of the chain to form a flat oval base for the body.

Spiral upward through the 12 body rounds, increasing as directed to shape the rounded form.

Pause partway to stuff the body firmly with polyester fiberfill once it's joined.

Chain 6 again for the head and work the same oval-start technique through 10 rounds.

Crochet the wings and ears directly into the body and head rounds as you reach those points.

Shape and attach the small beak using the orange yarn for a bright pop of color.

Add the simple feet piece to give the bird a stable base to sit on.

Assemble all the pieces together, then embroider eyelashes and pink cheeks for the finishing touch.

About this pattern

This Fluffy Bird Amigurumi is the kind of pattern that makes you fall in love with amigurumi all over again. With its round little body, perky head, and that unmistakable orange beak, this bird has so much personality packed into such a small stuffed shape. It's perfect for crocheters who want to make a nursery decoration, a baby shower gift, or just a cheerful little friend to sit on a shelf and make you smile every time you walk by.

This pattern leans on a few techniques that make it a satisfying intermediate project: starting the body and head with a flat oval spiral (chaining 6 instead of using a magic ring), working wings and ears directly into the rounds as you go, and finishing with hand-embroidered eyelashes and cheeks for extra charm. If you're comfortable with basic increases and continuous spiral rounds, you'll pick this up quickly — expect somewhere around 4 to 6 hours from first stitch to finished bird, including embroidery time.

When it's all stuffed and assembled, you'll have a small, huggable bird with a plush, rounded silhouette and a sweet embroidered expression that gives it real character. The soft baby yarn keeps it gentle enough for little hands, and the compact size makes it an easy carry-along toy or a charming addition to a shelf of amigurumi friends. It's the kind of finished piece that photographs beautifully and gifts even better.

Variations

I adore this pattern because it takes a classic amigurumi shape and gives it so much extra character. Starting the body and head with a chain-6 oval instead of a magic ring is such a satisfying technique — it creates that lovely elongated base before you spiral up into the rounds, and once you've done it once you'll want to use it everywhere. I also love that the wings and ears aren't separate pieces to sew on later; you crochet them right into the body and head rounds as you work, which saves so much finishing time and keeps everything looking seamless. The embroidered eyelashes and pink cheeks are where this bird really comes alive — a few simple stitches in black thread and a touch of pink plush yarn transform a plain round head into something genuinely expressive. Working in continuous spiral with a stitch marker keeps the whole project flowing without the bulk of joined rounds, and stuffing the body right after joining it means you get instant gratification as your bird starts to take shape in your hands. It's a wonderfully rewarding make from start to finish.

Common mistakes

  • Confusing the chain-6 oval start with a magic ringRemember this pattern deliberately begins the body and head with a flat oval made from a foundation chain of 6, not a magic ring — work stitches into both sides of the chain to create the oval base before spiraling upward.
  • Losing track of the round beginning inSince rounds are not joined, place a stitch marker in the first stitch of each round and move it up as you go so you always know exactly where each new round starts.
  • Attaching wings or earsThis pattern crochets wings and ears directly into the body and head rounds as you reach the specified point, so check your round count carefully and don't skip ahead — sewing them on later will change the proportions.
  • Stuffing too late or too sparsely in the bodyStuff the body firmly right after joining it as instructed, adding fiberfill in small pinches and pushing it into the oval ends first so the shape stays smooth and doesn't look lumpy once closed.
  • Using a hook that's too largeStick to the recommended 2.75mm or 3mm hook — a larger hook creates loose stitches that let fiberfill peek through, especially noticeable on a small amigurumi like this bird.
  • Rushing the embroidered eyelashes and cheeksTake your time placing the black embroidery thread eyelashes and pink cheek stitches symmetrically — pin or mark placement with a scrap of yarn first so both sides match before committing to permanent stitches.
  • Pulling color-change rows on the head too tightIn Rounds 3 and 4 of the Head, you're working into the row below to create a textured face panel — resist the urge to pull these stitches tight, since loose tension here creates the slightly puffed face effect that gives the bird its charm.
  • Struggling to find the exact stitch for safety eye placementThe safety eyes go in between Rounds 1 and 2 of the head, very close to the bottom of the face — gently part the fibers of the fluffy yarn with a pin to find the exact stitch before inserting the eye post, since once the washer is snapped on it cannot be removed without cutting.

The pattern

Written out round by round

Materials

Yarn

  • HiMALAYA Dolphin Baby (120 m / 100 g) — approximately 20–25 grams per toy; main color, white, and orange (for beak)

Hook

  • 2.75 mm or 3 mm

Safety eyes

  • 18 mm sparkle/trapezoid style

Thread for cinching

  • matching main color thread (iris or embroidery floss weight)
  • Black embroidery thread: for stitching eyelashes
  • Pink plush yarn or thread: for cheek embroidery

Stuffing

  • polyester fiberfill
  • Tapestry needle
  • Scissors
  • Stitch marker

Abbreviations

  • ch = chain
  • sl st = slip stitch
  • sc = single crochet
  • hdc = half double crochet
  • dc = double crochet
  • tr = treble crochet (double crochet with two yarn overs)
  • inc = increase (2 sc in same stitch)
  • dec = decrease (invisible decrease — 2 sc worked together through front loops)
  • dc inc = double crochet increase (2 dc in same stitch)
  • dc dec = double crochet decrease (2 dc worked together with shared top)
  • BLO = back loop only
  • FLO = front loop only
  • mr = magic ring

Body

Work in a continuous spiral around a chain foundation using main color yarn.

  1. Round 1Ch 6, starting in the 2nd ch from hook: inc, 3 sc, 4 sc in same stitch, 3 sc, inc. (14)
  2. Round 22 inc, 3 sc, 4 inc, 3 sc, 2 inc. (22)
  3. Round 3(1 sc, inc) × 2, 3 sc, (1 sc, inc) × 4, 3 sc, (1 sc, inc) × 2. (30)
  4. Round 421 sc, 1 hdc, 3 dc in same stitch, 1 hdc, 6 sc. (32)
  5. Round 521 sc, 3 dec, 5 sc. (29)
  6. Round 621 sc, dec, 6 sc. (28)
  7. Round 728 sc. (28)
  8. Round 8(5 sc, dec) × 4. (24)
  9. Round 92 sc, [First wing: ch 8, starting in 2nd ch from hook: 1 sc, 1 hdc, 2 dc, 3 tr] , skip 2 stitches on body, 8 sc along body, [Second wing: ch 8, starting in 2nd ch from hook: 1 sc, 1 hdc, 2 dc, 3 tr] , skip 2 stitches on body, 10 sc along body. (24, counting skipped stitches)
  10. Round 102 sc, fold first wing forward toward you and work behind it: 2 sc into the 2 skipped stitches from Rnd 9, 8 sc along belly between the wings, 2 sc behind second wing into its 2 skipped stitches, 10 sc along back. (24)
  11. Round 11(2 sc, dec) × 6. (18)
  12. Round 12(1 sc, dec) × 6. (12)Fasten off and weave in ends. Do not stuff the body yet — stuff after joining to the head.

Head

Work in a continuous spiral around a chain foundation. Begin with white yarn.

  1. Round 1Ch 6, starting in 2nd ch from hook: inc, 3 sc, 4 sc in same stitch, 3 sc, inc. (14)
  2. Round 22 inc, 3 sc, 4 inc, 3 sc, 2 inc. (22)
  3. Round 3(1 sc, inc) × 2, 3 sc, (1 sc, inc) × 4 — switch to main color yarn here — 3 sc worked into the stitches of Rnd 2 (one row below; keep these stitches loose, do not pull tight), (1 sc, inc) × 2. (30)
  4. Round 46 sc, 3 sc worked into stitches of Rnd 3 (one row below; keep loose), 21 sc. (30)

The next round is where you join the body.

  1. Round 55 sc, [First ear: ch 3, starting in 2nd ch from hook: 1 sc, 1 hdc] , 6 sc along head, [Second ear: ch 3, starting in 2nd ch from hook: 1 sc, 1 hdc] , 9 sc along head — now place the body against the head, front sides aligned, and crochet through both layers: 6 sc joining head and body together, then 4 sc along head only. (30)
  2. Round 65 sc before first ear, 6 sc between ears, 9 sc after second ear, 6 sc through back of body, 4 sc along head. (30)Install safety eyes between Rnds 1 and 2 of the head, spaced 6 stitches apart. Refer to reference photos to confirm placement before securing.

Now is the time to stuff the body with fiberfill.

  1. Round 7-930 sc each round. (30) — 3 rounds total
  2. Round 10(1 sc, dec) × 2, 3 sc, (1 sc, dec) × 4, 3 sc, (1 sc, dec) × 2. (22)
  3. Round 112 dec, 3 sc, 4 dec, 3 sc, 2 dec. (14)Stuff the head firmly with fiberfill.
  4. Round 127 dec. (7)Pull yarn through remaining stitches to close. Weave tail inside the head. Use a length of matching thread to cinch and shape the face as desired.

Beak

Worked directly onto the finished toy using orange yarn.

Attach orange yarn at Rnd 1 of the head, centered exactly between the two eyes. Working all stitches into that same single stitch: ch 2, then work 1 dc into that same stitch. Fasten off. Bring the starting tail to center, one row below, and tie both tails together with two knots. Weave ends inside.

Feet

Both feet are crocheted directly onto the body at Rnd 3, spaced 5–6 stitches apart.

For each foot: Attach yarn at your chosen stitch. Working all stitches into that same stitch: ch 3, then starting in 2nd ch from hook, work 2 sl st; fasten the chain with a sl st into the original stitch — this creates one toe . Repeat this sequence two more times in the same stitch (3 toes total per foot). Fasten off; tie the two yarn ends together with two knots and weave inside.

Assembly

Step 1

The body and head are already joined during Rnd 5 of the Head — no additional sewing is needed to connect these two pieces.

Step 2

Wings are integrated into Rnd 9 of the Body and folded into place during Rnd 10 — pin with stitch markers while working if needed to keep them oriented correctly.

Step 3

Ears are built directly into Rnd 5 of the Head and require no further attachment.

Step 4

Attach the beak and feet directly to the finished toy as described above.

Step 5

Using black embroidery floss, stitch delicate eyelashes above each safety eye.

Step 6

Using pink plush yarn or thread, embroider two small cheek blushes below the eyes using 2 straight stitches per cheek.

Important notes

💡 Use a 2.75mm or 3mm hook with the HiMALAYA Dolphin Baby yarn to keep stitches tight enough that fiberfill won't show through the fabric.

💡 Keep your stitch marker moving up every single round since this pattern works in a continuous spiral without joining — it's easy to lose your place otherwise.

💡 When starting the chain-6 oval for the body and head, work loosely into the first chain to leave room for stitches on both sides of the foundation.

💡 Stuff the body firmly right after joining it as the pattern notes suggest, rather than waiting until final assembly, so the shape holds well through the rest of construction.

💡 Since wings and ears are worked directly into the body and head rounds, double-check your round number before starting each new round so you don't miss the attachment point.

💡 Pre-plan your eyelash and cheek placement with the black embroidery thread and pink plush yarn before stitching — a light pencil dot or pin marker helps keep both sides symmetrical.

💡 This pattern uses US crochet terminology throughout.

💡 The finished toy measures approximately 10–11 cm, depending on yarn, hook size, and tension — if your toy comes out larger, go down a hook size or use a lighter weight yarn; if it's smaller than expected, try going up to a 3.5mm hook.

FAQs

Frequently asked questions

Do I need to know how to make a magic ring for this pattern?

No — this pattern intentionally starts both the body and head with a chain of 6 worked into a flat oval spiral rather than a magic ring, so that's the technique to focus on instead.

What size hook works best with HiMALAYA Dolphin Baby yarn for this bird?

A 2.75mm or 3mm hook is recommended to keep the stitches snug enough to hold in the fiberfill stuffing while still being easy to work with.

How much yarn will I need to complete one bird?

Each toy uses approximately 20–25 grams of the main color yarn, plus a small amount of orange for the beak, so one 100g ball comfortably makes several birds.

Are the wings and ears sewn on separately or crocheted in?

They're crocheted directly into the body and head rounds as you work through the pattern, which saves finishing time and gives a seamless, attached look.

When should I stuff the body — during construction or at the very end?

Stuff the body right after joining it, as noted in the pattern instructions, so the shape is well-filled and smooth before you move on to assembly.

Is this pattern suitable for beginners?

This pattern is best suited for confident beginners or intermediate crocheters. You should be comfortable working in a continuous spiral and making basic increases and decreases. The integrated wings, ears, beak, and feet require a little patience, but the instructions walk you through each step clearly.

Can I use a different yarn for this pattern?

Yes — any super bulky or bulky chenille or velvet yarn will work, just check your gauge. The finished bird should measure approximately 10–11 cm; if your toy comes out larger, go down a hook size or use a lighter weight chenille, and if it's smaller than expected, try going up to a 3.5 mm hook.

One at a time —

Get the next pattern

Tested round by round before it is sent. No spam.