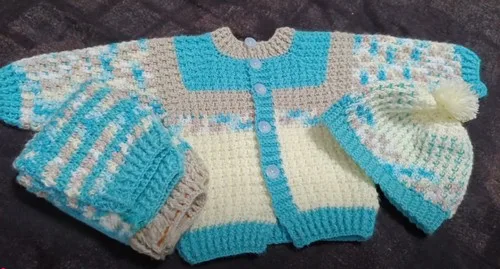
Made and counted by Wren —

Easy Crochet Baby Cap Pattern for Newborns 0-6 Months

Learn to crochet a soft ribbed baby cap for 0-6 months using single crochet stitches. A simple, cozy pattern perfect for gifting or baby showers.

Easy Crochet Baby Cap Pattern for Newborns 0-6 Months
BeginnerLevel
2-3 HoursTime
3 mmHook
DK/Light WorstedYarn
Jump to the pattern

At a glance

Chain a small foundation row and work single crochet across to start your ribbed strip.

Turn and repeat single crochet in the back loop only for many rows to build length and texture.

Continue the rib until it reaches the target inch length noted in the pattern.

Fold the finished strip and align the starting chain edge with the last row edge.

Join the two edges together with slip stitches to form the seamed cap shape.

Work a round of single crochet along the seamed edge to smooth and define it.

Add a decorative chain-space round around the brim for a pretty finished edge.

Gather the remaining top opening closed with the yarn tail, knot securely, then attach a pom-pom and weave in ends.

About this pattern

This easy crochet baby cap is built on a clever ribbed strip technique that gets folded and seamed into a snug, stretchy hat — no complicated shaping charts needed. The rib construction gives the finished cap a beautiful textured look that stretches gently to fit a growing little head, making it ideal for newborns through six months. It's the kind of pattern that looks far more impressive than the effort it actually takes, which makes it a favorite for new crocheters and busy gift-makers alike.

The whole cap comes together using just single crochet, working in the back loop only to create that signature rib texture, along with a few rounds of chain-spaced single crochet for the decorative brim detail. Because the pattern relies on repetition rather than complex stitch combinations, it's very approachable for beginners who already know how to chain and single crochet. Most crocheters can complete the cap in two to three relaxed sittings, making it a lovely weekend or evening project.

The finished cap is soft, stretchy, and beautifully textured thanks to the ribbed construction, with a neat gathered top finished off with a cheerful pom-pom. Sized for 0-6 months, it makes a heartfelt handmade gift for a baby shower, a new sibling announcement, or your own little one's first cool-weather accessory. Lightweight yet cozy, it's the kind of small project that carries a big dose of handmade love.
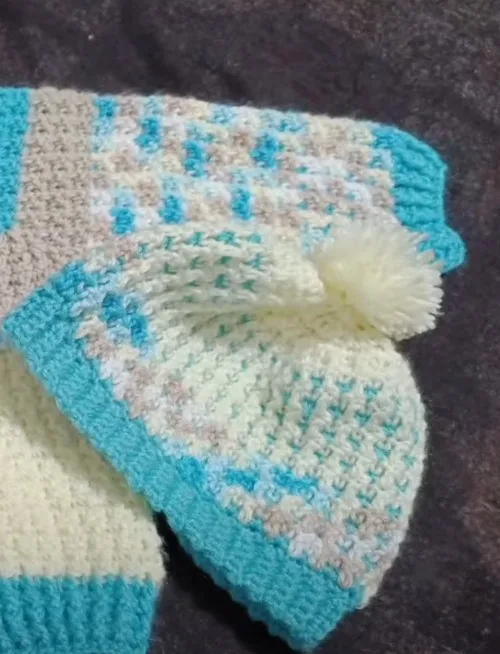
Variations

I adore this baby cap because it proves that simple stitches can create something truly special. Working the rib in the back loop only is one of those techniques that feels almost meditative once you get into the rhythm — chain, turn, single crochet, repeat — and watching that ribbed texture grow row by row is so satisfying. There's something magical about folding the finished strip and seaming it into a hat shape; it genuinely feels like a little bit of crochet trickery. I also love the chain-space brim round, which adds just enough decorative detail without adding difficulty. And don't even get me started on gathering that final hole closed and popping on a pom-pom — it's the moment the whole project suddenly looks like a real, adorable baby hat. This pattern is perfect for using up leftover DK-weight yarn, and because it works up quickly with a small 3mm hook, it's an easy way to squeeze in a meaningful handmade gift even on a tight timeline. It's simple, quick, and endlessly giftable.

Common mistakes

  • Crocheting into both loops instead of the back loop only during the ribbed rows.Always insert your hook under just the back loop for every stitch in the rib section — this is what creates the raised ridge texture that defines this pattern.
  • Losing track of the total row count while working the long ribbed strip.Use a row counter or make a small tick mark every ten rows so you can accurately reach the 72-row total needed before seaming.
  • Seaming the rib ends together with the wrong sides misaligned.Before joining, lay the strip flat and double check the starting chain edge lines up evenly with the final row edge so the cap forms a smooth, even circle.
  • Skipping stitches unevenly in the chain-space brim round.Keep the chain-1, skip-1, single crochet pattern consistent all the way around so the decorative edge stays even and doesn't pucker.
  • Pulling the gathering tail too tight or too loose when closing the top hole.Thread through all remaining chains first, then pull gradually and evenly so the hole closes into a neat, flat point rather than a bunched or gaping center.

The pattern

Written out round by round

Materials

  • 3 mm crochet hook

Abbreviations

  • ch = chain
  • sc = single crochet
  • dc = double crochet
  • sl st = slip stitch

Main Pattern

Always join a new color with a slip stitch.

If changing colors every two rows, leave the yarn on the wrong side.

For every row color change, leave the yarn on the back side.

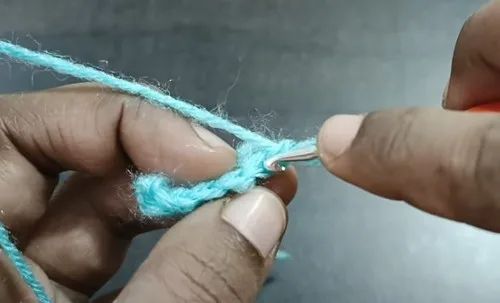
  1. Round 1Chain 5 (adjust to 4, 6, or 7 chains for a wider or narrower rib), chain 1 extra. Starting from the second chain from the hook, single crochet in each chain across. (5 sc)
  2. Round 272 Chain 1, turn. Skip the chain just made, single crochet into the back loop only in the next chain, then continue single crochet in the back loop only for the remaining stitches in the row. Repeat (chain 1, turn, single crochet in back loops) for 72 rows total, reaching 14 to 14.5 inches in length.
  3. Round 73Chain 1. Fold the rib, aligning the last row with the starting chain. Insert the hook into the first chain of the last row and the corresponding back loop of the first chain of the starting row. Join with a slip stitch and continue to join the remaining stitches with slip stitches. Chain 1 after the last slip stitch to secure the join.
  4. Round 74Work along the edge of the rib, single crochet in each raised and recessed section. (72 sc) Join with a slip stitch to the first single crochet.
  5. Round 75Chain 1. In the same chain where you slip-stitched, make 1 single crochet. Chain 1, skip the next chain, single crochet in the following chain. Repeat (chain 1, skip 1 chain, single crochet in next) around. Join with a slip stitch to the first single crochet.
  6. Round 76Turn. Chain 1. In the same chain where you slip-stitched, make 1 single crochet. Yarn over and double crochet in the chain space below. Single crochet in the next single crochet stitch. Double crochet in the next chain space below. Repeat (single crochet, double crochet) around. Join with a slip stitch to the first single crochet.
  7. Round 77onward: Turn. Chain 1, repeat (chain 1, skip 1 stitch, single crochet in next stitch) around. Join with a slip stitch, changing colors as described. Repeat the pattern rounds (single crochet/chain and double crochet/single crochet) until the cap measures 6 inches in height.Decrease Round 1: Combine every 7th and 8th stitch (single crochet and double crochet) around.Decrease Round 2: Combine every 6th and 7th stitch around.Decrease Round 3: Combine every 5th and 6th stitch around.Repeat this decrease pattern until you reach the top of the cap.

Assembly

Step 1

Once the cap reaches 6 inches, there will be a small hole at the top.

Step 2

Cut the yarn, leaving a long tail.

Step 3

Thread the tail through each of the remaining 9 chains around the hole.

Step 4

Pull the tail to close the hole.

Step 5

Secure by tying 2-3 knots with the yarn tail.

Step 6

Attach a pom-pom to the top using a hand needle.

Step 7

Weave in and trim any remaining yarn ends.

Important notes

Work a small tension swatch first with your 3mm hook to make sure your ribbed strip is stretchy enough to comfortably fit around a newborn head before committing to all 72 rows.

Keep your stitch tension consistent throughout the rib — since this section determines the cap's finished length and stretch, uneven tension can make the hat too tight or too loose.

When folding the strip to seam the ends, take your time aligning the first and last rows exactly so the ribbing pattern flows continuously around the cap without a visible break.

If changing colors, always leave a few inches of tail and join new colors with a slip stitch as specified, which keeps color transitions clean and secure.

Use a yarn needle rather than hook when threading through the final chains around the top hole, as it gives you more control for an even, secure gather.

Weave in all ends securely and trim them close, especially near the seam and gathered top, since these areas see the most handling and stretching when the cap is worn.

More photos

Easy Crochet Baby Cap Pattern for Newborns 0-6 Months — photo 2
Easy Crochet Baby Cap Pattern for Newborns 0-6 Months — photo 3
FAQs

Frequently asked questions

What size baby head does this cap fit?

This pattern is designed for babies 0-6 months, using the ribbed strip's natural stretch to accommodate typical newborn to six-month head sizes. If you want a snugger or looser fit, adjust the starting chain count as suggested in the pattern.

Do I need to know how to seam crochet pieces together?

Yes, but it's a simple slip stitch seam, not complex sewing. You'll fold the finished rib strip and join the edges with slip stitches, which is beginner-friendly once you've practiced a few stitches.

Can I make this cap without a pom-pom?

Absolutely — the pom-pom is a lovely finishing touch but entirely optional. You can leave the gathered top plain, add a small fabric bow, or top it with a tiny crochet flower instead.

Why does the pattern say to work in the back loop only?

Working in the back loop only creates the raised, ribbed texture that gives this cap its signature stretchy, textured look. Skipping this step would result in a flat, less elastic fabric that fits differently.

How long does this baby cap take to make?

Most crocheters can complete this cap in about 2 to 3 hours of relaxed crocheting, spread across a couple of sittings. The long ribbed section works up quickly once you find your rhythm.

One at a time —

Get the next pattern

Tested round by round before it is sent. No spam.