Made and counted by Wren —

Cute Crochet Baby Fish Amigurumi Pattern

Make an adorable crochet baby fish amigurumi with easy color-change scales, safety eyes, and cute little fins—perfect for beginners to intermediates.

IntermediateLevel
4-6 HoursTime
4 mmHook
WorstedYarn
Jump to the pattern

At a glance

Start the head and body with a magic ring and work five rounds, increasing to shape the rounded head and body.

Pause between rounds 3 and 4 to insert the 4mm safety eyes, folding the piece in half to line them up evenly.

Snap the safety eye backings in place once you've confirmed the eyes sit directly opposite each other.

Shape the tapered end of the fish with four decreasing rounds until the opening is small.

Stuff the body firmly as you go, adding more fill before the opening closes completely.

Pinch the last opening shut and join it with three single crochets through both layers.

Add a new color and work each tail fin separately with a chain of 4, then sc, hdc, and dc up the chain, slip stitching to join and fastening off.

Add the pectoral fin by lining up with the eye, slip stitching under the first row of scales, then chaining 3 and slip stitching back into the same stitch before fastening off.

Finish with the dorsal fin on top of the body: slip stitch under the second round of scales, then work a sc, hdc, and sc into consecutive stitches before fastening off.

About this pattern

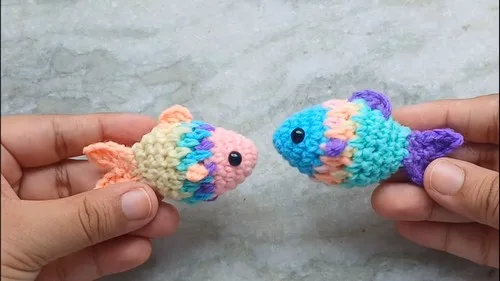
This little crochet baby fish amigurumi is the kind of quick, joyful make that turns a ball of yarn into a personality in just a few hours. Worked in the round from a simple head-and-body shape, it's finished off with playful scale color changes and a set of fins—two tail fins plus a pectoral fin and a dorsal fin—that give it real character. It's perfect for anyone who loves ocean-themed nursery decor, wants a cute shelf buddy, or is looking for a fast, satisfying gift project.

The finished fish is small, round, and huggable, with a glossy safety-eyed face and fins that give it motion and charm even sitting still. It has that irresistible amigurumi squish, ideal for tiny hands or a plush addition to a nursery shelf. Because it works up quickly and uses minimal yarn, it's a wonderful last-minute gift for a baby shower, a birthday, or just because—everyone who sees it wants one of their own.

Variations

This little fish is endlessly customizable, so don't be afraid to make it your own. For a rainbow reef vibe, use a different bright color for every scale round—think coral, turquoise, and sunshine yellow worked in worsted weight cotton like Lily Sugar'n Cream or With Love for a soft, washable finish. Want a more realistic goldfish? Stick to warm oranges and golds with a cream belly panel worked into the color changes. For a boy or gender-neutral nursery, try navy and mint, or a soft grey-and-white 'shark cousin' palette. If you'd like a mini version to make a whole school of fish, drop down to a DK weight yarn and a smaller hook—just know your rounds will finish smaller and quicker, so keep an eye on your decrease rounds so the body doesn't collapse too early. Conversely, sizing up to a chunky yarn and a larger hook creates a squishier, huggable jumbo fish, great for a keepsake pillow-sized toy (just add extra stuffing to keep the shape firm). Consider embroidering simple stripe or dot details onto the scale rounds with a contrasting strand of yarn for extra texture. Swap the safety eyes for embroidered French knot eyes if you're gifting to a very young baby where safety eyes aren't appropriate. You can also experiment with the fins—try adding an extra dorsal fin along the back or a second pectoral fin on the other side using the same joining technique for an even more fish-like silhouette. A sparkly metallic-blend yarn for the top scales instantly turns this into a magical 'mermaid fish' variation kids love.

I adore this pattern because it packs so much charm into such a small project. The color-change scales are genuinely satisfying to work—watching the new color emerge round by round feels like magic, and it's such a gentle way to practice clean color transitions without any complicated colorwork charts. Placing the 4mm safety eyes between rounds 3 and 4 and folding the piece to line them up perfectly is one of my favorite amigurumi moments; it's the second the fish actually starts looking back at you. The fins are a fun finishing touch too—the tail fins are just a chain of 4, a slip stitch, a sc, hdc, and dc worked up the chain, and then a quick pectoral fin and dorsal fin are joined straight into the scale rounds, and suddenly your fish has movement and personality. The decrease rounds at the end round everything off into that classic plump fish body that begs to be squeezed. It's quick enough to finish in a weekend, but detailed enough that you feel like you actually leveled up your amigurumi skills by the end. Honestly, there's nothing like pinching that last opening closed with 3 single crochets and watching a little face come together in your hands.
Common mistakes

  • Placing the safety eyes too earlyInsert the eyes loosely first, then fold the piece in half exactly at rounds 3-4 to confirm they land directly opposite each other before snapping on the backing—this step is reversible only before the backing is attached.
  • Leaving loose ends danglingWeave in each color change tail immediately along the inside of the next few stitches so you're not left with a tangled mess of ends to sew in at the very end.
  • Rushing the final decrease roundsStitch marker your first stitch of each decrease round and count carefully—decreases worked in the wrong spot will pull the shape lopsided instead of tapering evenly.
  • Under-stuffing the body before closing it up.Stuff firmly in small handfuls as you go rather than trying to cram it all in at the end, checking that the fish holds its round shape when you press gently on the sides.
  • Making the fin chains too looseChain the foundation 4 fairly snugly and work your first stitch into the second chain from the hook with a firm tension so the fin holds a nice triangular shape.
  • Forgetting to skip the first chain when starting each fin.Double-check you're skipping the first chain from the hook on both the first and second fin—skipping the wrong chain will throw off your stitch count and make the fin uneven.

The pattern

Written out round by round

Materials

  • Worsted weight yarn in multiple colors (for the body and color-change scales)
  • Crochet hook (size to suit your yarn)
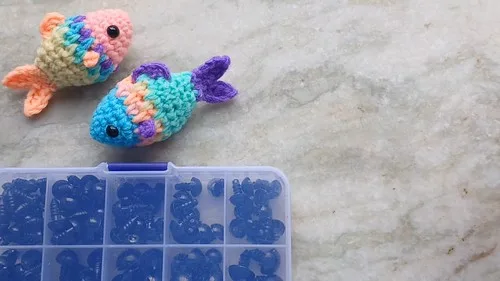
  • 4mm safety eyes
  • Polyester fiberfill stuffing
  • Yarn needle for weaving in ends
  • Scissors

Abbreviations

  • sc = single crochet
  • hdc = half double crochet
  • dc = double crochet

Head and Body

Create a magic circle .

  1. Round 1Make 6 single crochets (sc) into the magic circle. You'll have 6 stitches.
  2. Round 2(1 sc, 1 increase) repeat 3 times. You'll have 9 stitches.
  3. Round 3(1 sc in the next 2 stitches, 1 increase) repeat 3 times. You'll have 12 stitches.
  4. Round 4(1 sc in the next 3 stitches, 1 increase) repeat 3 times. You'll have 15 stitches.
  5. Round 5(1 sc in the next 4 stitches, 1 increase) repeat 3 times. You'll have 18 stitches.

Adding Eyes

Place the 4mm safety eyes between rounds 3 and 4.

Fold the piece in half to position the eyes directly opposite each other.

Secure the eyes with the safety backing.

Scales (Color Change)

  1. Round 6Change to a new color. (Chain 1, skip 1 stitch, 1 sc in the next stitch) repeat all the way around. You'll have 9 sc.
  2. Round 7Change to a new color. (Chain 1, skip the next sc, 1 sc into the sc from round 5) repeat 9 times.
  3. Round 8Change to a new color. (Chain 1, skip the next stitch, 1 sc into the sc from round 6) repeat 9 times.
  4. Round 9Change to a new color. Make 1 sc into every stitch from rounds 7 and 8. You'll have 18 sc.

Decreasing

  1. Round 10(1 sc in the next 4 stitches, 1 invisible decrease) repeat 3 times. You'll have 15 stitches.
  2. Round 11(1 sc in the next 3 stitches, 1 invisible decrease) repeat 3 times. You'll have 12 stitches.
  3. Round 12(1 sc in the next 2 stitches, 1 invisible decrease) repeat 3 times. You'll have 9 stitches.Stuff the body at this point.
  4. Round 13(1 sc, 1 invisible decrease) repeat 3 times. You'll have 6 stitches. Chain 1 and fasten off, leaving a long tail for weaving.

Tail Fins

Bring in a new color and make a slip knot.

  1. Closing StitchPinch the opening closed and make 3 sc through the pairs of stitches.
  2. First FinFirst fin: Chain 4. Skip the first chain from the hook. Make 1 sc, 1 half double crochet (hdc), and 1 double crochet (dc) in the following chains.Slip stitch into the next stitch to join.
  3. Second FinSecond fin: Chain 4. Skip the first chain from the hook. Make 1 sc, 1 hdc, and 1 dc in the following chains.Slip stitch into the next stitch to join.Cut the yarn and fasten off.

Pectoral Fins

Bring in the same color as the tail.

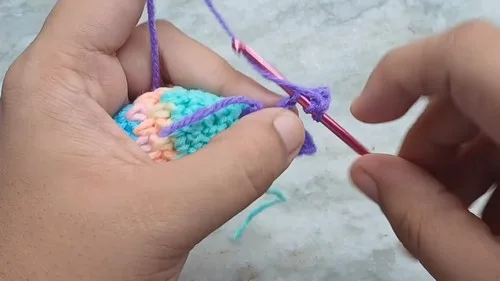
Lining up with the eye, make a slip stitch under the first row of scales to join the yarn.

  1. Pectoral FinChain 3 and slip stitch back into the same stitch.Cut the yarn and fasten off.

Dorsal Fin

Bring in the same color as the tail.

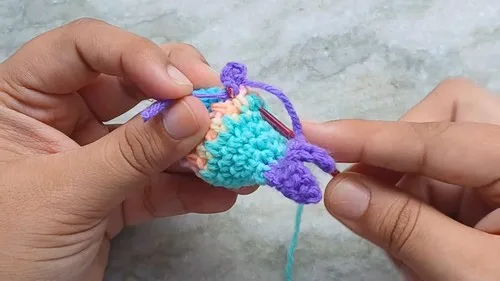
On the top of the body, make a slip stitch under the second round of scales to join the yarn.

  1. Dorsal FinIn the same stitch, make a single crochet. In the next stitch, make a half double crochet. In the next stitch, make a single crochet.Cut the yarn and fasten off.

Important notes

💡 Use a hook one size smaller than the yarn label suggests to keep your stitches tight enough that stuffing won't peek through the amigurumi fabric.

💡 Mark the start of every round with a stitch marker and move it up each round—this is essential for keeping track of exactly where round 3-4 falls for eye placement.

💡 When bringing in a new color for the scales, drop the old color to the inside of the work and pick it back up later rather than cutting it, if you'll reuse it—saves ends to weave in.

💡 Fold the piece in half carefully before securing the safety eye backings, since once they're snapped on they cannot be repositioned.

💡 Stuff a little more firmly around the head area than the body so the face keeps its shape once the eyes are in place.

💡 Keep your 3 single crochets through the pinched-closed opening nice and tight to fully seal the seam before starting the fins.

More photos

Cute Crochet Baby Fish Amigurumi Pattern — photo 2
Cute Crochet Baby Fish Amigurumi Pattern — photo 3
Cute Crochet Baby Fish Amigurumi Pattern — photo 4
FAQs

Frequently asked questions

What size safety eyes does this pattern use?

This pattern calls for 4mm safety eyes, placed between rounds 3 and 4 of the head and body. Fold the piece in half first to make sure they sit directly opposite each other before securing the backing.

How many fins does the baby fish have?

The fish gets four fin pieces total: two matching tail fins made with a chain of 4 worked in sc, hdc, and dc, plus a small pectoral fin joined near the eye with a chain-3 loop, and a dorsal fin along the top of the body made with a sc, hdc, and sc into consecutive stitches.

What yarn weight works best for this pattern?

A worsted weight cotton or acrylic yarn works beautifully for this amigurumi, giving good stitch definition for the scale color changes. Cotton yarn is especially nice for baby-safe toys since it's soft and easy to wash.

Can I skip the safety eyes for a baby-safe version?

Yes, if you're gifting this to a very young child, you can embroider simple eyes with yarn instead of using safety eyes. Just use the same rounds 3-4 placement guide for positioning your embroidered eyes symmetrically.

One at a time —

Get the next pattern

Tested round by round before it is sent. No spam.