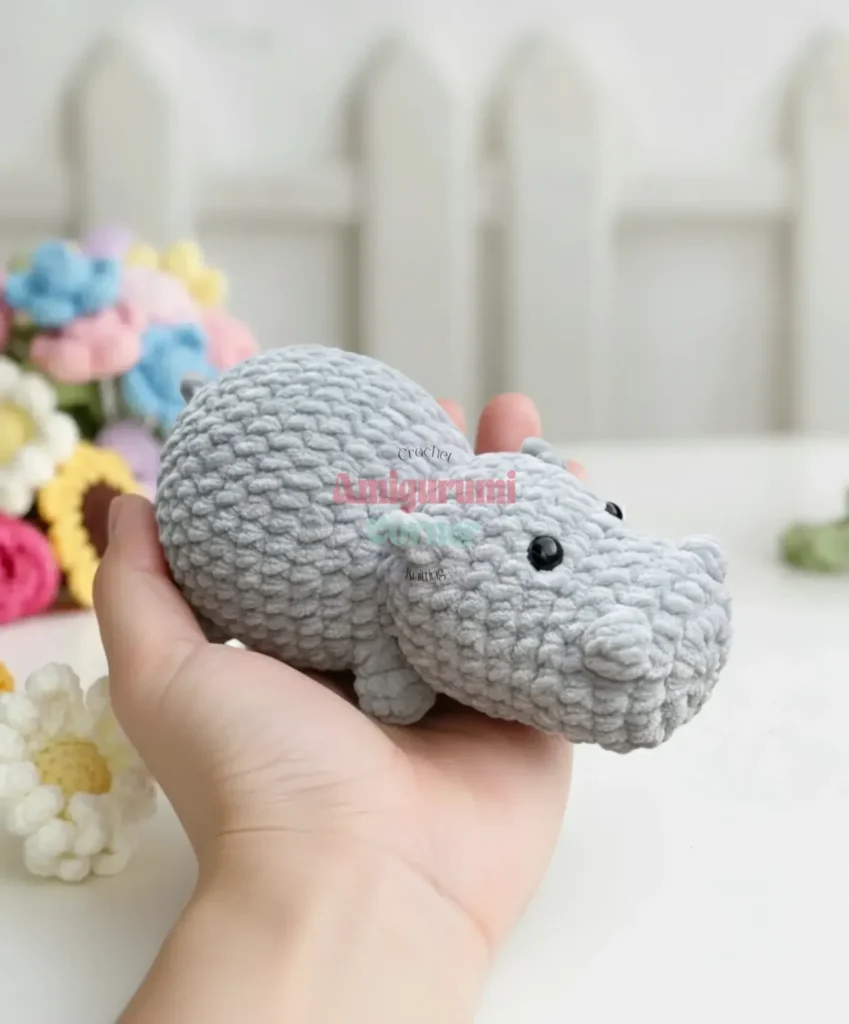
Made and counted by Wren —

Crocheting Happy the Hippo: a no-sew amigurumi guide

6.0mm hook, chunky double weight yarn: one-piece amigurumi hippo, no sewing required.

Crocheting Happy the Hippo: a no-sew amigurumi guide
BeginnerLevel
4-6 hoursTime
6.0 mmHook
ChunkyYarn
Jump to the pattern

About this pattern

Happy the Hippo is a no-sew amigurumi worked in one continuous spiral piece covering head and body, built on a 6.0mm (US J/10) hook with 100-150 yards of chunky double weight yarn in silver grey. The Head to Body section totals 24 rounds, shaped with increases and 3-DC bobble stitches, then stuffed with 2-3 oz of polyester fiberfill and closed using a 12-inch tail before 8mm safety eyes are set.

Happy the Hippo is a one-piece amigurumi body built head-to-toe in continuous spiral, no separate head seam required. The Head to Body section runs 24 rounds on a 6.0mm hook with chunky double weight yarn, increasing from 8 stitches in Round 1 to a tightly worked silhouette shaped later by decreases. Stuff with 2-3 oz (57-85 g) of polyester fiberfill as you go; the stitch count after Round 3 — 24 — sets the base circumference every later round is measured against.

The pattern

Written out round by round

Materials

Yarn

  • Chunky Double weight yarn in Silver Grey, approximately 100–150 yards (91–137 m)

Hook

  • 6.0mm (US J/10)

Safety Eyes

  • 8mm, black, 1 pair

Stuffing

  • Polyester fiberfill, approximately 2–3 oz (57–85 g)

Stitch Marker

  • any style, to track the spiral

Tapestry Needle

  • for weaving in ends

Scissors

  • sharp fabric scissors for trimming yarn

Abbreviations

  • BO = Bobble Stitch
  • ch = Chain
  • dc = Double Crochet
  • dec = Decrease (single crochet 2 together)
  • FO = Fasten Off
  • inc = Increase (2 sc in same stitch)
  • mr = Magic Ring
  • rnd(s) = Round(s)
  • sc = Single Crochet
  • sl st = Slip Stitch
  • st(s) = Stitch(es)
  • x = Times (multiplier)

Head to Body

Round 18 sc in mr. (8)
Round 2inc in each st around. (16)
Round 3[(2 sc, 4 inc, 2 sc)] twice. (24)
Round 48 sc, work 3-DC BO in next st, 6 sc, work 3-DC BO in next st, 8 sc. (24)
Round 524 sc. (24)
Round 65 sc, dec, 11 sc, dec, 4 sc. (22)
Round 78 sc, [inc] 3 times, sc, [inc] 3 times, 7 sc. (28)
Rounds 8–928 sc. (28)
Round 10Ear Round 10 sc, make first ear as follows: sc in next st, ch 3, sl st in 2nd ch from hook, sc in last ch, sc back into same st where ear chain began; 7 sc, make second ear in same manner; 9 sc to end of round. (30)
Round 1130 sc (working 2 sc into each ear section). (30)Insert 8mm safety eyes between Rounds 7 and 8, with 4 visible stitches between them. Secure the backs firmly, then begin stuffing the head.
Round 12[3 sc, dec] 6 times. (24)
Round 13[dec, sc] 8 times. (16)
Round 14[sc, inc] 8 times. (24)
Round 15[inc, 2 sc] 8 times. (32)
Round 163 sc, work 4-DC BO in next st, 24 sc, work 4-DC BO in next st, 3 sc. (32)
Round 178 sc, [inc, sc] 8 times, 8 sc. (40)
Rounds 18–2240 sc. (40)
Round 238 sc, [dec, sc] 8 times, 8 sc. (32)
Round 243 sc, work 4-DC BO in next st, 24 sc, work 4-DC BO in next st, 3 sc. (32)
Round 25[2 sc, dec] 8 times. (24)
Round 26Tail Round 12 sc, make tail as follows: sc in next st, ch 3, sl st in 2nd ch from hook, sc in last ch, sc into next st; 10 sc to end of round. (24)Begin stuffing the body firmly at this point, continuing to add stuffing as the rounds close in.
Round 27[2 sc, dec] 6 times. (18)
Round 28[sc, dec] 6 times. (12)
Round 29[dec] 6 times. (6)Fasten off after Round 29, leaving a 12-inch (30 cm) tail for closing the opening.

Assembly

Step 1After completing Round 29, finish stuffing the body firmly so the hippo can sit upright, making sure the head and body are evenly shaped with no lumps or gaps.
Step 2Thread the 12-inch (30 cm) tail onto your tapestry needle and weave it through the remaining 6 stitches of Round 29.
Step 3Pull the tail tight to cinch the opening closed completely, then pass the needle through the closure once more to secure it.
Step 4Weave the tail securely through several stitches on the inside of the piece and trim the excess close to the fabric.
Step 5Weave in any remaining yarn ends from the start of your project, again working through the inside of the piece so nothing shows on the surface.
Step 6Gently shape the hippo by hand, positioning the ears and easing the bobble stitches on the snout and back so they sit forward and read clearly.
Step 7If desired, embroider a small smile in Silver Grey or a contrasting yarn, or lightly brush the surface of the yarn for a softer texture.

Tester's notes

6.0mm (US J/10) is the only hook size given; sizing down tightens stitches so stuffing stays hidden, sizing up risks fiberfill showing through the fabric.

8 stitches open Round 1 in the magic ring; pull the ring closed fully before starting Round 2's increases, or the center hole stays visible.

24 is the stitch count locked in after Round 3; place a stitch marker in the last stitch of every round from here on, since the piece is worked in continuous spiral with no joins.

2-3 oz (57-85 g) of polyester fiberfill is the working range; add it in small amounts as rounds close rather than all at once, so the shape stays even without lumps.

12-inch (30 cm) is the tail length left for closing Round 29; leave it long when cutting, since a short tail cannot cinch the last 6 stitches closed.

This pattern is written in US crochet terminology.

Finished size: with the yarn and hook listed, the completed hippo measures about 6 inches tall and 4.5 inches wide.

At a glance

Rounds24
LevelBeginner
Time4-6 hours
Hook6.0 mm
YarnChunky

Gauge check

After Round 3, count stitches around the piece; the total should read 24, matching the count the pattern gives for that round.

If the count is off, the fabric will either gap open or pull too tight before fiberfill is added, so unravel back to Round 1 and recheck each increase round rather than continuing forward.

Stitch-count checkpoints

  • Head to Body · Rounds 8–9: 28 sts
  • Head to Body · Round 17: 40 sts
  • Head to Body · Round 29: 6 sts

If something looks wrong

The opening at the top won't cinch
The 12-inch (30 cm) tail is too short to weave through all 6 remaining stitches twice; leave extra length when cutting yarn before starting the closure.
The piece looks lumpy or uneven once stuffed.
Fiberfill went in as one large handful instead of gradually; remove some, redistribute in smaller amounts across the 2-3 oz (57-85 g) total, and check for gaps before closing the round.
Stitch count drifts away from the 24 set at Round 3.
The stitch marker wasn't moved to the last stitch of the round; since rounds are continuous with no join, recount back from Round 1 and re-mark each round as it finishes.
The 3-DC bobble clusters in Round 4
The bobble was worked too loosely; tighten the first loop of each double crochet in the cluster before closing it off, keeping tension matched to the 6.0mm hook.

Yarn substitutions

Acrylic, chunky double weightClosest match to the 100-150 yard silver grey original; keeps the 6.0mm hook unchanged and hides the 2-3 oz (57-85 g) fiberfill the same way.
Cotton, worsted weightThinner than the chunky double weight called for, so stitches need to stay tighter; drop a hook size down from the 6.0mm given, and expect to use more than the 150-yard upper estimate to cover the same 24 rounds.
Wool-blend, bulky weightThicker than the chunky double weight in the pattern, so fewer of the 100-150 yards are needed for the same 24 rounds; size the hook up from the 6.0mm given, and watch that the looser fabric doesn't let the 2-3 oz (57-85 g) fiberfill show through.
FAQs

Questions

Do I need to sew any pieces together for this pattern?

No. Happy the Hippo is worked in one continuous piece from head to body, with the ears and tail crocheted directly into the rounds. Once you fasten off and close the final opening, your hippo is complete with no separate seaming required.

What hook and yarn does this pattern need?

A 6.0mm (US J/10) hook and chunky double weight yarn in silver grey, roughly 100-150 yards (91-137 m), complete the Head to Body piece. No swatch gauge is specified, but stitches should stay tight enough that the 2-3 oz (57-85 g) of fiberfill inside doesn't show through. The finished hippo measures about 6 inches tall and 4.5 inches wide.

When do I attach the safety eyes?

Insert the 8mm safety eyes between Rounds 7 and 8, leaving 4 visible stitches between them for correct spacing. Secure the backs firmly before you begin stuffing the head, since the eyes are much harder to adjust once stuffing is in place.

Why use a stitch marker if the rounds are continuous?

The pattern is worked in continuous spiral without joining each round, so there's no slip stitch marking the start point. A stitch marker placed in the last stitch of every round is the only way to keep the count accurate through the increases and bobble clusters.

How many rounds make up Happy the Hippo's body?

The Head to Body piece shapes up fast: Round 1 opens at 8 stitches, Round 2 doubles to 16, and Round 3 reaches 24, which holds through the bobble work in Round 4. Assembly closes the piece at Round 29, cinching the final 6 stitches with the 12-inch (30 cm) tail.

One at a time —

Get the next pattern

Tested round by round before it is sent. No spam.