Made and counted by Wren —

Crochet Symbols, Directions & Abbreviations: A Beginner’s Reading Guide

Learn to read crochet symbols, directions, and abbreviations with this clear guide plus a simple practice pattern to build real confidence fast.

BeginnerLevel
1-2 HoursTime
WorstedYarn
Jump to the pattern

At a glance

Read through the full guide once, including both the Main Pattern and Part 2, before picking up your hook.

Gather a smooth worsted weight yarn and a hook sized comfortably for it to start your practice swatch.

Start the Main Pattern's foundation and place a stitch marker in the very first stitch you make.

Work through the Main Pattern's two rows, checking your stitch count against the pattern at the end of each one.

Move your stitch marker up each round so you never lose track of where a new round begins.

Continue into Part 2, watching closely for any increase or decrease symbols as you work its two rounds.

Jot quick notes about anything confusing or any changes you made as you go along.

Finish both parts, then compare your final stitch counts to the pattern to confirm you read everything correctly.

About this pattern

This isn't your typical amigurumi or wearable pattern — it's a hands-on guide that teaches you how to actually read crochet patterns, symbols, and abbreviations so every future project feels less intimidating. Instead of just handing you rounds to follow blindly, this piece walks you through the logic behind the shorthand, then gives you a small practice pattern (Main Pattern plus Part 2, two rounds each) to apply what you've learned. It's perfect for brand-new crocheters staring at their first pattern in confusion, or anyone who's been winging it for years and finally wants the code cracked.

The key skill here is translation — turning cryptic strings like 'sc, inc, rep* to end' into stitches your hands actually know how to make. You'll practice identifying the foundation chain, tracking stitch counts round by round, and spotting increase and decrease cues before they trip you up mid-project. This is true beginner territory, no fancy stitchwork required, and most crocheters can work through the full guide plus the two-round practice pattern in about an hour or two, swatch included.

the end, you'll have a small worked swatch in hand and, more importantly, a mental toolkit for approaching any pattern with confidence instead of dread. There's no dramatic finished object to gift here — the real 'finished result' is you, no longer needing to pause every three seconds to Google what 'sk' or 'FLO' means. Consider it the most useful five inches of practice crochet you'll ever make, and a gift to your future self on every project after this one.

Variations

Once you've worked through the Main Pattern and Part 2 with a standard worsted weight yarn and your everyday hook, try repeating the practice with a totally different yarn weight — a fine sport weight from Cascade Yarns or a chunky bulky Wool-Ease Thick & Quick — just to see how the same abbreviations behave differently at different gauges. It's a great way to prove to yourself that 'sc, inc, rep' means the same thing no matter the yarn in your hands. If you want a color-focused variation, work each of the two rounds in a contrasting color so you can visually see exactly where round one ends and round two begins; this is a fantastic trick for beginners who struggle to spot their round markers. For a seasonal spin, swap in a soft variegated yarn in autumn tones or icy winter blues just to keep the practice swatch pretty enough to keep as a coaster or mug rug rather than tossing it in your scrap bin. If you're teaching a friend or child to crochet, slow the whole guide down: write each abbreviation on an index card, work the stitch it represents, then flip to the next card — it turns the reference into a game. Left-handed crocheters can use this same guide by simply mirroring each direction as they read it, and it's worth writing your own left-hand notes in the margins as you go, since you'll want that reference again. Advanced beginners can challenge themselves by covering the written-out instructions after the first read-through and re-working the two rounds from the abbreviations alone, testing how much they've actually retained. However you adapt it, the goal is repetition — the more small swatches you make while consciously reading the shorthand, the faster it becomes second nature on real projects.

I remember the exact moment pattern abbreviations stopped looking like alphabet soup to me, and I wanted to bottle that feeling into this guide. What I love about walking through the Main Pattern and Part 2 together is that it's low-stakes — just two rounds each, so you're not committing to hours of stitching before you know if you've understood the system. You get to actually practice using a stitch marker to track your round beginnings, which sounds small but saves SO much frustration later when you're not counting from scratch every time you lose your place. There's something deeply satisfying about watching your stitch count match the pattern's stated number round after round — it's like a little proof-of-competency moment. I also love that this teaches you to watch for increases and decreases as you go, rather than discovering three rows later that your project has mysteriously grown a wonky edge. Keeping notes as you work through it is a habit I still use on every single pattern I write, and I promise it'll save you real time. This guide is short, but what you walk away with sticks with you forever.
Common mistakes

  • Skipping the initial read-throughRead the entire pattern, including Part 2, before picking up your hook — this catches confusing abbreviations or stitch counts early, before they turn into a frogged round.
  • Losing track of where the round beginsPlace a stitch marker in the very first stitch of each round the moment you make it, and move it up as you complete each new round — never rely on memory alone.
  • Misreading an increase (inc)Count your stitches at the end of every round and compare against the pattern's stated total; if it doesn't match, backtrack to find the missed increase before continuing.
  • Not distinguishingKeep an abbreviations key open beside your work until the terms feel automatic, and say each stitch name aloud as you work it to reinforce the connection.
  • Forgetting to jot down notesKeep a small notebook or notes app open while you work through the Main Pattern and Part 2, jotting quick notes like 'used sport weight, tighter gauge' for future reference.
  • Practicing the pattern onceRework the two rounds a second time without looking at the written-out instructions, using only the abbreviations, to genuinely test your retention.

The pattern

Written out round by round

Materials

  • Worsted weight yarn
  • Crochet hook (size to suit your yarn)
  • Stitch marker (to mark the beginning of your rounds)
  • Notebook or notes app (for jotting down changes or notes as you work)

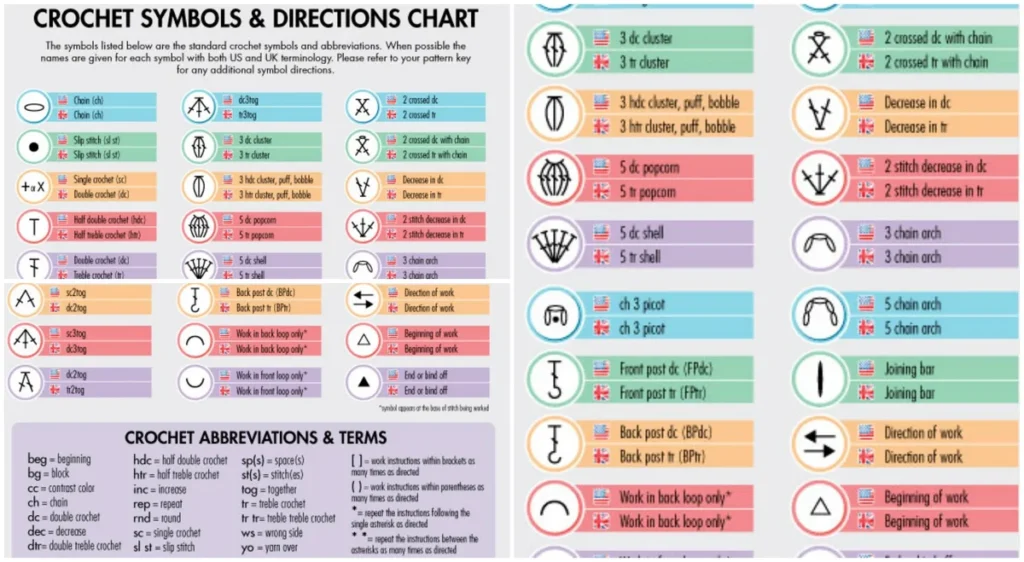
Abbreviations

  • ch = Chain
  • sl st = Slip Stitch
  • sc = Single Crochet
  • hdc = Half Double Crochet
  • dc = Double Crochet
  • tr = Triple Crochet
  • inc = Increase
  • dec = Decrease
  • yo = Yarn Over
  • cl = Cluster
  • shell = Shell Stitch
  • picot = Picot
  • rnd = Round
  • rep = Repeat
  • beg = Beginning
  • end = End
  • st = Stitch

Basic Scarf Pattern

Foundation Ch 30.

  1. Row 1Sc in 2nd ch from hook, sc across. (29 sc )Reading Tip Follow the Stitch Count: Pay close attention to the number of stitches indicated in each row or round to maintain the correct shape.
  2. Row 2Ch 1, turn. Sc across. Repeat Row 2 until desired length.

Reading Tip Look for Repeats: Patterns often include sections that should be repeated. This will help you keep track of your progress.

Granny Square Pattern

Reading Tip Start with the Foundation: Most patterns will begin with a foundation chain, followed by instructions for the first row or round.

  1. Round 1Ch 4 , join to form a ring. Ch 3 , 2 dc in ring, ch 2 , * 3 dc in ring, ch 2 ; repeat from * 2 more times. Join with sl st.Reading Tip Watch for Increases and Decreases: These will often be indicated within the pattern instructions, and it's essential to follow them for shaping your project.
  2. Round 2Ch 3 , 2 dc in same sp , ch 2 , 3 dc in next ch 2 sp ; repeat around. Join.

Reading Tip Take your time to read through the entire pattern before starting. Familiarizing yourself with the instructions can prevent confusion later on.

Important notes

💡 Use a smooth, light-colored worsted weight yarn for your practice swatch — it makes every stitch definition easy to see, which matters far more here than in a finished project.

💡 Choose a hook size on the larger side of the range recommended for worsted weight (like a 5.0mm/H-8) so your stitches stay loose and easy to identify while you're still learning to read the pattern.

💡 Place your stitch marker in a contrasting color from your working yarn so it's impossible to lose track of your round's starting point.

💡 Don't stuff or block this practice piece — keep it flat and unfinished so you can easily unravel and rework rounds as many times as you need while practicing.

💡 If a term stumps you mid-round, pause and look it up rather than guessing; guessing wrong here creates a habit that's much harder to unlearn later.

💡 Work through the Main Pattern and Part 2 in one sitting if you can — the abbreviations stick much better with continuous practice than if you spread it across several days.

💡 Practice: If you're new to crochet, practice each stitch and technique on a small swatch before starting your project.

FAQs

Frequently asked questions

Do I need to know any stitches before starting this guide?

Just the basics — chain stitch and single crochet will get you through both rounds of the practice pattern. Everything else is explained as you go through the symbols and abbreviations.

Why does the practice pattern only have two rounds?

Two rounds is enough to see a foundation chain, a full round, an increase or two, and a stitch count check — all without overwhelming a first-time reader. It's meant to be a quick, low-pressure trial run.

What if my stitch count doesn't match the pattern after round one?

Stop and recount before moving to round two — it's much easier to fix one round than to unravel two. Check for a skipped increase or an extra stitch worked accidentally into the same space.

Can I use this guide for patterns written with US crochet symbols only, or does it cover UK terms too?

This guide focuses on US crochet terminology, which is the standard used throughout the pattern parts here. If you're working from a UK-written pattern, keep in mind terms like 'dc' mean something different, so always check which convention a pattern is using first.

Is keeping notes really necessary for such a short practice pattern?

Yes — even on two short rounds, jotting quick notes builds the habit you'll rely on for every pattern afterward. It only takes a few seconds and saves real confusion on longer, more complex projects.

One at a time —

Get the next pattern

Tested round by round before it is sent. No spam.