Made and counted by Wren —

Crochet Squirtle Amigurumi Pattern for Pokemon Fans

Make an adorable crochet Squirtle amigurumi with this detailed pattern covering shell, body, arms, legs and tail for Pokemon-loving crafters.

Crochet Squirtle Amigurumi Pattern for Pokemon Fans
IntermediateLevel
4-6 HoursTime
12 mmHook
WorstedYarn
Jump to the pattern

At a glance

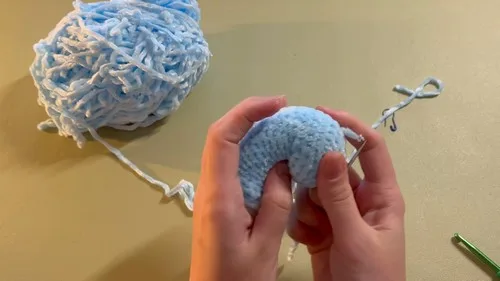
Start by crocheting the arms and legs as small stuffed tubes, making two of each to match later.

Work the head and body as one continuous piece, shaping it gradually through color changes from blue to beige.

Stuff the head and body firmly in sections as you go so the shape stays smooth and even throughout.

Crochet the shell separately, increasing steadily each round until it's wide enough to slip over the body.

Shape the curling tail with its own set of rounds, then stuff it lightly before setting it aside.

Attach the safety eyes to the head, testing placement before locking them in for the right expression.

Sew the shell, arms, legs, and tail onto the body, then add the blue felt shell details to finish.

About this pattern

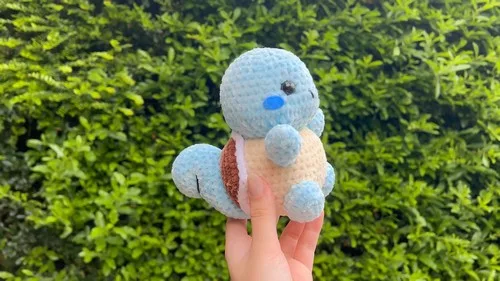
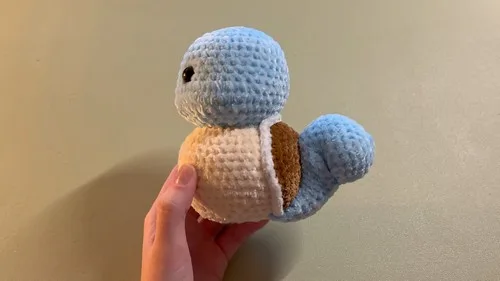
This pattern brings one of the most beloved Pokemon to life in soft, squeezable yarn form. Squirtle's signature blue body, cream belly, and rounded shell all come together through simple amigurumi shaping, making this a project that captures serious personality without requiring advanced skills. It's perfect for Pokemon fans who want a handmade collectible, parents crafting a gift for a young trainer, or anyone who loves working up a character piece with instantly recognizable charm.

You'll work primarily in single crochet, building the head and body as one continuous piece before adding a separately worked shell, plus arms, legs, and a curling tail. The shell involves a gradual increase pattern that grows wider each round until it's roomy enough to fit right over the body. Expect an intermediate-friendly experience — comfortable for confident beginners — with a total crafting time of about 4-6 hours depending on your stuffing and assembly pace.

The finished Squirtle sits at a classic amigurumi size, dense enough to hold its shape but soft enough for genuine cuddling. With 12mm safety eyes and a felt detail for the shell pattern, the final look is polished and shelf-ready, yet still approachable as a first character make. It's an ideal gift for birthdays, Pokemon-themed parties, or simply treating yourself to a nostalgic little friend.

Variations

Once you've got the basic Squirtle shape down, there's so much room to play. Try working the whole pattern in a pastel light blue with a soft pink shell for a 'Shiny Squirtle' variation, or swap in mint green and cream for an original color twist inspired by other water-type Pokemon. If you want a mini desk buddy version, drop down to a smaller weight yarn like DK with a matching smaller hook, and reduce your stitch counts proportionally on each round to shrink the finished size by about a third. For a bigger, huggable version perfect as a nursery decoration, size up to a bulky yarn such as Bernat Blanket or Wool-Ease Thick & Quick, adding an extra round or two of increases to each body section to keep proportions balanced. Yarn-wise, any worsted weight acrylic works beautifully — Super Saver in Aruba Sea or Turqua gives a great Squirtle blue, while Vanna's Choice in Linen or Beige is a lovely match for the belly. Feeling festive? Add a tiny knit or felt scarf for a winter-themed Squirtle, or swap the blue felt shell details for autumn oranges to make a 'leaf-type' seasonal mash-up. You could also experiment with embroidering a small heart or star onto the shell for a personalized touch, or attach a keychain clip to the top of the head instead of full stuffing for a bag-charm version. Don't be afraid to mix and match — amigurumi like this is endlessly customizable once you understand the basic shaping.

I adore how this Squirtle comes together almost like a puzzle — the head and body are worked as one continuous piece, so there's no separate assembly seam to fuss over, which keeps the shape so clean. Then the shell gets its own little project: watching it grow round by round with that steady increase pattern until it's just the right size to slip over the body feels incredibly satisfying, like solving a tiny math problem with yarn. The tail curls up with such personality, and adding the 12mm safety eyes is always my favorite moment because that's when Squirtle suddenly looks back at you. I also love that the white border row worked into only the front loops gives the shell edge this crisp, defined pop that really sells the illustrated-character look. This isn't a mindless single-crochet marathon either — the color changes between blue, beige, and brown keep your hands and brain engaged the whole way through, so you actually feel proud of the process, not just the finished toy.
Common mistakes

  • Losing track of stitch counts during the shell's increase rounds.Use a stitch marker at the start of each round and count your stitches before moving on — since each round adds one more single crochet between increases, a single miscount early on throws off the whole shell shape.
  • Stuffing the head and body unevenly since they're worked as one continuous piece.Stuff in small sections as you go rather than waiting until the end, adding polyfill gradually through the neck area so the head doesn't end up over-firm while the body stays soft and lumpy.
  • Placing the safety eyes too early or in the wrong position.Test-fit the 12mm safety eyes without locking the washers on first, trying a few rounds up or down and side to side until the expression looks right, since Squirtle's eyes sit fairly wide and low on the face.
  • Rushing color changes between blue, beige, brown, and white sections.Always change colors on the last yarn-over of the final stitch in the old color so the new color starts clean, and weave in ends immediately so they don't tangle into your next round.
  • Making the shell too tight or too loose to fit over the body.Follow the note to keep increasing in pattern, adding one more single crochet between increases each round, and periodically hold the shell up to the body to check the fit before finishing the final round.

The pattern

Written out round by round

Materials

  • Yarn (light blue, beige, black, white, brown)
  • Crochet Hooks
  • Polyfill (Toy Stuffing)
  • Safety Eyes (12mm)
  • Sewing Needle
  • Scissors
  • Blue Felt

Abbreviations

  • ch = chain
  • st = stitch
  • sl st = slip stitch
  • sc = single crochet
  • hdc = half double crochet
  • dc = double crochet
  • inc = increase
  • dec = decrease
  • mr = magic ring
  • fo = finish off

Arms (Make 2)

  1. Round 1Four single crochet in a magic ring.
  2. Round 2Increase to get 8 stitches. In Round 3: Single crochet and increase, repeat 4 times to get 12 stitches.
  3. Round 4-5Single crochet around.
  4. Round 6-7Single crochet around, slip stitch, fasten off, and stuff the arms.

Legs (Make 2)

  1. Round 1Chain five.
  2. Round 2Single crochet in the second chain from the hook, then 2 single crochets, and place two single crochets in the last stitch.After Round 3: Increase in every stitch to get 20 stitches.
  3. Round 4Single crochet around.
  4. Round 5(Final Round): Decrease in every stitch to end up with 10 stitches, fasten off.

Shell

  1. Round 1Six single crochet in a magic ring.
  2. Round 2Increase in every stitch to 12 stitches.

Head and Body

In Round 1 : Create 7 single crochet in a magic ring.

  1. Round 2Increase around to double the stitches from 7 to 14.
  2. Round 3Single crochet in the first stitch, then increase in the next stitch. Repeat around for a total of 21 stitches.In Round 4: Two single crochets, then an increase. Repeat for a total of 28 stitches.
  3. Round 5Three single crochets, then an increase. Repeat for a total of 35 stitches.
  4. Round 6-10Single crochet all the way around. After Round 11: Do 8 single crochets, 6 increases, 2 single crochets, 4 increases (for the nose area), another 2 single crochets, 6 increases, and finish off the round with 7 more single crochets.
  5. Round 12Single crochet all the way around.Round 13: Do 8 single crochets, 6 decreases, 2 single crochets, 4 decreases, another 2 single crochets, 6 decreases, and finish off the round with 7 single crochets.For Round 14: Three single crochets, then a decrease, repeated 7 times for the whole round.
  6. Round 15Two single crochets and a decrease, repeat this the whole way around for a total of 21 stitches.
  7. Round 16One single crochet, then a decrease, repeated for the whole round leaving you with 14 stitches. Color change to the body color on the last stitch.

Tail

After Round 1 : Six single crochet in a magic ring.

  1. Round 2Increase around.
  2. Round 3Single crochet and an increase, repeat around. In Round 4: Two single crochets and an increase, repeat around.
  3. Round 5-8Single crochet around.
  4. Round 9Six decreases and 12 single crochets, aiming for a curved shape. For Rounds 10 - 21: Single crochet around.Round 22: Two decreases, 10 single crochets, then another two decreases (14 stitches in total).
  5. Round 23(Final Round): Single crochet around, then stuff the tail.

Body (Continued)

  1. Round 17Increase all the way around to 28 stitches.
  2. Round 18-22Single crochet around. For Round 23: Five single crochets and an increase, repeat for a total of 49 stitches.
  3. Round 24Single crochet around.
  4. Round 25Five single crochets and a decrease, repeat to get back to 42 stitches. In Round 26: Four single crochets and a decrease, repeat for a total of 35 stitches.
  5. Round 27Three single crochets followed by a decrease, repeat around.
  6. Round 28Single crochet around for a total of 28 stitches. After Round 29: Two single crochets and a decrease, repeat around.In Round 30: Single crochet and a decrease, repeat around.
  7. Round 31Decrease all the way around.
  8. Round 32Last round, decrease all the way around and then fasten off.

Important notes

💡 Use a hook one size smaller than the yarn label suggests to keep your stitches tight enough that stuffing won't peek through, especially on the belly and shell sections.

💡 Place a stitch marker at the start of every round for the Head and Body section since it's worked continuously over 7 rounds without a defined stopping point.

💡 Keep your brown and beige yarn tails organized in separate small bags or clips while working the shell and belly color changes to prevent tangling mid-project.

💡 Stuff the arms, legs, and tail firmly but leave a little give at the very top of each piece so they're easier to sew onto the rounded body.

💡 Cut the blue felt for the shell pattern before you finish crocheting the shell so you can test the fit and trim as needed while the piece is still flexible.

💡 When working the front-loop-only white border, remember the back loops are left free — this is intentional and gives the shell that raised, textured rim look.

More photos

Crochet Squirtle Amigurumi Pattern for Pokemon Fans — photo 2
Crochet Squirtle Amigurumi Pattern for Pokemon Fans — photo 3
FAQs

Frequently asked questions

What size will my finished Squirtle be?

The finished size depends on your yarn weight and tension, but working in worsted weight with a standard hook yields a classic amigurumi size, roughly palm-to-hand sized. It's compact enough for shelf display but substantial enough to feel huggable.

Can I make this pattern without safety eyes?

Yes, you can substitute embroidered eyes using black yarn or embroidery floss if you're making this for a very young child or prefer a no-hardware option. Just plan the placement carefully before stitching since it's harder to adjust than safety eyes.

Why is the shell worked separately from the body?

Working the shell as its own piece with a gradual increase pattern lets it flare out into a dome shape that fits snugly over the body like a real shell. It also makes it much easier to attach the white front-loop-only border cleanly around the edge.

What yarn weight works best for this pattern?

A worsted weight yarn paired with an appropriately sized hook gives the classic amigurumi density and stitch definition this pattern needs. Acrylic yarns like or hold their shape well and are easy to work with for beginners and experienced crocheters alike.

How do I attach the shell to the body securely?

Once the shell is finished with its white front-loop-only border, position it over the stuffed body and use a sewing needle with matching yarn to whip stitch around the base edge. Check that it's centered and sitting evenly before you knot off and weave in the ends.

One at a time —

Get the next pattern

Tested round by round before it is sent. No spam.