Made and counted by Wren —

Crochet rabbit hair tie pattern with ears and bow

Crochet rabbit hair tie pattern: 2-round head, paired ears, magic-ring bow, single crochet join.

Crochet rabbit hair tie pattern with ears and bow
IntermediateLevel
4-6 hoursTime
WorstedYarn
Jump to the pattern

About this pattern

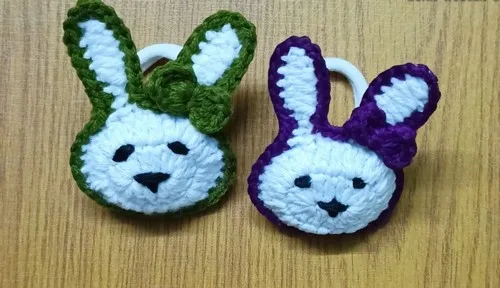
A crochet rabbit hair tie made from two 2-round Head panels, each with its own set of 2 Ears, joined by single crochet and finished with a 1-round magic-ring Bow. Cotton filling goes inside before closing, black yarn embroiders the eyes and nose, and white yarn attaches the hair rubber. Assembly runs 23 steps total.

This crochet rabbit hair tie builds from three small parts: a 2-round Head worked twice, a set of 2 Ears attached directly into each Head's stitches, and a 1-round magic-ring Bow. Two identical Head-and-Ears panels get joined with single crochet, cotton filling goes inside before the seam closes, and a hair rubber is stitched on with white yarn. The number that matters most is 2 — two full panels, each built the same way, have to match before assembly starts.

The pattern

Written out round by round

Materials

  • Crochet hook
  • Green yarn (for the Head, Ears, Bow, and joining the two panels)
  • Black yarn (for embroidering the eyes and nose)
  • White yarn (for attaching the hair rubber)
  • Yarn needle (for embroidery and stitching pieces together)
  • Scissors (for cutting yarn)
  • Cotton filling / stuffing
  • Hair rubber / hair tie elastic
  • Lighter (optional, for melting yarn ends)

Abbreviations

  • dc = double crochet
  • hdc = half double crochet
  • sc = single crochet
  • ch = chain
  • sl st = slip stitch

Head

Make 2

Make two identical Head patterns (front and back), each paired with a set of Ears, then join them together.

Round 1Create a slip knot; Chain 6; In the third chain from the hook, make 2 double crochets (dc); In the next two chains, make 1 dc in each; In the last chain, make 6 dc; Continue on the other side of the chain: make 1 dc in the next chain, then 1 dc in the next chain; In the last chain (where you started with 2 dc), make 4 dc; Slip stitch into the second chain of the initial two chains to close the round.
Round 2Chain 2; In the next double crochet, make 2 dc; In the next stitch, make 2 dc; In the next two stitches, make 1 dc in each; In the next six double crochets, make 2 dc in each (total of 12 dc); In the next two double crochets, make 1 dc in each; In the next four double crochets, make 2 dc in each; Slip stitch into the second chain of the initial two chains to close the round; Slip stitch into the next two chains.

Ears

Make 2

Hide the extra yarn by weaving it into the back.

Make this set of two ears once for the front Head pattern and once for the back Head pattern.

Round 1First Ear Chain 9; In the third chain from the hook, make 1 half double crochet (hdc); In the next four chains, make 1 dc in each; In the next chain, make 1 hdc; In the last chain, make 1 single crochet (sc); Slip stitch into the next chain on the main body; Slip stitch into the next two chains on the main body.
Round 2Second Ear Chain 9; Repeat the same process as the first ear: 1 hdc in the third chain, 1 dc in the next four chains, 1 hdc in the next chain, and 1 sc in the last chain; Slip stitch into the next chain on the main body; Chain 1 and cut the yarn, leaving a tail.

Bow

Pull the magic ring yarn tight to form the bow.

Wrap the long tail around the center of the bow a few times to define its shape.

Tie a knot and cut the magic ring yarn.

Round 1Using green yarn, create a magic ring; Chain 2; Make 3 dc in the magic ring; Chain 2; Slip stitch into the magic ring; Chain 2; Make 3 dc in the magic ring; Chain 2; Slip stitch into the magic ring; Chain 1 and cut the yarn, leaving a long tail for stitching.

Assembly

Step 1Using black yarn and a needle, create the eyes and nose on one of the rabbit patterns.
Step 2Eyes: Make two small stitches in the corners of the first round; you can double the yarn for a bolder look.
Step 3Nose: Start from the middle, bring the needle up, then down, and create a small triangle shape by stitching from the sides.
Step 4Tie a knot and cut the yarn.
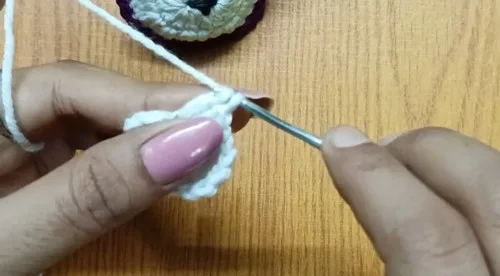
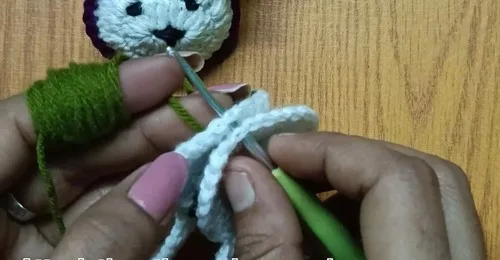
Step 5Take both rabbit patterns; using green yarn, attach them together with single crochet stitches.
Step 6Start from any point, insert the hook through both patterns, and attach the yarn with a slip knot.
Step 7Make a chain.
Step 8Continue making single crochet stitches around the edge, going through both patterns.
Step 9Leave a gap to fill with cotton.
Step 10Once you've stitched most of the way around, fill the rabbit with cotton.
Step 11Continue stitching with single crochet to close the opening.
Step 12Slip stitch into the first single crochet, chain 1, and cut the yarn.
Step 13Hide the extra yarn with a needle.
Step 14Thread the long tail of the bow onto a needle.
Step 15Stitch the bow onto one of the rabbit's ears, in the middle.
Step 16Secure it by stitching through the ear and the bow.
Step 17Tie a knot and cut the extra yarn.
Step 18Using white yarn and a needle, attach the hair rubber to the back of the rabbit.
Step 19Double the yarn for extra strength.
Step 20Place the hair rubber in the center of the back.
Step 21Stitch the hair rubber securely to the rabbit by going through the rubber and the rabbit's body multiple times.
Step 22Tie a knot and cut the yarn.
Step 23(Optional) Use a lighter to melt the ends of the yarn for a cleaner finish.
Tester's notes

2 Head panels must be worked identically — recheck the 12-dc marker partway through Round 2 on each before moving on to the Ears.

The 9-chain base sets the length for both Ears in a set; keep the same tension on the third-chain-from-hook start on each so the pair matches.

Stuff lightly: the Head is only 2 rounds per panel, so cotton filling should fill the shape without straining the single crochet seam that joins the 2 panels.

White yarn is reserved for attaching the hair rubber only — keep it separate from the green used for the Head, Ears, and Bow so no stray strand shows at the join.

A lighter is optional for melting yarn ends instead of weaving them in; use it away from the stuffed body and away from the 3-dc bow loops.

Work in progress

Crochet rabbit hair tie pattern with ears and bow — photo 2
Crochet rabbit hair tie pattern with ears and bow — photo 3

At a glance

Rounds5
Parts3
LevelIntermediate
Time4-6 hours
YarnWorsted

Gauge check

No gauge is given, so check tension by counting stitches instead of measuring: after the increase section of Head Round 2, the stitch count should read 12 dc exactly as the pattern states before the round continues.

If the count comes up short or long, undo back to the last increase point and re-work it rather than fudging the next round to compensate.

If something looks wrong

The two Head panels come out different sizes before joining.
One panel picked up an extra increase somewhere in the 12-dc section of Round 2. Recount to 12 dc at that point on both panels before continuing, and unpick rather than adjust later rounds to compensate.
An Ear flops instead of holding its shape.
The dc worked across the 4 center chains of the 9-chain base were left too loose. Tighten tension on that stretch and work the slip stitches into the main body snugly, not just tacked on.
The Bow looks lopsided, with one loop bigger than the other.
The two chain-2 gaps before each 3-dc group in the magic ring round weren't worked evenly. Pull the magic ring tail tight and even before tying off so both loops match.
The seam puckers where the two Head panels meet.
The single crochet join was pulled too tight around the perimeter. Ease the join stitches evenly around both matched panels instead of cinching every stitch.

Yarn substitutions

100% cotton, worsted weightFirmer fabric and sharper stitch definition on the Bow's 3-dc clusters, with less stretch overall, so the finished piece sits stiffer against the hair rubber.
Acrylic, DK weightSmaller finished Head and Ears since the weight is lighter than worsted; drop one hook size to keep stitches tight, and use less cotton filling to fill the smaller 2-round shell.
Wool-blend, worsted weightSofter drape and more give at the single crochet join between the two Head panels, but check the fiber isn't scratchy where it sits against hair.
FAQs

Questions

How much of each yarn color is needed?

The pattern doesn't quantify yardage, but green covers the Head, Ears, and Bow across all 2-round and 1-round parts, while black and white are used only for small embroidery and attaching the hair rubber. Scrap or leftover amounts of black and white are enough since neither is worked in rounds.

Can the eyes and nose embroidery be changed?

Yes. The eyes are two small stitches in the corners of the first round, and the yarn can be doubled for a bolder look; the nose triangle is stitched after by sewing from the sides. Both are added once both rabbit patterns exist, before joining.

Does stuffing go in before or after the two panels are joined?

Filling goes in as the single crochet join closes the 2 rabbit patterns together, not before. Add cotton filling gradually near the end of the join rather than packing one panel first.

One at a time —

Get the next pattern

Tested round by round before it is sent. No spam.