Made and counted by Wren —

Crochet an amigurumi octopus keychain with 18 tentacles

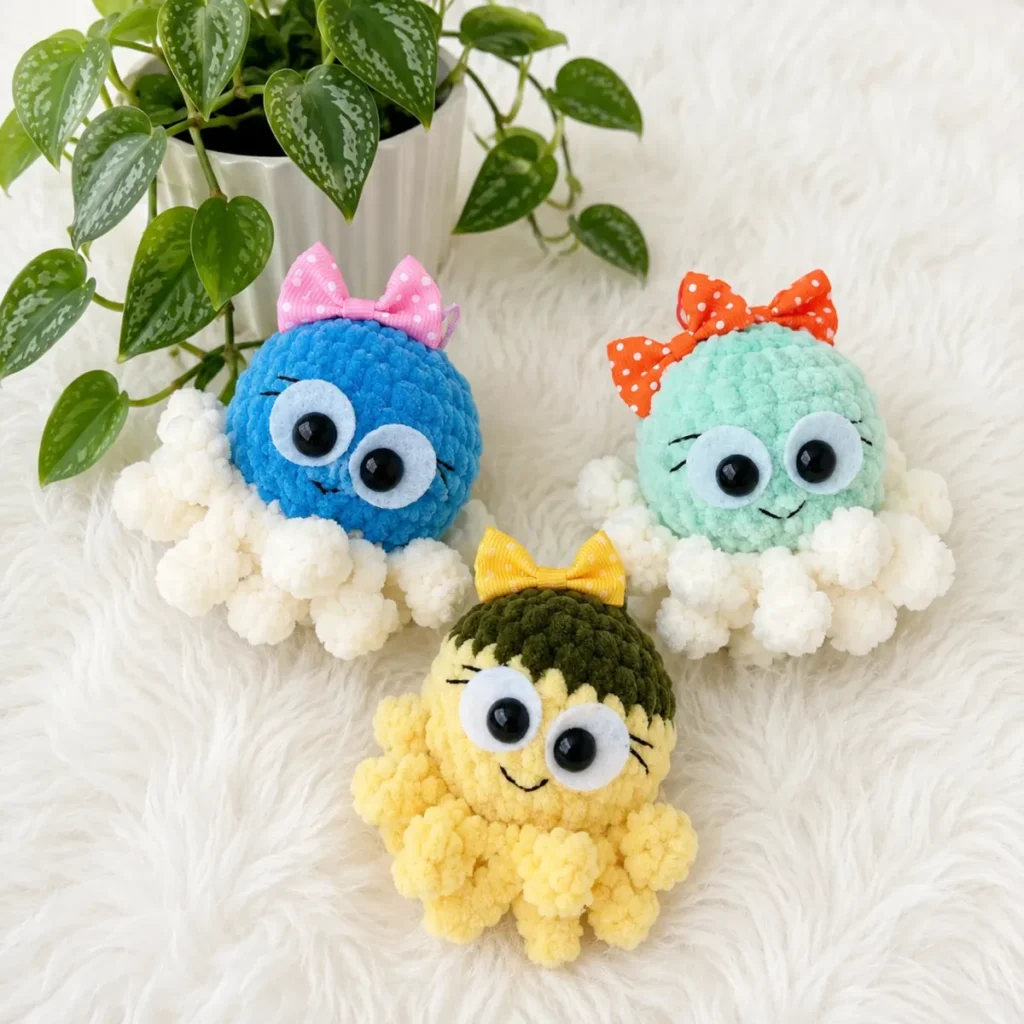
4.5mm hook, bulky chenille: amigurumi octopus keychain with 18 continuous-pass tentacles.

Crochet an amigurumi octopus keychain with 18 tentacles
BeginnerLevel
3-4 hoursTime
4.5 mmHook
BulkyYarn
Jump to the pattern

About this pattern

A bulky-weight amigurumi octopus worked in continuous spiral rounds, closed at Round 10 with a back-loop decrease, then finished with 18 front-loop tentacles worked without cutting yarn. Requires a G-6 (4.5mm) hook, 10mm safety eyes, fiberfill, and black embroidery thread for the face. Finished size is approximately 3 inches (8 cm) tall; the whole piece works up in under two hours, with body closure and the tentacle round the two techniques to get right.

This octopus keychain builds in continuous spiral rounds from a magic ring: 6 stitches in Round 1 double to 24 by Round 4, then five rounds worked even before the body closes. At Round 10, back loops close the bottom while front loops carry 18 tentacles worked in one continuous pass — no cutting yarn between legs. The number that matters most is 18: that's both the final stitch count of Round 10 and the tentacle total. The finished piece measures approximately 3 inches (8 cm) tall, worked as one continuous piece from crown to tentacles with no separate parts to sew together — a beginner-friendly project that works up in under two hours.

The pattern

Written out round by round

Materials

Yarn

  • Bulky weight chenille or plush yarn (such as Himalaya Dolphin Baby or equivalent), any color — this is a great stash-buster

Hook

  • US Size G-6 (4.5 mm)

Safety eyes

  • 10 mm, 1 pair

White felt

  • Two 20 mm circles (for eye backing)
  • Fiberfill stuffing
  • Black embroidery thread (for lashes and smile)
  • Decorative bow (ribbon or pre-made)
  • Craft glue
  • Keychain hardware (optional — or crochet a chain cord instead)
  • Stitch marker
  • Yarn needle and scissors

Abbreviations

  • ch = Chain
  • dec = Invisible Decrease (insert hook into front loop of next 2 sts, pull up 2 loops, yarn over, pull through all 3)
  • FLO = Front Loop Only
  • BLO = Back Loop Only
  • inc = Increase (2 sc in same stitch)
  • MR = Magic Ring
  • rnd = Round
  • sc = Single Crochet
  • sl st = Slip Stitch
  • st(s) = Stitch(es)

Head / Body

Round 16 sc in MR. (6)
Round 2Inc in each st around. (12)
Round 3[Sc, inc] repeat around. (18)
Round 4[2 sc, inc] repeat around. (24)
Rounds 5–9Sc in each st around. (24) Work 5 rounds even.
Round 10[2 sc, dec] repeat around. (18)Insert safety eyes between Rnds 7 and 8 before proceeding. Glue felt circles behind each eye and secure washers firmly.

Body Closure

Return to the Back Loops Only (BLO) of Rnd 10 to close the bottom of the body. Add any remaining stuffing now before closing.

Round 11(BLO): [2 sc, dec] repeat around. (12)
Round 12Dec around. (6)Fasten off, leaving a yarn tail. Thread tail onto yarn needle and weave through the front loops of the remaining 6 sts. Pull tight to close the opening completely. Weave in end securely.

Tentacles

Worked into the Front Loops Only (FLO) of Rnd 10 in one continuous pass. Do not cut yarn.

For each front loop of Rnd 10, work the following sequence:

Tentacle sequence (repeat × 18): Ch 4, sc in 2nd ch from hook, sc in next 2 ch, sl st into next FLO st of Rnd 10.

Repeat this sequence across all 18 front loops. You will have 18 tentacles fanning out around the base of the body.

Assembly

Step 1Embroider the face. Using black embroidery thread, stitch small curved lashes above each eye and a gentle smile below them. Keep stitches close and tidy against the plush yarn.
Step 2Attach the bow. Apply a small dot of craft glue to the back of your decorative bow and press it firmly onto the top of the head. Hold for 30 seconds. Allow to dry fully before handling.
Step 3Add the keychain hardware. Thread keychain hardware through the top of the magic ring closure or attach it to a small loop of chain stitches crocheted at the crown. If you prefer no hardware, crochet a cord of chains to the desired length and knot securely.
Step 4Weave in all remaining ends.

Tester's notes

4.5 mm (US G-6) is the only hook size given; no swatching round is specified, so tension is judged by feel rather than a gauge check.

10 rounds make up the body before closure; move a stitch marker up at the start of each round, since the continuous spiral has no join to mark it.

24 stitches hold steady from Round 4 through Round 9 — keep tension tight enough across those five even rounds that stuffing does not peek through.

18 front loops of Round 10 carry the tentacles in one continuous pass with no cut yarn between legs; confirm enough yarn remains on the skein before starting that round.

Add the last of the stuffing before Round 11 closes the bottom in back loops only — the opening is too small to stuff through once Round 12 decreases down to 6 stitches.

This pattern is written in US crochet terminology.

Gauge is not critical for this project; however, keep your tension firm so stuffing does not show through the stitches.

Stitch count is given at the end of each round in parentheses: (##).

Stuff the body firmly as you go. Do not wait until the end.

At a glance

Rounds8
Parts3
LevelBeginner
Time3-4 hours
Hook4.5 mm
YarnBulky

Gauge check

Gauge is not critical for this project — there is no swatch or tension square required before starting.

Keep your tension firm as you work so stuffing does not show through the stitches; if you can see gaps between stitches, go down a hook size.

Stitch-count checkpoints

  • Head / Body · Round 1: 6 sts
  • Head / Body · Round 2: 12 sts
  • Head / Body · Round 3: 18 sts
  • Head / Body · Round 10: 18 sts
  • Body Closure · Round 11: 12 sts
  • Body Closure · Round 12: 6 sts

If something looks wrong

Keep your tension tight with chenille yarn.
Plush yarn is forgiving on appearance, but loose stitches will let fiberfill peek through. Work each stitch snugly — if you can see gaps, go down a hook size.
Master the invisible decrease for a smooth base.
Insert your hook into the front loop only of the first stitch, then the front loop only of the second stitch, draw up two loops, yarn over and pull through all three. This eliminates the ridge that a standard decrease creates.
Don't overstuff.
The octopus should feel firm and hold its dome shape, but not so packed that the tentacle row pulls or distorts. Stop adding fiberfill once the shape feels stable.
Work the tentacles slowly.
The chain-and-sc tentacle sequence is repetitive but easy to miscount. Place a stitch marker in the first FLO st before you begin, and count each completed tentacle as you go. All 18 should be finished before the yarn runs out of front loops.
Felt backing makes all the difference.
The white felt circles behind the safety eyes create the classic amigurumi wide-eyed look. Cut them clean, apply a thin layer of glue, and press them flat against the fabric before snapping on the washer.

Yarn substitutions

Worsted weight yarnSubstituting worsted weight yarn with a US E-4 (3.5 mm) hook will produce a smaller, denser octopus — great for a more structured look, though it will change the finished size from the pattern as written.
Bulky or super bulky chenilleGives the classic plush, rounded shape shown in the pattern, worked with the called-for US G-6 (4.5 mm) hook.
FAQs

Questions

Can I use a different yarn weight for this octopus pattern?

Yes, you can substitute a different yarn weight, but it will change the finished size. Using a worsted weight yarn with a US E-4 (3.5 mm) hook will produce a smaller, denser octopus — great for a more structured look. A bulky or super bulky chenille will give you the classic plush, rounded shape shown here.

How do I keep the tentacles from curling too tightly or going flat?

The tentacles curl naturally because of the chain-then-sc-back construction — that's intentional and part of the design. If yours are curling more than you'd like, block them lightly by misting with water and pinning flat until dry. If they're not curling enough, try working the chain a little more loosely.

Is this pattern safe for young children as a toy?

The pattern uses 10 mm safety eyes with locking washers, which are designed to be secure in amigurumi toys. However, for children under 3, it is best to embroider the eyes instead of using hardware attachments, and to omit the keychain. Always use your judgment when making toys for very young children.

What is the best way to attach the keychain hardware so it stays secure?

Thread the keychain ring directly through the top of the magic ring closure at the crown of the head — the tight yarn structure there is the strongest anchor point. Alternatively, crochet a short chain of 4–6 stitches at the crown, loop it through the keychain ring, and slip stitch the ends together before weaving in. Either method holds well with regular everyday use.

One at a time —

Get the next pattern

Tested round by round before it is sent. No spam.