Made and counted by Wren —

Crochet Mesh Heart Pattern: A Sweet Handmade Love Token

Learn to crochet a delicate mesh heart with this easy pattern. Perfect appliqué, ornament, or gift topper for beginners and pros alike.

Beginner-IntermediateLevel
1-2 HoursTime
WorstedYarn
Jump to the pattern

At a glance

Begin by working the foundation row to establish the base chain spaces the whole heart will build on.

Move into the first shaping round, setting up the open mesh pattern that gives the heart its lacy texture.

Work the second shaping round, adding gentle increases that start rounding out the two top lobes of the heart.

Continue into the third round, shaping the sides inward so the piece narrows toward a point at the bottom.

Fasten off once the heart shape is complete and weave in any loose ends neatly.

Block the finished heart by pinning it into shape and letting it dry so the mesh lies flat and even.

Optionally embellish with beads, embroidery, or buttons for a personalized finishing touch.

Attach a loop or string if you plan to hang the heart or link several together into a garland.

About this pattern

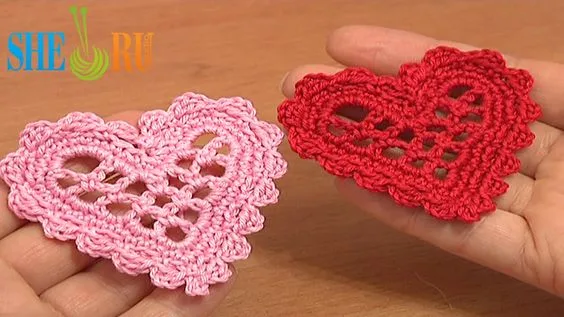
This crochet mesh heart takes the classic symbol of love and reimagines it in airy, open stitchwork that lets light and color show through every gap. What makes it so special is how few materials and how little time it takes to create something genuinely eye-catching — no dense stitching, no complicated shaping, just a graceful heart silhouette built from simple mesh spaces. It's perfect for crafters who want a fast, satisfying project that still feels thoughtful and personal, whether you're making one heart or a whole garland.

The pattern relies on foundational mesh techniques — working chain spaces to create that signature open, lacy look — combined with a gentle increase pattern across three rounds to shape the heart's rounded lobes and pointed base. Because the stitch count stays manageable and the structure is repetitive once you get going, this is a wonderful confidence-builder for beginners while still being quick and enjoyable for experienced crocheters. Most makers finish a single heart in about an hour, making it an ideal project for an evening on the couch.

The finished heart has a delicate, lace-like quality — sturdy enough to hold its shape as an appliqué or ornament, yet light and open enough to feel romantic rather than heavy. It's small enough to tuck into a card, sew onto a sweater, or string together with several others for a garland. As a handmade gift, it carries an unmistakable warmth that a store-bought trinket simply can't match — every loop says 'I made this for you.'

Variations

I adore this pattern because it proves you don't need hours of work to make something meaningful. Starting with that simple foundation row and building into the heart shape across just three rounds, you can watch the silhouette emerge almost immediately — there's something so satisfying about seeing a recognizable heart take form from a handful of chain spaces. The open mesh structure is incredibly forgiving too; if your tension varies slightly, it barely shows, which makes this a stress-free project even on a busy day. I love that it's genuinely useful beyond just being cute — sew it onto a tote bag, clip it to a gift, or make a dozen in an afternoon for a garland that'll make your whole room feel cozier. It's also endlessly customizable with beads, embroidery, or buttons, so no two hearts ever have to look quite the same. Honestly, this is the kind of pattern I keep a hook and scrap yarn ready for, because I never know when I'll want to whip one up as a last-minute handmade gift.

Common mistakes

  • Starting the foundation too tightlyKeep your foundation chain relaxed and even — if you tend to crochet tight, try going up half a hook size just for the starting chain.
  • Losing track of which round you'rePlace a stitch marker at the start of each round and move it up every time you begin a new one, so you always know exactly where you are.
  • Uneven increases while formingCount your increase stitches carefully on each side of the heart's center point and mirror them exactly — laying the piece flat periodically helps you spot asymmetry early.
  • Working the mesh chain spacesUse the same number of chains for every space throughout the round, and resist the urge to pull chains extra tight or leave them extra loose.
  • Not blocking the finished heartPin the damp heart to a blocking mat in the correct heart shape and let it air dry completely — this step makes a huge visual difference for mesh work.
  • Skipping a gauge checkWork up a quick sample of the foundation and first round to check that your chain spaces and stitch sizing match what you want before committing to a full heart.

The pattern

Written out round by round

Materials

  • Worsted weight yarn
  • Crochet hook (size to suit your yarn)

Abbreviations

  • ch = chain
  • st = stitch
  • sl st = slip stitch
  • sc = single crochet
  • hdc = half double crochet
  • dc = double crochet
  • inc = increase
  • dec = decrease
  • mr = magic ring
  • fo = finish off

Create the Foundation

Begin with a magic circle to keep the center tight and adjustable.

First Row

  1. Round 1Chain 3 (counts as the first double crochet), then work 9 double crochets into the circle. Join with a slip stitch to complete the circle.

Form the Heart Shape

  1. Round 2Chain 3, work 2 double crochets in each stitch around.
  2. Round 3Create the heart's peaks by crocheting in specific patterns to form the top bumps and decrease to shape the point at the bottom.Mesh Pattern From here on, the mesh pattern takes over: alternating chain spaces with double crochets creates the open, lacy lattice look for the rest of the heart.
  3. Round 4+Alternate between chain spaces and double crochets to create a mesh effect, increasing and decreasing as needed to maintain the heart shape.

Important notes

💡 Choose a worsted-weight yarn with good stitch definition — the mesh spaces are the star of this design, so avoid overly fuzzy or splitty yarns that muddy the open pattern.

💡 A stitch marker at the start of each of the three shaping rounds saves you from miscounting where the heart's increases should land.

💡 Because this heart is worked flat and stays open (no stuffing involved), block it firmly after finishing to help the mesh lie flat and symmetrical.

💡 If you're making multiples for a garland, keep your tension consistent across all pieces by working them in one sitting rather than spacing them out over several days.

💡 When adding beads or buttons as embellishments, thread them onto your yarn before you begin the final round so they're ready to slide into place as you stitch.

💡 Use a hook one size smaller than you'd normally choose for the yarn weight if you want a firmer, less floppy mesh that holds its heart shape without blocking aids.

FAQs

Frequently asked questions

Is this mesh heart pattern good for a first-time crocheter?

Yes — the foundation row and three shaping rounds use simple, repetitive stitches that are easy to learn as you go. Just take it slow through the increase rounds and count carefully, and you'll have a lovely finished heart.

How much yarn do I need for one heart?

Because the heart is small and worked in open mesh, a single skein of worsted-weight yarn will make several hearts with plenty left over. It's a great scrap-yarn project if you already have leftover balls in your stash.

Can I turn this into a garland?

Absolutely — simply make multiple hearts and either crochet a chain to string them together or sew a loop of yarn or ribbon through the top of each one. This is one of the most popular ways to display several mesh hearts at once.

Do I need to stuff or add stiffening to the heart?

No stuffing is needed since the heart is worked flat in an open mesh design. Blocking it well after finishing is usually enough to help it hold a crisp, symmetrical shape.

What's the best way to attach beads or buttons to the finished heart?

Sew beads along the border or within the mesh spaces using a sewing needle and matching thread once the heart is complete and blocked. Buttons work well stitched around the outer edge for a playful, textured finish.

One at a time —

Get the next pattern

Tested round by round before it is sent. No spam.