Made and counted by Wren —

Crochet Giraffe Amigurumi Pattern

Make an adorable crochet giraffe amigurumi with safety eyes, spiral-worked body, and cute horns and ears. A charming stuffed animal pattern for any skill l

Crochet Giraffe Amigurumi Pattern
IntermediateLevel
4-6 HoursTime
3.5 mmHook
WorstedYarn
Jump to the pattern

At a glance

Start with the small accent pieces — horns, ears, nostrils, and tail — working each in continuous spiral rounds.

Crochet the upper and lower muzzle pieces separately, using pink for the lower muzzle and yellow for the upper.

Work the head in a continuous spiral, pausing to insert the safety eyes between Rounds 3 and 4.

Stuff the head firmly as you close it, then attach the horns, ears, and muzzle pieces to build the face.

Crochet both legs and both arms in spiral rounds, stuffing each lightly before setting them aside.

Work the body through all 21 rounds, stuffing gradually as the shape increases and decreases.

Attach the legs and arms to the body, then join the finished head to complete the giraffe's form.

Finish by sewing on the tail and adding a small scrap-yarn tuft to the tip for a realistic touch.

About this pattern

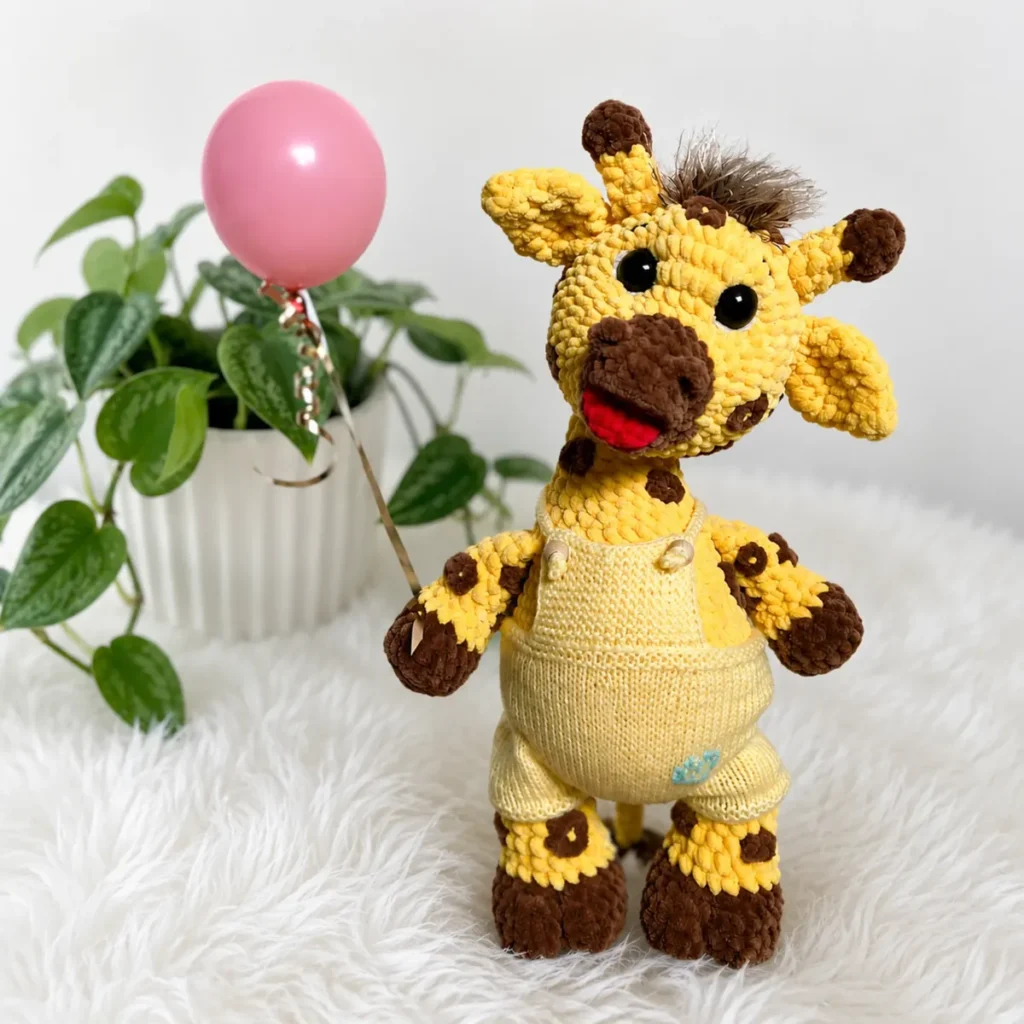
This crochet giraffe amigurumi brings together ten separate pieces — from tiny nostrils to a spiraled body — into one irresistibly sweet stuffed animal. What makes it special is the layered muzzle detail, where a pink lower muzzle nestles against a yellow upper muzzle to give the face real dimension and personality. It's perfect for crocheters who love a project with lots of small, satisfying components that all click together into something bigger than the sum of its parts.

The finished giraffe stands up proudly on sturdy legs, with a long-necked head, perky horns, floppy ears, and a swishy tail finished with a yarn tuft. Worked in plush or worsted weight yarn, it has that squeezable, huggable texture kids and collectors both adore. Whether it lives on a shelf or becomes a bedtime companion, this giraffe makes a heartfelt handmade gift that feels far more special than anything off a store shelf.

Variations

This giraffe is incredibly easy to customize once you understand the basic construction. For a classic reticulated giraffe look, try adding small brown patch appliques to the body and legs after assembly using scrap Yarn B — simple ovals worked in single crochet and tacked on with a yarn needle. Want a baby giraffe for a nursery? Drop to a smaller hook, like a D-3/3.25mm, and use DK weight yarn instead of worsted; expect the finished giraffe to shrink by roughly 25-30%, though you'll want to test your gauge on the head first since the safety eye placement is gauge-dependent. For yarn substitutions, Bernat Baby Velvet or Yarn Feels Like Butta work beautifully in place of standard plush yarn and give that irresistible soft-toy texture, while Super Saver is a budget-friendly worsted weight option if you prefer a firmer, more classic amigurumi feel. Color-wise, try an all-white giraffe with gray patches for a whimsical 'moon giraffe' theme, or swap Yarn A for a soft lavender and Yarn B for deep purple to make a fantasy-creature version for older kids. You could also experiment with a longer neck by adding 2-3 extra rounds partway through the head or body construction if you want a more exaggerated, storybook-style silhouette — just remember to add proportional stuffing so the neck doesn't flop. For a no-sew shortcut on the horns, you can single crochet them directly onto the head at the correct round instead of sewing them on separately, though this requires more advance planning of your rounds.

I adore this giraffe pattern because every single piece has a job to do in building character. The two-tone muzzle — pink Yarn C tucked under the yellow upper muzzle — is such a simple trick, but it instantly makes the face read as 'giraffe' instead of generic amigurumi animal. I also love that the horns and ears are worked identically in structure but placed so differently that they transform the whole silhouette. Inserting the safety eyes between Rounds 3 and 4 of the head is one of my favorite moments in any amigurumi build, because that's the exact second the piece stops being an abstract yellow ball and starts staring back at you with personality. The flat rows in the muzzle and legs are a welcome textural break from all that spiral work, keeping your hands and brain engaged. And don't sleep on the scrap-yarn hair tuft for the tail — it's a five-minute detail that adds so much charm. By the time you're stuffing the 21-round body, you'll feel like a genuine amigurumi pro.
Common mistakes

  • Losing track of where the spiral round begins, causing the piece to visibly spiral or lean.Place a locking stitch marker in the first stitch of every round and move it up as you go — this is non-negotiable for a clean-looking head and body.
  • Confusing the flat 'Row' sections of the muzzle and legs with the spiral rounds used everywhere else.Pause and re-read the pattern notes whenever you hit a labeled 'Row' — these sections require turning your work and are worked back and forth, unlike the continuous rounds.
  • Inserting the safety eyes at the wrong round, resulting in an oddly placed or asymmetrical face.Follow the note exactly: insert eyes between Rounds 3 and 4 of the head, and check placement from the front before pushing the backs on, since eyes can't be repositioned once secured.
  • Overstuffing the horns, ears, or nostrils, making them stiff and misshapen instead of soft and rounded.Use small pinches of fiberfill and stuff gradually, checking the shape against the pattern photo as you go — these small pieces need just enough fill to hold their form, not to feel firm.
  • Sewing the horns, ears, and muzzle pieces onto the head before the head is fully stuffed and closed.Always finish stuffing and closing the main head piece first, then attach smaller pieces on top — this prevents lumpy, uneven attachment points.
  • Using yarn that's too thin or too thick without adjusting hook size, leading to visible gaps or an overly tight fabric that fiberfill shows through.Swatch a quick magic ring and first few increase rounds before committing — your stitches should be snug enough that stuffing doesn't peek through the E-4/3.5mm gauge.

The pattern

Written out round by round

Materials

  • Yarn A (Main): Yellow — Worsted weight or bulky plush/velvet yarn
  • Yarn B (Contrast): Brown — same weight as Yarn A
  • Yarn C (Accent): Pink — small amount for lower muzzle

Hook

  • E-4 / 3.5 mm (or size appropriate to your yarn)

Safety eyes

  • 12 mm, 1 pair

Stuffing

  • Polyester fiberfill

Stitch markers

  • 2–3 locking markers
  • Yarn needle / tapestry needle
  • Scissors

Optional

  • Scrap yarn in beige or gray for hair tufts

Abbreviations

  • BLO = Back Loop Only
  • ch = Chain
  • dec = Invisible Decrease (2 sts decreased to 1)
  • inc = Increase (2 sc in same stitch)
  • MR = Magic Ring
  • Rnd = Round
  • Row = Row
  • sc = Single Crochet
  • sl st = Slip Stitch
  • SM = Stitch Marker
  • st / sts = Stitch / Stitches

Horns (Make 2)

  1. Round 16 sc in MR. (6)
  2. Round 2(1 sc, inc) ×3. (9)
  3. Round 3Work 1 rnd even; change to Yarn A (yellow) on the last stitch. (9)
  4. Round 4dec ×4, 1 sc. (5)
  5. Round 5(1 sc, inc) ×4, 1 sc. (7) (Widens slightly at base for attachment.)
  6. Round 6Work 2 rnds even. (7)Fasten off, leaving a long tail for sewing.

Ears (Make 2)

  1. Round 14 sc in MR. (4)
  2. Round 2(inc, 1 sc) ×2. (6)
  3. Round 3(1 sc, inc) ×3. (9)
  4. Round 4(1 sc, inc) ×4, inc. (14)
  5. Round 5-7Work 3 rnds even. (14)
  6. Round 8dec ×7. (7)Fasten off, leaving a long tail for sewing.

Nostrils (Make 2)

  1. Round 13 sc in MR. (3)Pull ring closed tightly. Fasten off, leaving a tail for sewing.

Tail

  1. Round 1Ch 15. (15)
  2. Round 2Turn; starting from the 2nd ch from hook, work 14 sl st along one side of the foundation chain, then 14 sl st back along the opposite side.

Upper Muzzle

  1. Round 15 sc in MR. (5)
  2. Round 2Ch 1, turn (marks row beginning); inc ×5. (10)Next row: Insert hook from the wrong side of each stitch and draw through to the next — this creates the curved lip ridge.
  3. Round 3Ch 1, turn; 9 sc, 1 sc BLO. (10)Place a SM on the first and last stitches. Remove the working loop from your hook and leave it open. Insert hook into the 4th sc from the right, pull working yarn through, and work:Ch 1, 2 sc, sl st. Remove hook — leave loop open.Insert hook into 3rd sc from right; ch 1, 4 sc; pick up the open loop and sl st together with it.Insert hook into 2nd sc from right; ch 1, 6 sc; pick up open loop and sl st.Insert hook into 1st sc from right; ch 1, 8 sc; pick up both open loops and sl st. (10)Leave final loop open. Cut yarn leaving a 20 cm tail.Sew both nostrils onto the upper muzzle now, before continuing.

Lower Muzzle

(Work in Yarn C — pink)

  1. Round 15 sc in MR. Mark beginning of round. (5)
  2. Round 2Ch 1, turn; inc, 3 sc, inc. Change to Yarn A on the ch. Work the next row in BLO:
  3. Round 3Ch 1, 7 sc. (7)Place a SM on the 1st and last stitches. Remove working loop and leave open. Insert hook into 2nd sc from right, pull yarn through, and work:Ch 1, 3 sc; pick up open loop, sl st.Insert hook into 1st sc from right; ch 1, 5 sc; pick up both open loops, sl st. (7)Leave loop open. Cut yarn leaving a 15 cm tail.Fold the upper and lower muzzle pieces together with right sides facing out. Sew them together and tuck in the side edges to shape the open mouth.

Head

We now have 17 stitches combined (10 from the upper muzzle + 7 from the lower muzzle). Insert your hook into the open loop on the lower muzzle where the working yarn is attached. Add 1 stitch at the point where the chain was worked on the upper muzzle — you now have 18 stitches total. Place a SM and work in a continuous spiral.

  1. Round 1(2 sc, inc) ×6; change to Yarn A on the last st. (24)
  2. Round 224 sl st. (24)
  3. Round 3(1 sc, inc) ×3, 2 sc, (inc, 1 sc) ×3, 10 sc. (30)
  4. Round 4(inc, 1 sc) ×4, inc, 2 sc, inc, (1 sc, inc) ×4. (40)
  5. Round 511 sc, inc ×8, 21 sc. (48)
  6. Round 6-11Work 6 rnds even. (48)Begin working spot/patch texture during these rounds using Yarn B. Insert safety eyes between Rnds 3 and 4 counting up from the muzzle seam.
  7. Round 12(6 sc, dec) ×6. (42)
  8. Round 13-14Work 2 rnds even. (42)
  9. Round 15(5 sc, dec) ×6. (36)
  10. Round 16Work 1 rnd even. (36)
  11. Round 17(4 sc, dec) ×6. (30)
  12. Round 18(3 sc, dec) ×6. (24)
  13. Round 19(2 sc, dec) ×6. (18)
  14. Round 20(1 sc, dec) ×6. (12)
  15. Round 21dec ×6. (6)Stuff head firmly. Pull opening closed and fasten off.

Legs (Make 2)

  1. Round 16 sc in MR. Mark beginning of round. (6)
  2. Round 2Ch 1, turn; inc ×6. (12)
  3. Round 3Ch 1, turn; inc ×11, 1 sc. (23)Next row: Insert hook into each stitch and draw through to the next before picking up yarn — creates the v-shaped hoof ridge.
  4. Round 422 sc, 1 sc BLO. (23)Work the v-shaped edge by inserting hook from the wrong side and drawing through to the next stitch: 6 sc; at the marked stitch, pull the loop through to the back side.Turn work and work 29 sc (last sc works into the marked stitch column).
  5. Round 52 sc, dec, 25 sc. (28)
  6. Round 6(5 sc, dec) ×4. (24)
  7. Round 7dec ×3, 18 sc; change to Yarn A on the 9th sc. (21)
  8. Round 8(5 sc, dec) ×3. (18)
  9. Round 9(4 sc, dec) ×3. (15)
  10. Round 10Work 1 rnd even. (15)
  11. Round 11(3 sc, dec) ×3. (12)
  12. Round 12-15Work 4 rnds even. (12)Work spot texture, stuff firmly, work yarn tuck at halfway point. Fold flat and work 6 sc across the opening to close.

Arms (Make 2)

  1. Round 18 sc in MR. (8)
  2. Round 2inc ×8. (16)Next rnd: Insert hook into each stitch and draw through to the next as before.
  3. Round 3(7 sc, inc) ×2. (18)
  4. Round 4Work 1 rnd even. (18)
  5. Round 5(7 sc, dec) ×2; change to Yarn A on last st. (16)
  6. Round 63 sc, dec, 2 sc, dec, 2 sc, dec, 3 sc. (13)
  7. Round 74 sc, dec, 1 sc, dec, 4 sc. (11)
  8. Round 8-9Work 2 rnds even. (11)
  9. Round 109 sc, dec. (10)
  10. Round 11-12Work 2 rnds even. (10)Work spot texture, stuff halfway, fold flat, work 5 sc across opening to close.

Body

  1. Round 112 sc in MR. (12)
  2. Round 2inc ×12. (24)
  3. Round 3(3 sc, inc) ×6. (30)
  4. Round 4(4 sc, inc) ×6. (36)
  5. Round 5(5 sc, inc) ×5; join left leg: 5 sc, inc. (42)
  6. Round 66 sc, inc, 6 sc, inc, 1 sc; join right leg: 5 sc, inc, (6 sc, inc) ×3. (48)
  7. Round 7(11 sc, inc) ×4. (52)
  8. Round 8-13Work 6 rnds even. (52)
  9. Round 14(dec, 3 sc) ×2, (3 sc, dec) ×2, (3 sc, dec) ×3, 2 sc, (dec, 3 sc) ×3. (42)
  10. Round 15Work 1 rnd even. (42)
  11. Round 16dec, 3 sc, dec, 2 sc, dec, 3 sc, dec, 26 sc. (38)
  12. Round 17Work 1 rnd even. (38)
  13. Round 18dec, 3 sc, dec, 3 sc, dec, (4 sc, dec) ×2, 2 sc, (dec, 4 sc) ×2. (31)Attach the tail at this stage and work spot texture on the body.
  14. Round 1910 sc; join right arm: 5 sc; 11 sc; join left arm: 5 sc. (31)
  15. Round 20(8 sc, dec) ×3, 1 sc. (28)
  16. Round 21(5 sc, dec) ×4. (24)
  17. Round 22Work 1 rnd even. (24)
  18. Round 23(6 sc, dec) ×3. (21)
  19. Round 24Work 1 rnd even. (21)
  20. Round 25(5 sc, dec) ×3. (18)
  21. Round 26-27Work 2 rnds even. (18)Stuff firmly. Fasten off, leaving a long tail for sewing.

Assembly

Step 1

Position the completed head on top of the body and pin it in place before sewing — tilt it slightly forward for a natural, character-forward look.

Step 2

Using the yarn tail from the head, attach it to the body with a whipstitch worked around the entire neck opening. Pull firmly and evenly so no gap shows.

Step 3

Sew ears onto each side of the head, placing them just above the eye line and angling them outward slightly.

Step 4

Sew horns between the ears, slightly toward the center of the head.

Step 5

Style and attach yarn hair tufts between the horns by pulling loops of scrap yarn through the top of the head and trimming to shape.

Step 6

Embroider eyebrows above the safety eyes using a short length of dark yarn and a straight stitch.

Step 7

Confirm the tail is firmly anchored at the back base of the body.

Step 8

Weave in all remaining yarn ends securely.

Important notes

💡 Keep 2-3 locking stitch markers on hand at all times — you'll want one in the working round and possibly one marking the eye placement round on the head so you don't miscount.

💡 Because this pattern uses continuous spiral rounds throughout most pieces, resist the urge to slip stitch or chain between rounds unless the pattern specifically labels a section as a 'Row.'

💡 Stuff as you go rather than waiting until a piece is fully closed — it's much easier to distribute fiberfill evenly in the body and head while there's still an opening to work through.

💡 When working the pink Yarn C lower muzzle against the yellow Yarn A upper muzzle, weave in color-change tails immediately so they don't tangle with your working yarn on such a small piece.

💡 Use a 12mm safety eye size as specified, and double-check both eyes are inserted at the same round and roughly mirrored in spacing before snapping on the backing washers.

💡 Save your scrap beige or gray yarn for the tail tuft until the very end — attaching it last means you won't accidentally catch it while sewing on other pieces.

FAQs

Frequently asked questions

What yarn weight works best for this giraffe pattern?

Worsted weight or a bulky plush/velvet yarn both work well with the recommended E-4/3.5mm hook. Plush yarn gives the softest, most huggable texture, while standard worsted weight creates a firmer, more classic amigurumi feel.

Can I use regular yarn instead of plush or velvet yarn?

Absolutely — any worsted weight yarn will work as long as you keep your stitches snug enough to prevent fiberfill from showing through. Just be aware the finished texture will be less plush and slightly more textured than velvet yarn.

Why does the pattern say to insert safety eyes between Rounds 3 and 4 of the head?

That specific placement is where the head shaping creates the ideal spot for the eyes to sit naturally and symmetrically once the piece is fully worked and stuffed. Inserting them too early or late can throw off the giraffe's expression.

How much fiberfill will I need for this pattern?

The exact amount depends on your yarn weight and how firmly you stuff, but plan for a generous bag of polyester fiberfill since the body alone spans 21 rounds. It's better to have extra on hand than run short mid-project.

Are the horns, ears, and tail worked the same way?

The horns and ears are both worked over 6 rounds each and share a similar construction, while the tail is a much shorter 2-round piece finished with a yarn tuft. Each piece is worked separately, then sewn on during assembly.

One at a time —

Get the next pattern

Tested round by round before it is sent. No spam.