Made and counted by Wren —

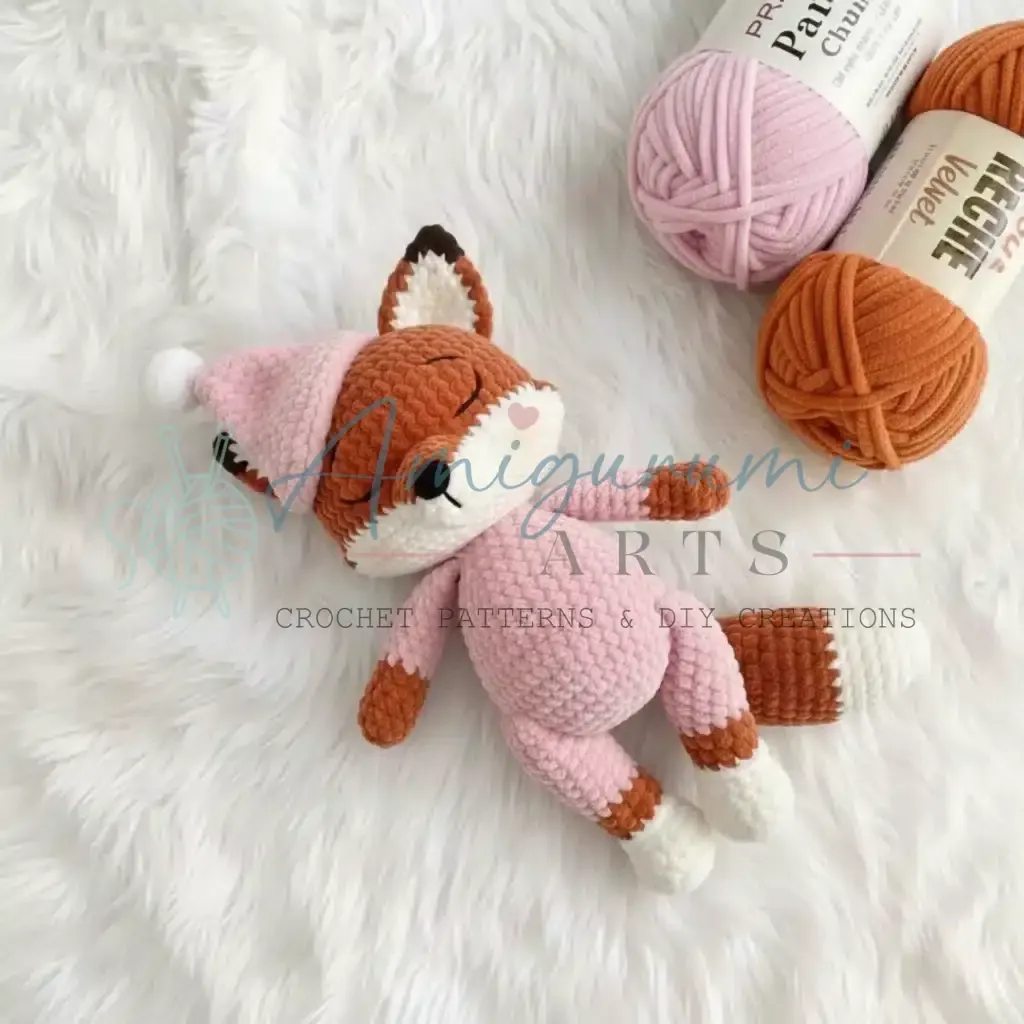
Crochet fox amigurumi pattern with winter hat details

5 mm hook, super bulky chenille: amigurumi fox with winter hat, 11 parts, 16-round head.

Crochet fox amigurumi pattern with winter hat details
IntermediateLevel
6-9 hoursTime
14 mmHook
Super BulkyYarn
Jump to the pattern

About this pattern

This is an amigurumi fox built from eleven separately crocheted pieces, including a 16-round head, an 18-round body, hind legs and forelegs at 28 and 22 rounds, a tail, and a winter hat with pompom. Work happens in spiral rounds with a stitch marker at the round end, using a 5 mm main hook and a 3.25 mm hook for edging. Safety eyes and nose get secured and heat-set with a lighter before the head is stuffed and closed.

This amigurumi fox breaks into eleven separate pattern parts -- head, ears with dark brown tips, muzzle, white face markings, body, two hind legs, two forelegs, tail, winter hat, and a pompom -- each worked in continuous spiral rounds with no turning chain. The head runs 16 rounds; the hind legs run longest at 28 rounds each. Safety eyes seat between rounds 13 and 14, spaced 7-8 sc apart edge to edge, before the head closes around stuffing packed firmly into the cheeks.

The pattern

Written out round by round

Materials

Glitter safety eyes

  • 12-14 mm
  • Black velvet safety nose: 10×12 mm

Stuffing material

  • Polyester fiberfill
  • Needle and scissors

Crochet hook

  • 5 mm main hook (or 3.5-5 mm depending on your gauge)

Smaller hook

  • 3.25 mm for edging and details

Lighter

  • For securing safety eyes and nose

Abbreviations

  • MR = magic ring
  • SC = single crochet
  • SL ST = slip stitch
  • INC = increase (2 sc in one stitch)
  • DEC = decrease (2 sc together)
  • CH = chain
  • DC = double crochet
  • HDC = half double crochet
  • HDC2TOG = crochet 2 hdc together
  • BLO = back loop only
  • FLO = front loop only
  • *N = number of repetitions in the round
  • (N) = number of stitches in the round

Head

Insert safety eyes between rounds 13 and 14, with approximately 7-8 sc distance between them (measured from edge to edge). After securing the plug, use a lighter to melt the plastic legs and flatten them by pressing with the lighter back.

Begin stuffing the head firmly at round 20.

Cut yarn leaving a long tail for sewing. Stuff the head very well, pushing fiberfill into the cheeks to create full, rounded features.

Step by step: Leave a long tail.

Before sewing, attach dark brown or black yarn to the safety nose, then insert nose between rounds 4 and 5 of the muzzle. Pull the short yarn end to the wrong side and secure with plug. Use lighter to melt and flatten.

Step by step: Hide and secure all yarn ends inside the body after round 8; Secure all ends inside the body after round 23; Cut yarn and hide end inside. Stuff body firmly but not too hard.

Step by step: Source text is truncated/incomplete at this point.

Round 16 sc in a MR. (6)
Round 26 inc. (12)Step by step: (1 sc, in... [source text cuts off here].
Round 3(1 sc, inc)*6. (18)Step by step: 18 sc, 1 sl st. (18).
Round 4(2 sc, inc)*6. (24)Step by step: 24 sc, 2 extra sc, 1 sl st. (24).
Round 5(3 sc, inc)*6. (30)
Round 6(4 sc, inc)*6. (36)
Round 736 sc. (36)
Round 8(5 sc, inc)*6. (42)Join the hind legs: 7 sc, 6 sc joining leg and body, 16 sc, 6 sc joining second leg and body, 7 sc. (42)Step by step: 42 sc. (3 rounds) (42).
Rounds 9–1242 sc. (4 rounds) (42)Join the forelegs: 4 sc, 4 sc joining foreleg and body, 5 sc, 4 sc joining second foreleg and body, 1 sc. (18)Step by step: 18 sc, 1 sc, 1 sl st. (18).
Round 137 sc, (1 sc, inc)*3, 15 sc, (1 sc, inc)*3, 8 sc. (48)
Rounds 14–1748 sc. (4 rounds) (48)
Round 187 sc, (1 sc, dec)*3, 15 sc, (1 sc, dec)*3, 8 sc. (42)
Round 19(5 sc, dec)*6. (36)Step by step: 36 sc. (3 rounds) (36).
Round 20(4 sc, dec)*6. (30)Step by step: 30 sc. (2 rounds) (30).
Round 21(3 sc, dec)*6. (24)Step by step: 24 sc. (2 rounds) (24).
Round 22(2 sc, dec)*6, 2 sc, 1 sl st to align. (18)

Ears

Make 2

Outer ear is worked in orange; inner ear is worked as a flat white piece.

Leave a long tail for sewing.

Round 1Outer Ear 6 sc in a MR. (6)
Round 2Outer Ear 6 inc. (12)
Round 3Outer Ear (1 sc, inc)*6. (18)
Round 4Outer Ear (2 sc, inc)*6. (24)
Round 5Outer Ear 24 sc. (24)
Round 6Outer Ear (2 sc, dec)*6. (18)
Round 1Inner Ear - White 6 sc in a MR. (6)
Round 2Inner Ear - White 6 inc. (12)
Round 3Inner Ear - White (1 sc, inc)*6. (18)
Round 4Inner Ear - White 18 sc, 1 sl st. (18)
Round 7Place the white inner ear inside the orange outer ear, slightly offset to show the white; fold the ear in half at the base and crochet through both layers: 9 sc through both sides. (9)

Hind Legs

Make 2

Right Leg: Attach white yarn to FLO of round 9 and work 18 sl st for a decorative edge.

Right Leg: Attach orange yarn to FLO of round 12 and work 18 sl st for a decorative edge.

Right Leg: If necessary, crochet 2-4 extra sc to align, then fold in half and crochet 6 sc through both sides. Stuff leg firmly to the middle, and stuff the top firmly. Do not stuff the very top (last few rounds).

Left Leg: Attach white yarn to FLO of round 9: 18 sl st.

Left Leg: Attach orange yarn to FLO of round 12: 18 sl st.

Left Leg: Fold and close with 6 sc through both sides. Stuff same as right leg.

Note: The legs close from different directions – one at the front, one at the back, with the wrong side of the closure facing inward toward the body.

Round 1Right Leg 6 sc in a MR. (6)
Round 2Right Leg 6 inc. (12)
Round 3Right Leg (1 sc, inc)*6. (18)
Round 4Right Leg (2 sc, inc)*6. (24)
Round 5Right Leg (3 sc, inc)*6. (30)
Rounds 6–7Right Leg 30 sc. (2 rounds) (30)
Round 8Right Leg (1 sc, dec)*6, 12 sc. (24)
Round 9Right Leg 6 dec, 10 sc, change to light blue on last stitch and move marker here. (18)
Round 10Right Leg BLO 18 sc with light blue. (18)
Round 11Right Leg 18 sc with light blue, change to orange on last stitch. (18)
Round 12Right Leg 18 sc with orange. (18)
Round 13Right Leg BLO 18 sc with orange. (18)
Rounds 14–16Right Leg 18 sc with orange. (3 rounds) (18)
Round 17Right Leg (1 sc, dec)*6. (12)
Round 1Left Leg 6 sc in a MR. (6)
Round 2Left Leg 6 inc. (12)
Round 3Left Leg (1 sc, inc)*6. (18)
Round 4Left Leg (2 sc, inc)*6. (24)
Round 5Left Leg (3 sc, inc)*6. (30)
Rounds 6–7Left Leg 30 sc. (2 rounds) (30)
Round 8Left Leg 12 sc, (1 sc, dec)*6. (24)
Round 9Left Leg 12 sc, 6 dec, change to light blue. (18)
Round 10Left Leg BLO 18 sc with light blue. (18)
Round 11Left Leg 18 sc, change to orange. (18)
Round 12Left Leg 18 sc orange. (18)
Round 13Left Leg BLO 18 sc orange. (18)
Rounds 14–16Left Leg 18 sc orange. (3 rounds) (18)
Round 17Left Leg (1 sc, dec)*6. (12)
Forelegs/Arms

Make 2

Right Arm: Attach light blue yarn to FLO of round 9 and work 12 sl st for a decorative edge.

Right Arm: Crochet 2-3 extra sc if needed, fold in half and work 4 sc through both sides. Stuff well up to round 10, lightly until round 15. Do not stuff the top.

Left Arm: Attach light blue yarn to FLO of round 9: 12 sl st.

Left Arm: Fold and close with 4 sc through both sides. Stuff same as right arm.

Round 1Right Arm 6 sc in a MR. (6)
Round 2Right Arm 6 inc. (12)
Round 3Right Arm (1 sc, inc)*6. (18)
Round 4Right Arm (8 sc, inc)*2. (20)
Rounds 5–6Right Arm 20 sc. (2 rounds) (20)
Round 7Right Arm (1 sc, dec)*4, 8 sc. (16)
Round 8Right Arm 4 dec, 6 sc, change to light blue on last stitch and move marker. (12)
Round 9Right Arm 12 sc with light blue. (12)
Round 10Right Arm BLO 12 sc with light blue. (12)
Rounds 11–15Right Arm 12 sc. (5 rounds) (12)
Round 16Right Arm (2 sc, dec)*3. (9)
Round 1Left Arm 6 sc in a MR. (6)
Round 2Left Arm 6 inc. (12)
Round 3Left Arm (1 sc, inc)*6. (18)
Round 4Left Arm (8 sc, inc)*2. (20)
Rounds 5–6Left Arm 20 sc. (2 rounds) (20)
Round 7Left Arm 8 sc, (1 sc, dec)*4. (16)
Round 8Left Arm 8 sc, 4 dec, change to light blue. (12)
Round 9Left Arm 12 sc. (12)
Round 10Left Arm BLO 12 sc. (12)
Rounds 11–15Left Arm 12 sc. (5 rounds) (12)
Round 16Left Arm (2 sc, dec)*3. (9)

Tail

Begin with white yarn for the tip; leave a long tail for sewing. Stuff tail firmly.

Round 16 sc in a MR. (6)
Round 26 inc. (12)
Round 3(1 sc, inc)*6. (18)
Round 4(2 sc, inc)*6. (24)
Rounds 5–724 sc. (3 rounds), change to orange on last stitch of round 7 (24)
Rounds 8–1024 sc with orange. (3 rounds) (24)
Round 11(2 sc, dec)*6. (18)
Rounds 12–1418 sc. (3 rounds) (18)
Round 15(1 sc, dec)*6. (12)
Round 1612 sc, 1 sl st. (12)

Winter Hat

Leave a small tail. Work edging around the foundation chain (round 1): 42 sl st. Weave in ends.

Round 1Ch 42, join in a circle (be careful not to twist). (42)
Round 242 sc (to create a clean base). (42)
Round 342 hdc. (42)
Round 4(5 hdc, hdc2tog)*6. (36)
Rounds 5–636 hdc. (2 rounds) (36)
Round 7(4 hdc, hdc2tog)*6. (30)
Rounds 8–930 hdc. (2 rounds) (30)
Round 10(3 hdc, hdc2tog)*6. (24)
Rounds 11–1324 hdc. (3 rounds) (24)
Round 14(2 hdc, hdc2tog)*6. (18)
Rounds 15–1718 hdc. (3 rounds) (18)
Round 18(1 hdc, hdc2tog)*6. (12)
Rounds 19–2112 hdc. (3 rounds) (12)
Round 226 hdc2tog. (6)
Round 236 sc, 1 sl st. (6)

Assembly

Step 1Attach ears between rounds 5 and 12 of the head, angled slightly outward for a natural fox appearance.
Step 2Sew the dark brown ear tip pieces to the very tips of the ears for the characteristic dark fox ear markings.
Step 3Sew muzzle to head between rounds 13 and 20, centered below the eyes.
Step 4Sew the white face marking pieces on either side of the muzzle, slightly below the eyes, to create the fox's white facial pattern.
Step 5Needle sculpting: insert needle at point 'A' (back of head opening); exit at point 'B' (below eye), insert at 'C' (other side below eye); exit at point 'D' and return to 'A'; gently pull to define the muzzle area; tie off and repeat 2-3 times for definition.
Step 6Embroidery: use dark brown/black fine yarn to embroider closed, sleeping eyes (curved lines above eyes); embroider a small 'Y' shape below the nose for the mouth; optionally add small eyebrows above the eyes.
Step 7Sew tail to the back of the body just above the hind legs, positioned for a natural upward curve.

Tester's notes

Place a contrasting-color stitch marker at the end of every round. The work is spiral with no turning chain, so rounds drift fast without one.

Stuffing on the head starts at round 20 and needs to be pushed into the cheeks before closing, or the face reads flat instead of rounded.

Safety eyes go between rounds 13 and 14, spaced 7-8 sc apart; melt the posts flat with a lighter once seated so they do not work loose later.

The toy is crocheted in a spiral, so place a marker at the end of each round using a contrasting color thread.

Do NOT make a turning chain at the end of rounds to avoid visible seams.

Count your stitches carefully in each round, especially when starting out.

Color changes always happen on the last stitch of the round when two loops remain on the hook.

Use a lighter to melt and flatten the safety eye and nose attachments for extra security, ensuring they won't come loose during play or handling.

Do not stuff too firmly – distribute fiberfill from center to edges.

Stuff the head and body well, but keep limbs softer for posability.

Stuff as you go, especially for the head and body, rather than waiting until pieces are complete.

At a glance

Rounds102
Parts6
LevelIntermediate
Time6-9 hours
Hook14 mm
YarnSuper Bulky

Gauge check

After Head round 5, the piece should read 30 sc and lie flat without cupping or ruffling at the edge.

Stitch-count checkpoints

  • Head · Round 5: 30 sts
  • Head · Round 13: 48 sts
  • Head · Round 21: 24 sts
  • Head · Round 22: 18 sts
  • Ears · Round 3: 18 sts
  • Ears · Round 6: 18 sts

If something looks wrong

Rounds drift and a count no longer matches the pattern, for example round 5 reads anything other than 30 sc.
A round marker was lost or a stitch miscounted somewhere earlier. Recount back to the last marked round, correct the stitch total, and re-mark before continuing.
The outer ear flares instead of cupping toward the tip.
Round 5 of the outer ear is worked straight at 24 sc with no shaping, so uneven tension there shows immediately. Keep tension consistent through that flat round and match the inner white piece to the same stitch count before seaming.
Eyes sit crooked or closer together than intended on the finished head.
Spacing drifted off the 7-8 sc window between rounds 13 and 14. Pull the plug backing before melting the post, re-measure spacing, then re-seat and heat-set.
The face reads flat instead of rounded once the head is closed.
Cheeks were not packed before round 20 closed over them. Reopen a few stitches near the top, push extra fiberfill into the cheek area, then re-close.

Yarn substitutions

Polyester chenille, super bulkyHolds the same gauge at the 5 mm hook and keeps the stated round counts accurate. Drape is slightly stiffer than the called-for chenille, so firm stuffing matters more to avoid visible lumps.
Cotton-acrylic blend, worsted/aranThinner than the super bulky chenille the pattern calls for, so pieces finish smaller than the round counts suggest. Drop to a 3.5-4 mm hook and expect either added rounds or a smaller finished fox.
Acrylic baby yarn, DKCloser in weight class to the secondary teal color than to the bulky main color. A 3.5 mm hook keeps the fabric dense enough to hold stuffing, but overall size drops compared to sections worked in the bulky yarn.
FAQs

Questions

When do the safety eyes go in?

Insert them between rounds 13 and 14 of the head, spaced 7-8 sc apart edge to edge. Secure the plug backing, then melt the plastic post flat with a lighter before stitching further rounds.

How much of each yarn color does the fox actually need?

One skein of the super bulky orange chenille covers the main color sections. The teal secondary color needs more at 1.5 skeins since it covers body, legs, arms, and hat, while white and cream stay small at 1/4 skein and a bit more.

Why does the pattern call for two different hook sizes?

The 5 mm hook handles the bulky chenille sections -- head, body, legs, and hat. The 3.25 mm hook tightens gauge on smaller detail pieces like the ear tips and face markings, where a looser stitch would leave visible gaps.

One at a time —

Get the next pattern

Tested round by round before it is sent. No spam.