Made and counted by Wren —

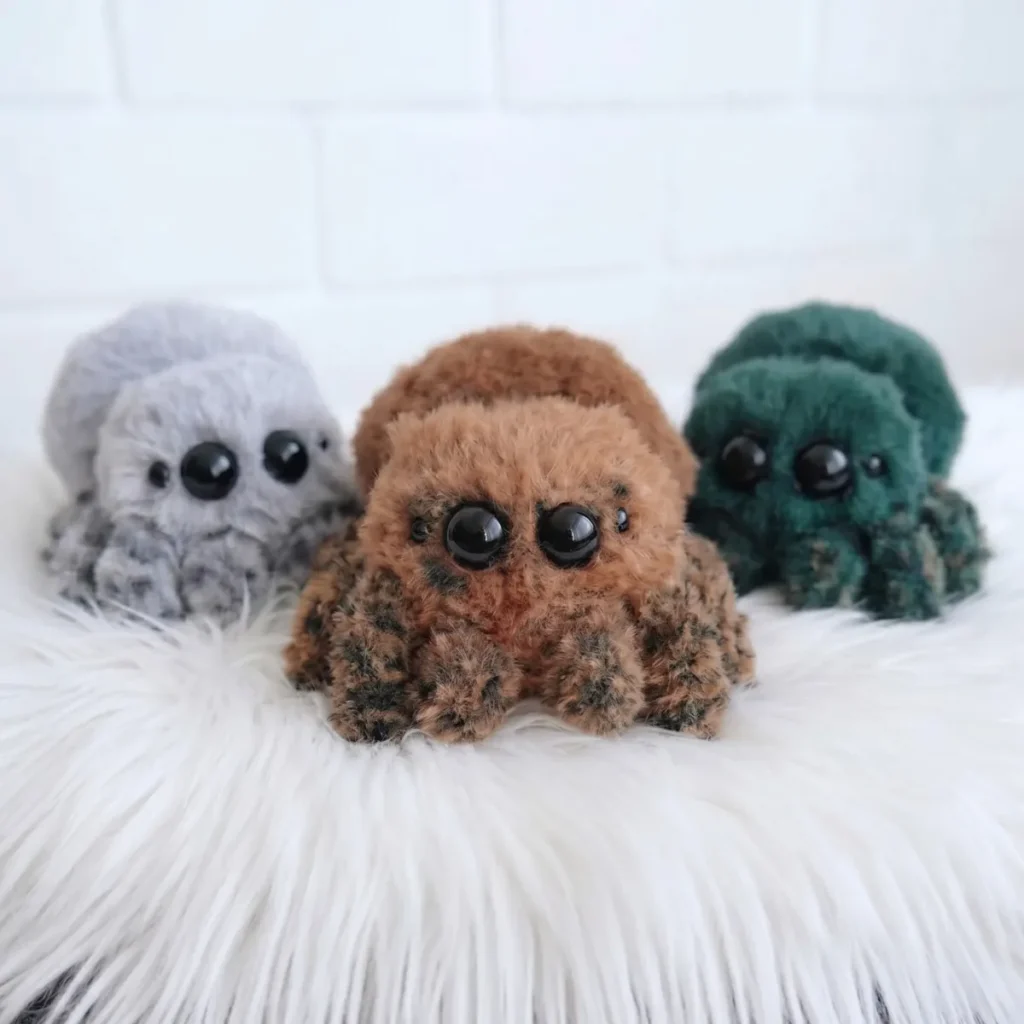
Crochet a fluffy spider amigurumi with trimmed faux fur

4.5mm hook, bulky fluffy yarn: an 8-legged spider amigurumi with trimmed faux-fur texture and safety-eye face.

Crochet a fluffy spider amigurumi with trimmed faux fur
IntermediateLevel
4-6 hoursTime
4.5 mmHook
BulkyYarn
Jump to the pattern

About this pattern

A bulky fluffy-yarn amigurumi spider with an eight-round magic-ring head, a separately worked ten-round body, eight 4-single-crochet legs, and two 2-single-crochet fangs. Requires a 4.5mm hook, 100g/60m of two-color chunky fur-style yarn, 12mm and 5-6mm safety eyes, and fiberfill. Legs and fangs are trimmed with scissors after crocheting to sculpt the fuzzy texture and define the face.

This spider amigurumi builds from a magic-ring head worked in eight continuous rounds, shaping from 6 stitches up to 18 before decreasing back to 6. The body is worked separately in ten rounds, shaping from 6 stitches up to 24 before decreasing back to 12, then sewn to the head. Eight identical legs — each a 4-single-crochet row worked into a 5-chain foundation — get sewn on four per side. Two 2-single-crochet fangs, made the same short-row way, finish the face. Bulky fluffy yarn and scissors do the real shaping, since the fuzzy pile gets trimmed after assembly to sculpt the features and even out the legs.

The pattern

Written out round by round

Materials

Yarn

  • Bulky fluffy/faux fur weight yarn, approximately 100g/60m — two colors (main body color and accent color). Suggested alternatives include any similar chunky eyelash or mink-style yarn.

Hook

  • 4.5mm crochet hook

Safety eyes

  • 12mm screw-back safety eyes (2) and 5–6mm screw-back safety eyes (2–4)

Adhesive

  • Strong clear-drying craft glue suitable for safety eyes

Stuffing

  • Polyester fiberfill
  • Tapestry needle
  • Sharp scissors (for trimming yarn pile to sculpt the face and legs)

Abbreviations

  • mr = Magic Ring
  • ch = Chain
  • sc = Single Crochet
  • inc = Increase (2 sc in same stitch)
  • dec = Decrease (invisible decrease)
  • sl st = Slip Stitch
  • Rnd = Round
  • st(s) = Stitch(es)

Head

Round 16 sc in magic ring. (6)
Round 2Inc in each st around. (12)
Round 3\[1 sc, inc\] repeat 6 times. (18)
Rounds 4–6Sc in each st around. (18) — Work 3 rounds even.
Round 7\[1 sc, dec\] repeat 6 times. (12)
Round 8Dec 6 times around. (6)Stuff the head firmly before pulling closed.Fasten off and pull the opening closed. Weave in tail. Using sharp scissors, carefully trim the yarn pile on the front of the head to sculpt and define the muzzle area. Insert the 12mm safety eyes into the trimmed area, then position the 5–6mm safety eyes above and to the outer edges of the larger eyes. Secure all eyes in place with craft glue if needed.

Body

Round 16 sc in magic ring. (6)
Round 2Inc in each st around. (12)
Round 3\[1 sc, inc\] repeat 6 times. (18)
Round 4\[2 sc, inc\] repeat 6 times. (24)
Rounds 5–7Sc in each st around. (24) — Work 3 rounds even.
Round 8\[2 sc, dec\] repeat 6 times. (18)
Round 9Sc in each st around. (18)
Round 10\[1 sc, dec\] repeat 6 times. (12)Stuff the body firmly before closing.Fasten off, leaving a tail of approximately 15cm (6 inches) for sewing. Set aside.

Legs — Make 8

Foundation: Ch 5.

Round 1Starting in the 2nd ch from hook, sc in each ch across. (4 sc) Fasten off, leaving a tail of approximately 10cm (4 inches) for attaching.

After all 8 legs are made, use sharp scissors to trim the yarn pile on each leg, giving them a neat, uniform fuzzy appearance.

Fangs — Make 2

Foundation: Ch 3.

Round 1Starting in the 2nd ch from hook, sc in each ch across. (2 sc) Fasten off, leaving a tail of approximately 10cm (4 inches) for attaching.Trim the yarn pile on both fangs to neaten and define their shape.

Assembly

Step 1Attach body to head: Thread the 15cm tail left on the body onto a tapestry needle. Position the body below and slightly behind the head, with the open end facing the head. Sew the body securely to the head using the tail, stitching all the way around the edge for a firm join. Weave in and hide all tails inside the head.
Step 2Attach legs: Take 4 legs and sew them evenly spaced along one side of the head, angling them slightly downward and outward. Repeat with the remaining 4 legs on the opposite side of the head. Use the 10cm tails to sew each leg in place, then draw the tails through to the inside of the head and weave them in securely so no ends are visible.
Step 3Attach fangs: Position both fangs at the front center of the head, side by side, pointing slightly downward. Sew each fang in place using its tail, then weave the ends inside the head.
Step 4Final trimming: Do a final pass with your scissors over the entire spider, tidying up any uneven pile across the head, body, legs, and fangs. This sculpting step is what gives Tosya her polished, professional finish.

Tester's notes

4.5mm hook pairs with bulky fluffy yarn; go down a size if the 6-stitch magic ring at round 1 leaves visible gaps between stitches.

Mark round 1 with a stitch marker before the first increase round, since the head is worked in continuous spiral rounds with no join point to reference.

Two yarn colors are needed for this design — main body color and one accent — so keep both balls wound and ready before starting the head.

Stuff the head and body firmly before closing each piece for best results — access is easiest while the last few stitches of each piece remain open.

Legs and fangs are trimmed once per batch — all 8 legs after they're all crocheted, and both fangs after their row — before any pieces are sewn on; a final scissor pass then evens out the whole spider once assembly is complete.

This pattern uses US crochet terminology.

Work is completed in continuous spiral rounds unless otherwise noted. Do not join rounds unless specified.

At a glance

Rounds16
Parts4
LevelIntermediate
Time4-6 hours
Hook4.5 mm
YarnBulky

Gauge check

Check the head after round 3, when the count reaches 18 stitches: the fabric should feel dense enough that fiberfill can't poke through between stitches.

Stitch-count checkpoints

  • Head · Round 1: 6 sts
  • Head · Round 2: 12 sts
  • Head · Round 3: 18 sts
  • Head · Round 8: 6 sts
  • Body · Round 2: 12 sts
  • Body · Round 4: 24 sts

If something looks wrong

The face looks patchy instead of smooth after trimming.
Fur pile length varies by round when increases and decreases aren't spaced evenly; trim the head in small passes moving outward from round 2 rather than one long cut, working toward eye placement last.
Legs come out uneven lengths.
Each leg is a single 4-single-crochet row worked from a 5-chain foundation, so tension on the chain changes the finished length; chain all 8 leg bases before starting row 1 to keep tension consistent across the set.
Safety eyes sit crooked on the head.
The head shapes from 6 stitches up to 18, holds steady for three rounds, then decreases back down to 6, so the surface still curves where eyes usually seat; place both the 12mm and 5-6mm eyes and check from the front before stuffing, not just by round count.
The head-to-body join gapes or looks loose at the seam.
The 15cm tail left on the body is meant to sew all the way around the opening in one continuous pass; stitch through both layers at closer intervals instead of skipping stitches, and weave in tails only after the seam closes fully.

Yarn substitutions

Other chunky eyelash or mink-style yarnAny chunky faux fur, eyelash, or mink-style yarn works beautifully as a substitute. Look for a similar weight — approximately 60–80m per 100g — with a long, dense pile so the trimming technique still sculpts cleanly.
Two strands of lighter eyelash yarn held togetherIf you can't find a bulky fluffy yarn, hold two strands of a lighter-weight eyelash yarn together as you crochet to approximate the same fluffy texture and bulk as the single-strand original.
FAQs

Questions

Why does the body shape go up to 24 stitches while the head only reaches 18?

The head increases from 6 stitches up to 18 over its first three rounds, holds steady for three more rounds, then decreases back down to 6 for a compact rounded shape. The body, worked as a separate piece, increases further to 24 stitches before decreasing to 12, giving it a slightly larger oval silhouette that sits below the head once sewn together.

Why are there two safety eye sizes listed?

The materials call for 12mm eyes (2) plus 5-6mm eyes (2-4), covering the main pair plus optional smaller accent eyes for added detail. Use only as many small eyes as the intended face arrangement calls for, and test placement before inserting any permanently.

Do all 8 legs and both fangs need trimming before they're sewn on?

Yes — trim each type once every piece of that type is made: all 8 legs get trimmed together right after crocheting, and both fangs get trimmed together after their row, all before sewing anything onto the head. A final scissor pass then evens out the whole spider after assembly is complete.

One at a time —

Get the next pattern

Tested round by round before it is sent. No spam.