Made and counted by Wren —

Crochet Flower Pillow Pattern in Chunky Yarn (Cozy Floral Cushion)

Crochet a cozy flower pillow with chunky yarn using simple HDC increases and petal shaping. A beginner-friendly floral cushion pattern with color-change ti

Crochet Flower Pillow Pattern in Chunky Yarn (Cozy Floral Cushion)
IntermediateLevel
4-6 HoursTime
ChunkyYarn
Jump to the pattern

At a glance

Start with a small ring, either chained or made as a magic circle, to form the flower's very center.

Work an even round of half double crochet stitches into that ring to build the first solid layer.

Increase evenly around the next round so your stitch count doubles, keeping the circle flat and balanced.

Work another increase round using an alternating single-then-double stitch rhythm to widen the base further.

Optionally cut your yarn and join a new color with a slip stitch for a two-tone effect.

Shape the outer edge into individual petals so the flat circle transforms into a dimensional bloom.

Stuff the piece firmly and evenly, filling both the petals and the center for a plush finish.

Close up the opening neatly and weave in any remaining tails to finish your cozy flower pillow.

About this pattern

This crochet flower pillow transforms a handful of chunky yarn rounds into a soft, sculptural bloom you can actually rest your head on. It starts as a simple circle worked in half double crochet, then blossoms outward into distinct petals, making it equal parts wall-worthy decor and everyday comfort object. It's perfect for crocheters who want a project that feels like a bouquet but functions like a pillow, and it's an especially satisfying make for anyone decorating a nursery, reading corner, or dorm room with a pop of floral personality.

The techniques here are refreshingly approachable: chaining into a circle (or using a magic circle if you prefer a tighter center), working consistent HDC increases round by round, and then shifting into petal formation once your base reaches 30 stitches. There's also an optional color change worked in cleanly with a slip stitch join, which is a great low-pressure way to practice swapping yarn colors mid-project. Expect this to take a relaxed weekend, roughly 4-6 hours, and know that the chunky yarn means big, visible progress with every round.

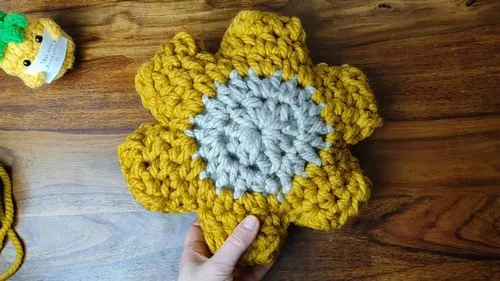
Once stuffed and joined, the finished piece reads as a plump, dimensional flower — thick, huggable, and satisfyingly tactile thanks to the chunky yarn's texture. It's substantial enough to double as a lumbar cushion or an accent pillow on a bed, and its bold, graphic shape makes it a standout handmade gift for a new mom, a plant-and-flower lover, or anyone who could use a little extra softness in their space. Wrap it simply or tuck it into a gift basket — either way, it doesn't look homemade in the humble sense, it looks intentional.

Variations

The base pattern is wonderfully open to personalization, starting with color. Try a classic look with a golden-yellow center and soft pink petals, or go bold with a sunflower palette of mustard and deep brown for the very center rounds. Bernat Blanket in 'Vintage White' paired with 'Coral' makes a sweet, cottagecore-inspired bloom, while 'Dusty Rose' and 'Sage' creates a more muted, farmhouse-style pillow. If you want a bigger statement piece, work one or two additional increase rounds after the 30-stitch round before starting your petals — just keep your increases evenly spaced (roughly every 3rd stitch) so the circle stays flat and round. For a smaller accent pillow, you could use a worsted weight yarn held double instead of true chunky yarn, which will naturally shrink your finished diameter while keeping the same stitch counts. Swapping yarn brands is easy here too — Wool-Ease Thick & Quick or Grande are both great chunky substitutes for the suggested Bernat, and both come in huge color ranges for experimenting. For a seasonal spin, try deep burgundy and burnt orange for a fall-inspired bloom, or icy blue and white for a wintery frosted-flower look. You can also make the color change happen twice instead of once — once for the center, once for the petals, and once more for petal tips — for an ombré-style flower, just remember each new color joins in with a slip stitch the same way the pattern describes. Finally, consider working two flowers in coordinating colors and joining them back-to-back around the edge instead of stuffing one alone, giving you a fuller, more dramatic pillow with color on both sides.

I adore how this pattern makes a big, bold statement using nothing but half double crochet and thoughtful increases. Starting the base with a chain-4 ring (or a magic circle if that's your preference) and watching it double from 10 to 20 to 30 stitches in just a few rounds is so satisfying — the chunky yarn means those increases show up fast and dramatically. Then shaping the petals is where the real magic happens, turning a flat circle into something with real floral personality. I also love that there's an easy opportunity to change yarn colors partway through, which lets you play with a two-tone bloom without any complicated colorwork. Because the yarn is chunky and the stitch count stays manageable, this never feels fussy or fiddly — it feels like real, tangible progress with every round. By the time you're stuffing and closing it up, you'll have something that looks like it came from a boutique home shop, not a hook and a ball of yarn. It's the kind of project that makes you want to start a second one in a different colorway immediately.
Common mistakes

  • Pulling the starting chain-4 ringCinch the tail firmly before working your first round of 10 HDC, and go back after finishing the piece to snug up the tail one more time with a yarn needle.
  • Losing track of stitch countsUse a stitch marker in the first stitch of each round and count out loud as you go — with chunky yarn, miscounts are easy to spot early if you check every few stitches rather than only at the end.
  • Forgetting that the joining slip stitchAlways treat the join and turning chain as connectors only, and begin counting your working stitches with the very first HDC after the chain.
  • Working the alternating 'one HDCPlace a stitch marker at the start of every increase pair so you can visually confirm the rhythm of single-then-double stitches before moving to the next round.
  • Cutting the yarn too close to the workLeave at least a 6-inch tail before cutting for a color change, and join the new color with a firm slip stitch so the transition stays neat and secure.
  • Under-stuffing the pillow, resulting inStuff firmly and evenly into the petals as well as the center, checking that no lumps or thin spots form before you close the final seam.

The pattern

Written out round by round

Materials

  • Chunky Yarn (100g, 50m, 100% acrylic; Bernat yarn is suggested as an alternative)
  • Crochet Hook suitable for chunky yarn
  • Stitch Marker
  • Yarn Needle
  • Stuffing Material

Abbreviations

  • hdc = half double crochet

Form Circle

Start Chain 4. If you prefer, you could use a magic circle instead.

Join with a slip stitch into the first chain to form a circle.

  1. Round 1Establishing the Base Chain 2: This does not count as a stitch. Half Double Crochets (HDC): Make 10 HDC into the circle. You may crochet over the tail end to tighten the circle later.

Close Round

Join with a slip stitch to the first HDC.

  1. Round 2Increasing Chain 2: This does not count as a stitch. Increase: Make 2 HDC in each stitch around (20 stitches total).(20)

Join

Slip stitch to the first HDC of the round.

Color Change and Pattern Variation

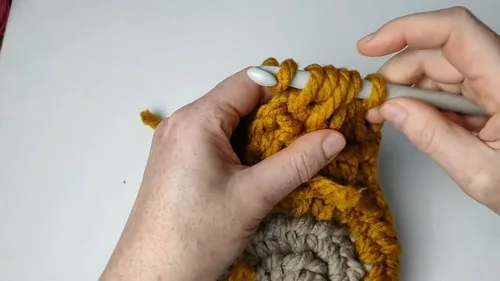
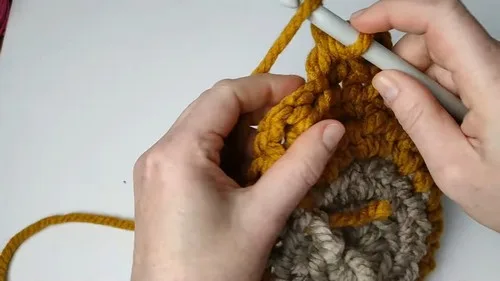
At this point, you may choose to change yarn color. Cut your current yarn and join the new yarn with a slip stitch.

  1. Round 3Chain 2. In the pattern now, alternate between one HDC in the next stitch and 2 HDC in the following stitch , around. You will end up with 30 stitches.(30)

Creating Petals

Form Petals

Each petal spans over 5 stitches.

  1. PetalStart with a chain 2, then make 5 HDC (one into each of the next five stitches). Chain 2, turn your work. Then, create a decrease by crocheting two HDC together, make one HDC in the next stitch, and then another decrease (crocheting two HDC together). Chain 1 to secure and cut your yarn, leaving a tail for sewing.

Assembly

Assembly

Step 1

Pair Creation:: Repeat the petal creation process to make as many pairs as needed.

Step 2

Joining:: Place the wrong sides of a petal pair together. Using a yarn needle and a length of yarn, stitch around the edges to join. Before fully closed, stuff the petal.

Step 3

Final Touches:: Repeat the joining and stuffing process for all petals, then stitch them together at the base as needed to create your plush project.

Step 4

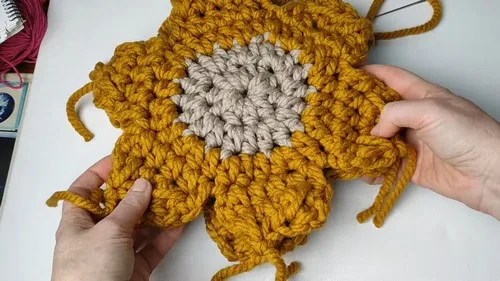
Finishing:: Weave in any loose ends.

Step 5

Adjust stuffing as needed to ensure even shaping.

Important notes

💡 Choose a hook one size larger than your yarn label suggests if you want looser, drapier stitches, or stick to the recommended size for a firmer, more structured pillow shape.

💡 Keep a stitch marker in the first stitch of every round — with chunky yarn the rounds move fast, and it's easy to lose your place without one.

💡 When you reach the note about changing yarn color, cut the old yarn with a 6-inch tail, then join the new color with a slip stitch through the last stitch worked before continuing.

💡 Stuff as you go rather than waiting until the very end — it's much easier to distribute filling evenly into petal shapes before the opening gets too small to work with.

💡 Weave in all tail ends, including the one at the very center of the circle, with a yarn needle so nothing works its way loose after repeated use as a pillow.

💡 Block your finished flower gently by shaping the petals with your hands while lightly steaming, which helps chunky yarn hold its floral silhouette instead of curling inward.

More photos

Crochet Flower Pillow Pattern in Chunky Yarn (Cozy Floral Cushion) — photo 2
Crochet Flower Pillow Pattern in Chunky Yarn (Cozy Floral Cushion) — photo 3
Crochet Flower Pillow Pattern in Chunky Yarn (Cozy Floral Cushion) — photo 4
FAQs

Frequently asked questions

What yarn weight works best if I don't have chunky yarn?

You can substitute a worsted weight yarn held double throughout to mimic the thickness of chunky yarn. Just know your finished pillow will run a bit smaller and denser since worsted-doubled strands behave slightly differently than true chunky yarn.

How much stuffing will I need for this pillow?

It depends on your desired firmness, but plan for a generous handful more than you think you'll need since chunky yarn stitches have larger gaps that flatten stuffing visually. Stuff firmly into the petals first, then fill the center, checking for even plumpness throughout.

Can I make this pillow without changing yarn colors?

Absolutely — the color change is optional and purely decorative. Working the entire flower in a single color still gives you a beautiful, dimensional bloom, it just won't have that two-tone contrast between the center and the petals.

Is a magic circle or a chain-4 ring better for beginners?

A chain-4 ring is a bit more beginner-friendly since it's easier to see and count, while a magic circle gives you a tighter, hole-free center once tightened. Either works perfectly for this pattern, so choose whichever feels more comfortable in your hands.

How do I keep my flower pillow lying flat instead of cupping?

This usually comes down to keeping your increase counts accurate in the early rounds — going from 10 to 20 to 30 stitches evenly is what keeps the base flat before petal shaping begins. If it starts to cup or ruffle, check that you haven't added extra increases anywhere along the round.

One at a time —

Get the next pattern

Tested round by round before it is sent. No spam.