Made and counted by Wren —

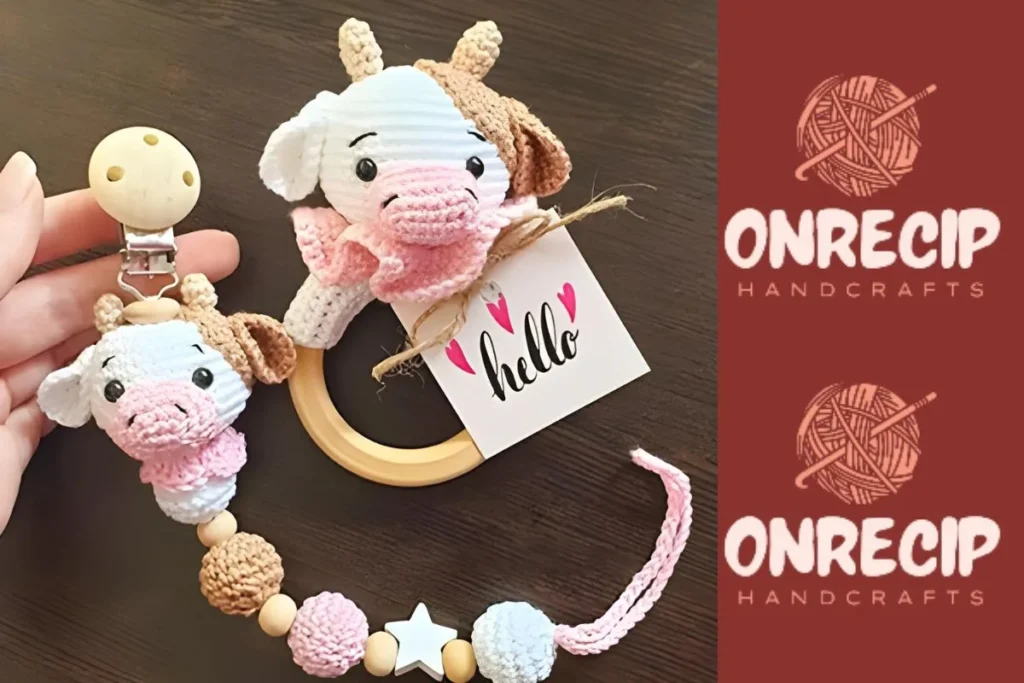
Crochet cow pacifier clip and rattle amigurumi pattern

2mm hook and fingering-weight yarn shape a cow pacifier clip and rattle amigurumi with a 13-round head.

Crochet cow pacifier clip and rattle amigurumi pattern
IntermediateLevel
4-6 hoursTime
2 mmHook
FingeringYarn
Jump to the pattern

About this pattern

This is a cow-shaped amigurumi pacifier clip and rattle, built from a 13-round head, two pink nose pieces (4 rounds and 3 rounds), and 2-round horns. A 2mm hook keeps the fabric dense enough to hide 16mm and 10mm beads stuffed inside for the rattle sound, and a 70mm wooden ring holds the clip hardware. Expect a small-scale project best suited to a crocheter comfortable reading round-by-round color changes.

This cow pacifier clip and rattle set amigurumi builds a small head from 13 rounds, tops it with two separate pink nose pieces worked from a 4-round chain-4 start and a 3-round chain-7 start, and finishes with 2-round horns. A 70mm wooden ring attaches the clip hardware, while 16mm and 10mm beads tucked inside give the rattle its sound. The 13-round head count is the figure that matters most — every color-change round and the final closing depend on hitting that total before beads and stuffing go in.

The pattern

Written out round by round

Materials

  • 2mm hook
  • 6mm eyes
  • 16mm beads
  • 10mm beads
  • 6mm eyes
  • 2mm hook
  • 70mm wooden ring

Abbreviations

  • ch = chain
  • st = stitch
  • sc = single crochet
  • inc = increase
  • dec = decrease
  • rnd = round

Nose

(Pink)

Ch 4, start in second ch from hook,

Round 12sc, 3sc in last ch, continue around on other side, 1sc,inc
Round 2inc, 1sc, 3sc, 1sc, 2inc
Round 31sc, inc, 1sc, (1sc,inc)*3, 1sc, (1sc,inc)*2
Round 4sc in all

Nose

(Pink)

Ch 7, start in second ch from hook,

Round 1inc, 4sc, 3sc in last ch, continue around, 5sc
Round 2(inc)*2, 4sc, (inc)*3, 4sc, inc
Round 3sc in all

Head

(White)

Rnd 1: 6 in ring

Step by step: Rnd 1: 4sc in ring.

Step by step: 1 brown 1 white; 6 sc in ring.

Step by step: (Brown); 6 sc in ring.

Step by step: 6 sc in ring.

Step by step: Rnd 1: 6 in ring.

Step by step: 1 brown 1 white Rnd 1: 6sc in ring.

Step by step: (Brown); Rnd 1: 7sc in ring.

Round 2inc (12)
Round 31sc,inc (18)Step by step: 2sc,inc (30).
Round 42sc,inc (24)
Rounds 5–6sc in all
Round 73sc,inc (30)Step by step: 4sc,inc.
Rounds 8–9sc in all
Round 104sc,inc (36)Step by step: 5sc,inc (42); sc in all Attache safety eyes between row 11-12 with 7 st apart; 5sc,dec (36).
Round 11sc in all
Round 124sc,dec (30)Attache safety eyes between row 8-9 with 5 st apart.
Round 133sc,dec (24)
Round 142sc,dec (18)
Round 151sc,dec (12)Step by step: dec.Step by step: Put the bead in; dec.
Round 16dec (6)

Horns

Rnd 1: 4sc in ring

Round 21sc,inc
Rounds 3–5sc in all Designer Instagram: handmadebylacey

Tester's notes

2mm hook: keep this hook size through every part — nose, head, and horns — since a looser gauge lets the 16mm and 10mm rattle beads show through the stitches.

13-round head: color changes between brown and white land on specific rounds per the step-by-step notes, so mark the start of each round to catch a missed swap before finishing the next one.

70mm wooden ring: check it fits through the head's opening before the closing round is worked, since widening an opening is easier than reopening a finished amigurumi head.

6mm eyes: place and pin them before stitching the head closed, since position depends on counting rounds down from the nose attachment point.

Nose pieces (4-round and 3-round): both start pink from different base chains — ch 4 and ch 7 — so keep track of which piece is sewn where, since swapping them changes the snout proportions.

At a glance

Rounds22
Parts4
LevelIntermediate
Time4-6 hours
Hook2 mm
YarnFingering

Gauge check

After round 1 of the head, count stitches against whichever start was worked — 6 sc in the ring for the single-color version or the two-tone brown-and-white version's own count — before moving to round 2.

If the count is off, unravel back to the ring and redo round 1, since the color panels through all 13 rounds of the head rely on that base count staying fixed.

Stitch-count checkpoints

  • Head · Round 4: 24 sts
  • Head · Round 12: 30 sts
  • Head · Round 15: 12 sts
  • Head · Round 16: 6 sts

If something looks wrong

The nose piece flares out instead of curving into a snout shape.
Increases in round 2 (inc, 1sc, 3sc, 1sc, 2inc) landed unevenly around the piece. Count stitches at the end of round 2 before starting round 3 and redo the round if the total does not match the increase pattern.
Beads rattle loosely or threaten to fall out the opening.
The closing round after the 13-round head was left too wide for the 16mm and 10mm beads. Cinch the closing round tighter and check the opening against bead size before adding stuffing and beads.
Horns sit flat or wobble instead of standing up.
Only 2 rounds are worked per horn, leaving little room to fix stuffing later. Stuff firmly before the final round closes rather than trying to pack the horn after it is sewn shut.

Yarn substitutions

Cotton, fingering weightClosest match to the original scale and stitch count; firm fabric holds bead shape well. Keep the 2mm hook as given.
Acrylic, sport weightFinished head and nose pieces come out slightly larger than fingering weight. Size the hook down about half a size to keep the fabric dense enough to contain stuffing and beads.
Cotton-acrylic blend, DK weightNoticeably bigger finished pieces and a looser fabric overall. Move up a hook size or two and add a thin layer of fiberfill around beads to prevent show-through.
FAQs

Questions

Can the pacifier clip part be skipped and only the rattle used?

Yes. Skip attaching the 70mm wooden ring and the finished head, nose, and horn pieces work as a standalone rattle toy. No other round counts change.

Why does the pattern use two different nose pieces?

The 4-round nose and the 3-round nose are both pink and stack to build the layered snout shape. They start from different base chains — ch 4 and ch 7 — because one piece sits on top of the other.

What stops the rattle beads from showing through the stitches?

Working at the specified 2mm hook keeps the fabric tight enough to hide the 16mm and 10mm beads once they are stuffed inside. A thin layer of fiberfill packed around the beads before closing the round adds extra coverage.

One at a time —

Get the next pattern

Tested round by round before it is sent. No spam.