Made and counted by Wren —

Crochet Bull Amigurumi: A Beginner-Friendly Build

US G-6/4.0mm hook, bulky plush yarn: a 9-piece amigurumi bull with 2.0mm-hook horns and a sewn-on muzzle.

Crochet Bull Amigurumi: A Beginner-Friendly Build
BeginnerLevel
4-6 hoursTime
4.0 mmHook
BulkyYarn
Jump to the pattern

About this pattern

Nine separate pieces make up this bull: Body, two Ears, two Arms, Muzzle, two Legs, two Horns, and a one-round Tail. Everything works in continuous spiral with no joining except the Tail. The number that matters most is the hook swap — 4.0 mm for every plush part, down to 2.0 mm for the Horns at 16 rounds, so the smallest component gets the firmest, tightest fabric of the whole piece.

The pattern

Written out round by round

Materials

Body yarn

  • Bulky plush yarn, main body color (approx. 1 skein)

Muzzle yarn

  • Bulky plush yarn, light/cream color

Hoof yarn

  • Bulky plush yarn, dark/brown color

Horn yarn

  • Sport or DK weight smooth yarn (e.g., a cotton-blend yarn), in a contrasting color

Hook size

  • US G-6 / 4.0 mm (for body and all plush components); US B-1 / 2.0 mm (for horns)

Eyes

  • Safety eyes with lashes, plus adhesive glue to attach lashes

Optional

  • Small decorative flower for embellishment

Tools

  • Fiberfill stuffing
  • Stitch markers
  • Yarn needle / tapestry needle
  • Sewing needle and thread for attaching components
  • Scissors

Abbreviations

  • BLO = Back Loop Only
  • ch = Chain
  • dec = Invisible Decrease (insert hook in front loop of next 2 sts, pull up loop, yarn over, pull through all 3 loops)
  • hdc = Half Double Crochet
  • inc = Increase (2 sc in same stitch)
  • MR = Magic Ring
  • sc = Single Crochet
  • sl st = Slip Stitch
  • SM = Stitch Marker
  • st / sts = Stitch / Stitches

Body

Round 16 sc in MR. (6)
Round 2inc in each st around. (12)
Round 3sc, inc repeat 6 times. (18)
Round 42 sc, inc repeat 6 times. (24)
Round 53 sc, inc repeat 6 times. (30)
Round 64 sc, inc repeat 6 times. (36)
Round 75 sc, inc repeat 6 times. (42)
Round 86 sc, inc repeat 6 times. (48)
Round 97 sc, inc repeat 6 times. (54)
Round 108 sc, inc repeat 6 times. (60)
Rounds 11–15sc in each st around. (60) 5 rounds total.
Round 168 sc, dec repeat 6 times. (54)
Round 17sc in each st around. (54)
Round 187 sc, dec repeat 6 times. (48)
Round 19sc in each st around. (48)
Round 206 sc, dec repeat 6 times. (42)
Round 215 sc, dec repeat 6 times. (36)
Rounds 22–25sc in each st around. (36) 4 rounds total.
Round 264 sc, dec repeat 6 times. (30)
Round 27sc in each st around. (30)
Round 283 sc, dec repeat 6 times. (24)
Round 292 sc, dec repeat 6 times. (18)
Round 30sc, dec repeat 6 times. (12)
Round 31dec 6 times. (6)Pull the opening closed and weave the yarn tail to the inside of the Body.
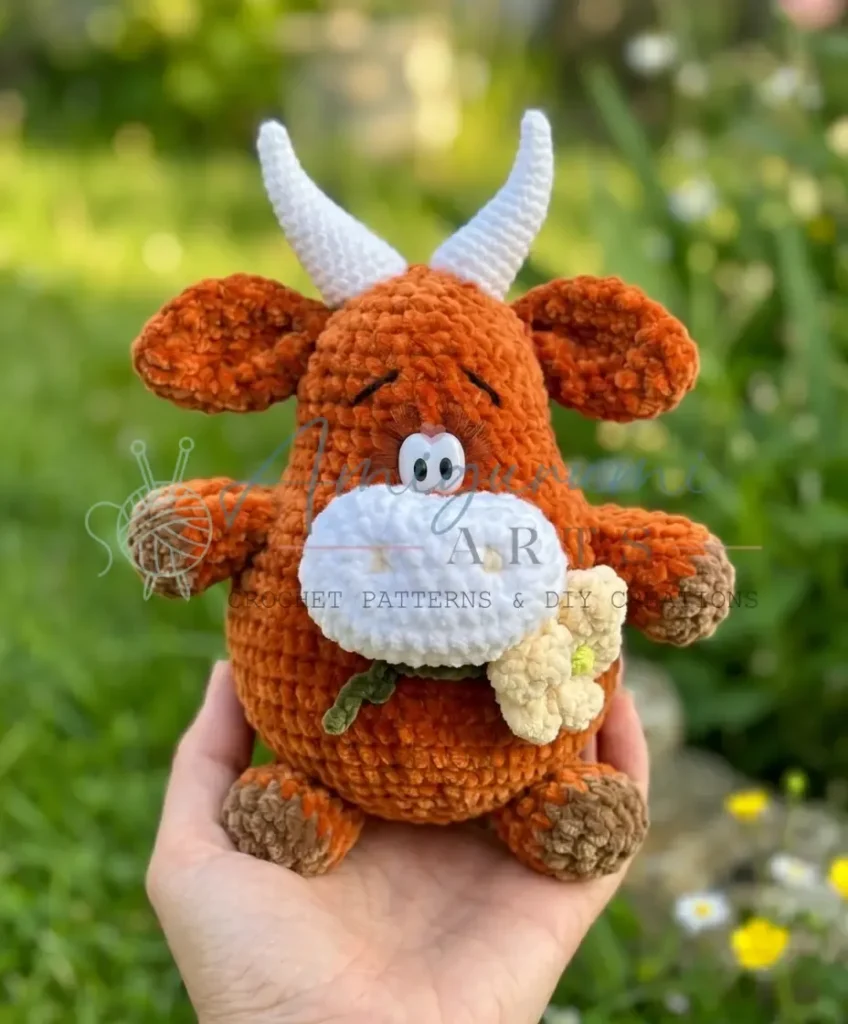
Ears (Make 2)

Round 16 sc in MR. (6)
Round 2sc, inc repeat 3 times. (9)
Round 32 sc, inc repeat 3 times. (12)
Round 43 sc, inc repeat 3 times. (15)
Rounds 5–6sc in each st around. (15) 2 rounds total.
Round 73 sc, dec repeat 3 times. (12)
Round 82 sc, dec repeat 3 times. (9)Fold the ear in half and work 4 sc across the open edge to close it. Fold in half once more and sew the ear into its final shape.

Arms (Make 2)

Begin with hoof color yarn.

Round 16 sc in MR. (6)
Round 2inc in each st around. (12)
Round 3sc in BLO in each st around. (12) Change to body color yarn at the end of this round.
Rounds 4–5sc in each st around. (12) 2 rounds total.
Round 610 sc, dec. (11)
Round 79 sc, dec. (10)Fold flat and work 5 sc across the open edge to close. Do not stuff.

Muzzle

Round 1Ch 7. Starting in the 2nd ch from hook: inc in first ch, 4 sc across, then work 4 sc into the last ch (corner); rotate and work along the other side of the foundation chain: 4 sc, inc in final ch. (16)
Round 2inc, inc, 4 sc, inc, inc, inc, inc, 4 sc, inc, inc. (24)
Round 3sc, inc twice, 4 sc, sc, inc 4 times, 4 sc, sc, inc twice. (32)
Round 4sc in each st around. (32)
Round 5dec, 14 sc repeat 2 times. (30)
Round 6sc in each st around. (30)
Round 7sc, dec, 9 sc, dec, 2 sc, dec, 9 sc, dec, sc. (26)Stuff the Muzzle lightly before attaching. Pull the nostrils inward with a yarn needle and thread after sewing on to create the nostril indentations.

Legs (Make 2)

Round 16 sc in MR. (6)
Round 2inc in each st around. (12)
Round 3sc, inc repeat 6 times. (18)Do not stuff. Flatten and sew to the Body base.

Horns (Make 2)

Use sport/DK weight yarn and US B-1 / 2.0 mm hook.

Round 14 sc in MR. (4)
Round 23 sc, inc. (5)
Round 34 sc, inc. (6)
Round 45 sc, inc. (7)
Round 56 sc, inc. (8)
Round 67 sc, inc. (9)
Round 78 sc, inc. (10)
Round 87 sc, inc, sc, inc. (12)
Round 910 sc, inc, sc. (13)
Round 1011 sc, inc, sc. (14)
Round 1112 sc, inc, sc. (15)
Round 1213 sc, inc, sc. (16)
Round 1313 sc, inc, 2 sc. (17)
Round 1414 sc, inc, 2 sc. (18)
Round 1515 sc, inc, 2 sc. (19)
Round 1615 sc, inc, 3 sc. (20)Fasten off and stuff the Horn firmly with fiberfill before attaching.

Tail

Row 1Ch 10.
Row 2Starting in the 2nd ch from hook, work 9 hdc along the chain.At the end of the Tail, create a small tassel using the hoof color yarn. Fasten off and leave a long tail for sewing.

Assembly

Step 1Position the Muzzle on the lower-front portion of the Body. Use a yarn needle and matching yarn to sew it on with a whipstitch, leaving a small gap to insert additional stuffing if needed before closing completely.
Step 2Attach the Eyes behind and above the Muzzle. Press safety eyes firmly through the plush fabric. Attach lashes using adhesive glue and allow to dry fully.
Step 3Embroider the nostrils by pulling a threaded yarn needle through the Muzzle at two points, drawing the yarn inward and pulling gently to create dimples. Secure with a knot inside.
Step 4Embroider the eyebrows above the safety eyes using a contrasting yarn color and a straight stitch.
Step 5Sew the Ears to the top sides of the Body, positioning them symmetrically. Use the yarn tails and a whipstitch to secure.
Step 6Attach the Horns between and slightly in front of the Ears. Sew securely through the base of each Horn into the Body.
Step 7Sew the Arms to either side of the upper Body, just below the widest point.
Step 8Attach the Legs to the base of the Body, flat-side down, evenly spaced.
Step 9Sew the Tail to the back lower section of the Body, securing both the base and the tassel end.
Step 10Glue or sew a small decorative flower to the corner of the Muzzle or to one Ear if desired.
Step 11Weave in all remaining ends securely.

Tester's notes

Place a stitch marker at the first stitch of every round on every part except the Tail — all of them work in continuous spiral with no join, so losing the marker means losing the round count.

The Arms change from hoof color to body color at the end of Rnd 3, worked in BLO; make the swap exactly at the round's starting stitch so the color jog lines up under the wrist.

Stuff firmly enough that none of the fiberfill shows through the fabric, but leave the Muzzle's whipstitch seam open at a small gap until extra stuffing is confirmed, then close it fully.

The Body's first 3 rounds (6, 12, 18 sc) set the base cone before Rnd 4 flattens and sews on — skipping ahead without checking those three counts throws off every later increase round.

This pattern is written in US crochet terminology.

Insert safety eyes and attach lashes before closing the Body's final opening at Rnd 31 — press them in firmly through the plush yarn and feel for the click, since the backing becomes inaccessible once that opening is closed.

At a glance

Rounds65
Parts7
LevelBeginner
Time4-6 hours
Hook4.0 mm
YarnBulky

Gauge check

After Rnd 3 of the Body, count stitches before moving on — the pattern calls for 18 sc at that point, so a mismatch there means a missed or extra increase.

There is no stated stitch-per-inch gauge; instead, judge the fabric by feel and tighten tension if stuffing is visible through the stitches, since firmness matters more than a measured swatch here.

Stitch-count checkpoints

  • Body · Round 7: 42 sts
  • Body · Round 19: 48 sts
  • Body · Round 30: 12 sts
  • Body · Round 31: 6 sts
  • Ears (Make 2) · Round 2: 9 sts
  • Ears (Make 2) · Round 4: 15 sts

If something looks wrong

The magic ring at the start of a part
The tail end wasn't cinched before the first stitch of Rnd 2 was worked; pull the short tail tight now and, if a gap remains, close it with a few whipstitches using the yarn needle.
The Ears sit floppy instead of holding
Those two rounds are worked plain with no shaping and little or no stuffing, so floppiness is expected; sew the flattened Ear on with the natural curve facing forward instead of trying to stiffen it.
The color change on the Arm forms a
The BLO round at Rnd 3 is the color-change round — if the new color was joined mid-round instead of at the stitch marker, the jog shows; rip back to the marker and rejoin there.
The Horns feel soft or wobbly once all
The 2.0 mm hook with sport/DK yarn needs tighter tension than the 4.0 mm plush sections; redo a test round with smaller stitches, or add a firmer stuffing pass before closing the tip.

Yarn substitutions

Worsted-weight acrylic or wool blendFinished Body and limbs come out smaller than with bulky plush; drape is less soft, so a 3.5 mm hook (one size down from the 4.0 mm called for) and extra stuffing passes keep the fabric firm enough to hide filling.
Heavier worsted cotton for the Horns in place of sport/DKStiffer, less flexible Horns across the same 16 rounds; size the hook up to roughly 2.75 mm to keep the fabric from becoming too dense to shape.
Super bulky yarn for the Body, Arms, and LegsA noticeably larger bull from the same 24-round Body count; move up to a 5.5 mm hook and expect to use more fiberfill per part to match the firmer feel the pattern needs.
FAQs

Questions

Why does this pattern use two different hook sizes?

The 4.0 mm hook runs the Body, Ears, Arms, Muzzle, and Legs in bulky plush yarn, while the 2.0 mm hook is reserved for the 16-round Horns worked in sport/DK yarn. The smaller hook and finer yarn keep the Horns proportionally small and rigid next to the plush body.

Can the plush yarn be swapped for a standard acrylic worsted?

Yes, but the finished bull will be smaller since worsted is thinner than bulky plush. Drop to a 3.5 mm hook and add extra stuffing passes so the fabric stays firm enough that filling doesn't show through.

Does the Muzzle need any extra stiffening before attaching?

No wire or stiffener is called for. The Muzzle is whipstitched onto the Body's lower-front with a small gap left open for additional stuffing, then closed fully once firm.

One at a time —

Get the next pattern

Tested round by round before it is sent. No spam.