Made and counted by Wren —

Crochet Baby Dragon Amigurumi Pattern – Adorable Toy for Kids

Make this sweet crochet baby dragon amigurumi with simple rounds for the head, ears, and body—a huggable handmade gift kids will adore.

Crochet Baby Dragon Amigurumi Pattern - Adorable Toy for Kids
IntermediateLevel
4-6 HoursTime
3.5 mmHook
WorstedYarn
Jump to the pattern

At a glance

Start the head in a magic ring and work steady increase rounds to build a smooth, rounded shape over ten rounds.

Stuff the head firmly in small amounts as you go so it holds a nice even sphere.

Work the ears separately in a quick four-round sequence, keeping tension tight so they stay perky.

Set the ears aside and begin the body with its foundational round, establishing the base shape.

Weave in all yarn tails on each finished piece before moving on to assembly.

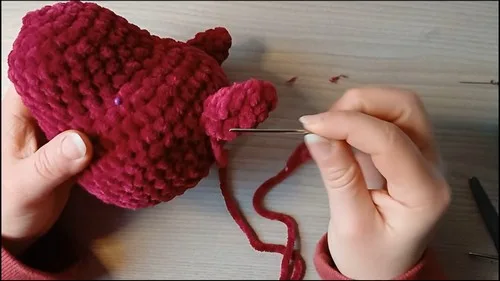
Pin the ears onto the head to check placement and symmetry before committing to stitches.

Sew the ears securely onto the head using matching yarn and a whip stitch.

Attach the head to the body, adjusting stuffing as needed so the dragon sits balanced and huggable.

About this pattern

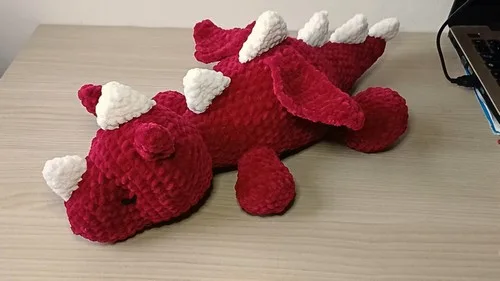
This crochet baby dragon amigurumi turns a handful of yarn into a pocket-sized, huggable creature that feels like it flew straight out of a storybook. With its rounded head, perky ears, and plump little body, this pattern captures all the charm of a dragon without any of the fierceness—just pure, soft-bodied cuteness. It's an ideal project for anyone who loves fantasy-themed crochet, wants to make a one-of-a-kind gift for a child, or simply enjoys the satisfaction of watching a shapeless ball of yarn transform into a character with real personality.

The pattern builds each piece separately using amigurumi basics: starting in a magic ring, working steady increase rounds to shape the head over ten rounds, and shaping the smaller ears in just four quick rounds. The body is worked as a single foundational round that sets up the base for the rest of the toy. If you've made a few amigurumi before and feel confident counting stitches and working in continuous spiral rounds, you'll find this a comfortable, enjoyable project to complete in a weekend afternoon or two, roughly 4 to 6 hours total.

Variations

One of the best parts of this pattern is how much personality you can pack in just by changing your yarn choices. Try a classic emerald green body with golden-yellow horns and belly panel for a traditional fantasy look, or go soft and nursery-friendly with a lavender body and cream ears for a gender-neutral baby gift. A two-tone approach—deep teal for the head and body with a contrasting coral for the ears—adds a playful pop without any extra stitch changes, just simple color swaps between pieces. For yarn, a worsted weight acrylic like Super Saver or Vanna's Choice works beautifully and keeps the dragon budget-friendly, while Bernat Softee Baby is a lovely choice if you want an extra-soft finish for a baby's crib toy. If you want a mini version, work each piece with a smaller hook (try a 3.0mm instead of 3.5mm) and lighter weight yarn such as a DK weight, which will naturally shrink the head, ears, and body proportionally without changing the stitch counts. For a bigger, huggable version, size up to a 5.0mm hook with bulky yarn for a pillow-sized dragon that makes a fantastic nursery centerpiece. Seasonal fans can have fun too: a white-and-icy-blue dragon feels like a winter frost dragon, while an orange-and-black combo makes for a fun autumn-themed companion. Don't be afraid to experiment with speckled or self-striping yarns on the body for a scaled, textured look without any extra effort—the color changes happen automatically as you work each round.

There's something so satisfying about starting with nothing but a magic ring and watching a dragon's head slowly take shape over those ten rounds—each increase round adding just enough roundness to give it that perfect chubby-cheeked amigurumi look. I love how the ears come together so quickly in just four rounds; they're the kind of small, fast piece that gives you an instant sense of progress, which keeps the momentum going when you're eager to see the finished toy. Working the body's foundation round after finishing the head and ears feels like the moment everything clicks into place, and you can finally picture your little dragon standing on its own two feet (or paws!). This pattern is also endlessly customizable in color, so you can make a fire-red dragon, a pastel dreamy one, or anything in between. It's a project that rewards patience in the small shaping details while still moving along briskly enough that you won't lose interest. By the end, you'll have a toy that feels genuinely special—handmade, huggable, and totally unique to whoever you decide to gift it to.
Common mistakes

  • Pulling the magic ring closed too loosely at the start of the head, leaving a visible hole.After completing the first round of single crochets into the ring, tug the yarn tail firmly to cinch the center closed completely before continuing, and weave the tail through a few stitches to secure it.
  • Losing track of stitch counts during the head's increase rounds, resulting in a lopsided shape.Use a stitch marker at the start of each round and count your stitches every round or two, especially during increase rounds where the total changes quickly.
  • Under-stuffing the head, leaving it soft and shapeless instead of rounded.Stuff firmly in small amounts as you go rather than all at once at the end, pushing fiberfill into the corners and gently shaping the head into a smooth sphere before closing it up.
  • Sewing the ears on symmetrically without checking placement first.Pin both ears in place with removable stitch markers, step back to compare their position and angle, and adjust before sewing them down permanently with matching yarn.
  • Forgetting to weave in ends before assembly, leading to tangled yarn tails inside the stuffed pieces.Weave in and trim every yarn tail on each piece immediately after finishing it, before moving on to stuff or sew it to another part.

The pattern

Written out round by round

Materials

Yarn

  • Choose the color(s) you would like your dragon to be in.

Crochet Hook

  • The size of the hook often depends on the yarn weight. A common size for amigurumi is a 3.5 mm (E) hook.

Stuffing

  • Polyester fiberfill is commonly used for stuffing amigurumi toys.

Safety Eyes

  • These come in various sizes and give the dragon a professional finish.

Tapestry Needle

  • Scissors

Abbreviations

  • ch = chain
  • st = stitch
  • sl st = slip stitch
  • sc = single crochet
  • hdc = half double crochet
  • dc = double crochet
  • inc = increase
  • dec = decrease
  • mr = magic ring
  • fo = finish off

Head

Start with a magic ring.

  1. Round 16 single crochets into the magic ring.
  2. Round 26 increases (one increase in each stitch). You'll have 12 single crochets. For Round 3: [1 single crochet, 1 increase] repeat 6 times (18 single crochets).(18)
  3. Round 4[2 single crochets, 1 increase] repeat 6 times (24 single crochets).(24)
  4. Round 5to 8: 1 single crochet in each stitch (still 24 single crochets). In Round 9: Work in front loops only - [6 single crochets worked regularly, then (2 single crochets, 1 increase) repeated 6 times in front loops only] (30 single crochets total).
  5. Round 10[6 single crochets, then (3 single crochets, 1 increase) repeated 6 times] (36 single crochets total).
  6. Round 11[6 single crochets, then (4 single crochets, 1 increase) repeated 6 times] (42 single crochets total).After Rounds 12 to 15: 1 single crochet in each stitch (42 single crochets).
  7. Round 16[6 single crochets, then (4 single crochets, 1 decrease) repeated 6 times] (36 single crochets total).
  8. Round 17[6 single crochets, then (3 single crochets, 1 decrease) repeated 6 times] (30 single crochets total).For Round 18:Start by making 8 single crochets then [2 single crochets, 1 decrease] repeated 6 times (24 single crochets total).
  9. Round 19[2 single crochets, 1 decrease] repeated 6 times (18 single crochets total).
  10. Round 20[1 single crochet, 1 decrease] repeated 6 times (12 single crochets total). In Round 21: 6 decreases (6 single crochets total).Finish by slip stitching and leaving a tail for sewing.

Ears

  1. Round 14 single crochets into a magic ring.
  2. Round 2[1 single crochet, 1 increase] repeated twice (6 single crochets). For Round 3: [2 single crochets, 1 increase] repeated twice (8 single crochets).(8)
  3. Round 4[3 single crochets, 1 increase] repeated twice (10 single crochets).(10)
  4. Round 51 single crochet in each stitch (10 single crochets). Finish with a slip stitch and leave a tail for sewing.

Body

  1. Round 16 single crochets into a magic ring. Subsequent rounds involve a pattern of increasing and single crochet rounds, much like the head pattern, to create the dragon's tail and body.

Important notes

💡 Use a 3.5mm (E) hook as your starting point, but don't be afraid to size down slightly for the ears if you want them extra firm and perky.

💡 Place a stitch marker at the beginning of every round, especially during the head's ten increase rounds, since amigurumi is worked in a continuous spiral without a clear round marker.

💡 Stuff the head gradually in small pinches rather than one big handful at the end, so you can shape it into a smooth, even round as you work the final rounds.

💡 Keep your tension consistent throughout the head and body so the fabric is tight enough to hold stuffing in without gaps between stitches.

💡 If you're changing colors between the head, ears, and body, leave a long enough tail (at least 6 inches) on each piece to make sewing them together much easier later.

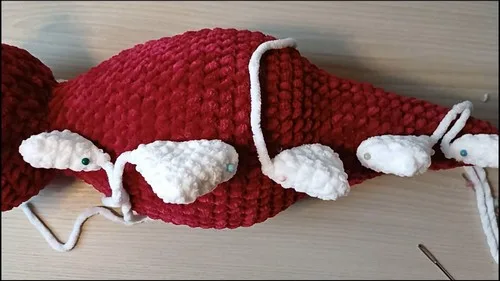
💡 Lay out your head, ears, and body pieces together before sewing anything to double-check proportions and placement, since it's much easier to adjust pins than unpick stitches.

More photos

Crochet Baby Dragon Amigurumi Pattern - Adorable Toy for Kids — photo 2
Crochet Baby Dragon Amigurumi Pattern - Adorable Toy for Kids — photo 3
FAQs

Frequently asked questions

What yarn weight works best for this baby dragon pattern?

A worsted weight yarn pairs perfectly with the suggested 3.5mm hook and gives the amigurumi a firm, well-defined shape. Acrylic or acrylic-blend yarns are especially popular since they're affordable and hold stitch definition nicely.

How much yarn do I need to make one dragon?

Since the pattern is compact with just a head, ears, and body, you'll likely only need one skein of worsted weight yarn per color you choose. Keeping a little extra on hand is smart in case you want to add extra details or make adjustments.

Can I make this dragon bigger or smaller?

Yes, sizing up to a larger hook with bulkier yarn will create a bigger, huggable version, while a smaller hook with lighter yarn shrinks it down for a mini dragon. The stitch counts stay the same either way since it's your hook and yarn weight doing the resizing.

What's the best stuffing to use for this pattern?

Polyester fiberfill is the classic choice for amigurumi because it's lightweight, washable, and holds its shape well over time. Stuff firmly but evenly, especially in the head, so the finished dragon feels plush without any lumps.

Is this pattern good for a beginner crocheter?

This pattern is best suited for someone with some amigurumi experience since it involves magic rings, continuous increase rounds, and assembling multiple pieces. If you've completed a simpler amigurumi before, you should feel comfortable tackling this cute little dragon.

One at a time —

Get the next pattern

Tested round by round before it is sent. No spam.